Customizing Your Toolbars
Toolbars appear in the rectangular area above the main content area in your web browser. Typically their backgrounds are gray in color.
- Menu Bar: Browser menus such as File, Edit, View, Help, and so on.
- Navigation Bar: The Location Bar, the buttons used to navigate websites, and the Search box.
- Bookmarks Toolbar: Bookmarks that you place in your Bookmarks Toolbar Folder.
Firefox allows you to add additional tools, re-arrange spacing, and more. Customizing toolbars lets you re-arrange, organize, add, and remove buttons or fields to change your Firefox experience to suit your needs.
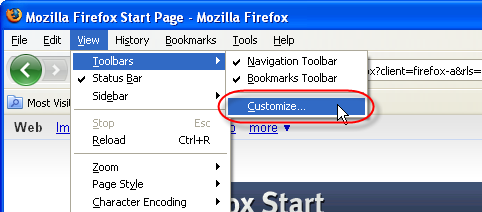
To customize your toolbar, from the Firefox menu, select the View menu, and then select the Toolbars sub-menu, inside of which you should select the Customize... item to open the Customize Toolbar window.

Adding or Removing Items
You can add or remove items on the toolbar to customize it according to your specific needs.

Adding an item to the toolbar
- From the Customize Toolbar window, click the item you wish to add to your toolbar and drag it onto the toolbar.
- The item is added to the toolbar.
If you're looking for a specific item that doesn't appear in Customize Toolbar window, you can download add-ons for more items at addons.mozilla.org. - Click Done.
Removing an item from the toolbar
- From the Customize Toolbar window, click the item in the toolbar and drag it to the Customize Toolbar window.
- The item is removed from the toolbar.
Re-arranging items on the toolbar
When the Customize Toolbar window is open, you can re-arrange items in the toolbar by clicking and dragging them.
To reposition a toolbar item, click it and hold down the mouse button. As you drag it, a black line indicates its destination. To place it in the indicated location on the toolbar, release the mouse button.Changing the toolbar appearance
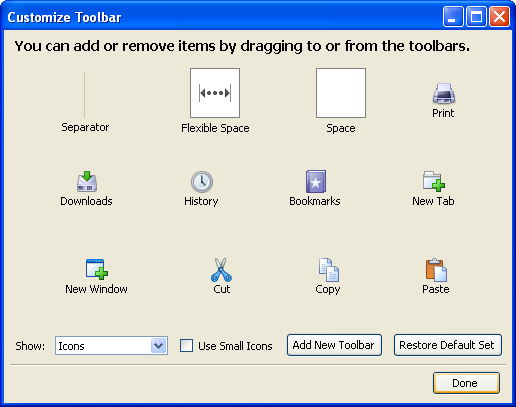
At the bottom of the Customize Toolbar window, there are additional options for changing the appearance of the toolbar.
- Show. From the Show drop-down, you can choose what to display on the toolbar: Icons, Text, or Icons and Text together. By default, Firefox shows Icons.
- Use Small Icons. To conserve screen space in the toolbar, select Use Small Icons to display tools using smaller icons.
- Restore Default Settings. To restore your toolbar to its default settings, click . Any changes to the default toolbar and any custom toolbars that you added will be lost.
Adding special items
The following special items can be added to the toolbar to group items and to change spacing between them:
- Separator. This item is a vertical separator bar that can be used to group similar tools together.
- Space. This item creates a small space between two items in the toolbar. Add multiple instances of the Space item to create larger space.
- Flexible Space. This item adds space of an adjustable width to the toolbar so that the toolbar fills the width of the browser window.
Adding a New Toolbar
You can create a new toolbar for items that you use often. The new toolbar appears below the default Firefox toolbar.
- Select View > Toolbars > Customize.
- Click .
- In the New Toolbar dialog, enter a name for your toolbar, and click .
- Click Done.
The toolbar appears as a blank band across the screen below the default toolbar. You can add new items by clicking and dragging them into this band.
Showing or Hiding Toolbars
You can show or hide a toolbar at any time by doing one of the following:
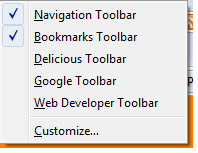
- Right-clicking a toolbar and either selecting it or de-selecting it from the menu. When selected, a toolbar shows a checkmark next to it on the menu.

- Selecting View > Toolbars and selecting or de-selecting a toolbar.


