Installing TrueCrypt
TrueCrypt can be installed on Windows, Linux, or MacOSX. The installation files are available here: http://www.truecrypt.org/downloads
The following gives complete detail on how to install TrueCrypt on your computer for each of these Operating Systems, starting with Ubuntu.
Installing on Ubuntu
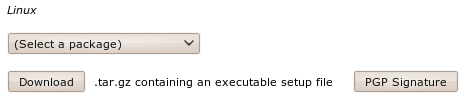
TrueCrypt is not available in the standard Ubuntu repositories. This means you cannot use the Ubuntu Software Center or apt-get (a command line method for installing software on Ubuntu) to install it. Instead you must first visit the TrueCrypt downloads page (http://www.truecrypt.org/downloads).
You will see a drop-down menu under the heading Linux.
From the '(Select a package)' drop down menu you can choose from four options:
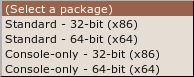
This is a little technical - the console version is the one you choose if you are either very technical and don't like Graphical User Interfaces or you wish to run this on a machine that you have only a terminal (command line or 'shell') access to (like a remote server for example).
Assuming you are running this in your laptop its best to choose the easy 'standard' option - this will give you a nice user interface to use. From these two options you need to choose the one most suitable for the architecture of your machine. Don't know what this means? Well, it basically comes down to the type of hardware (processor) running on your computer, the options are 32-bit or 64-bit. Unfortunately Ubuntu does not make it easy for you to find this information if you don't already know it. You need to open a 'terminal' from the Applications->Accessories menu and type the following, followed by the [enter] key
uname -a
The output will be something like 'Linux bigsy 2.6.32-30-generic #59-Ubuntu SMP Tue Mar 1 21:30:46 UTC 2011 x86_64 GNU/Linux'. In this instance you can see the architecture is 64-bit ('x86_64'). In this example I would choose the 'Standard - 64-bit (x64)' option. If you see 'i686' somewhere in the output of the uname command then you would choose the other standard option to download.
Once selected press the 'download' button and save the file to somewhere on your computer.
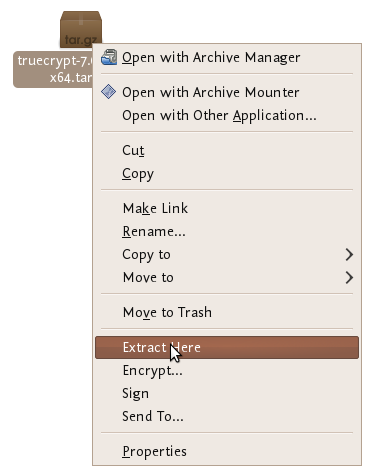
So the installation process is still not over. The file you downloaded is a compressed file (to make downloading it is faster) and you need to first de-compress the file before you install it. Fortunately Ubuntu makes this easy - simply browse to the file on your computer and right click on it and choose 'Extract Here'.
You will see a new file appear next to the compressed file:
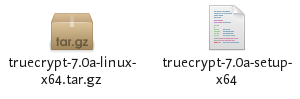
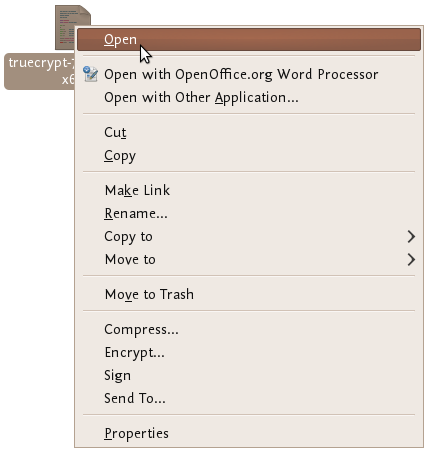
Nearly done! Now right click on the new file and choose 'open' :
If all is well you will see a window open like this:
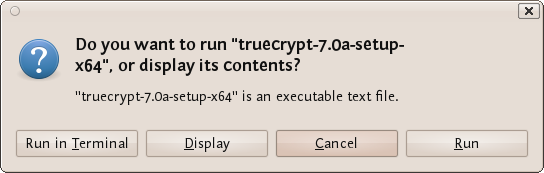
Choose 'run' and you see the following:
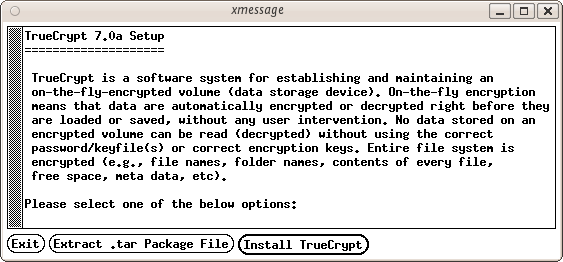
Now we are getting somewhere...press 'Install TrueCrypt'. You will be displayed a user agreement. At the bottom press 'I accept and agree to be bound by the license terms' (sounds serious). You will then be shown another info screen telling you you can uninstall TrueCrypt. Press 'OK' then you will be asked for your password to install software on your computer. Enter your password and then you will finally see a screen like this:

Believe it or now your are done...TrueCrypt is installed and you can access it from the Applications->accessories menu...close the setup window. Now proceed to the chapter on Using TrueCrypt.
Installing on OSX
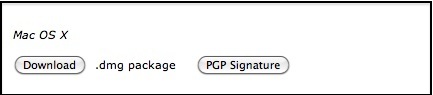
1. To install TrueCrypt on OSX first visit the download page (http://www.truecrypt.org/downloads) and press the download button under the OSX section.
2. Download this to your computer find the .dmg file and open it to acces the installation package.
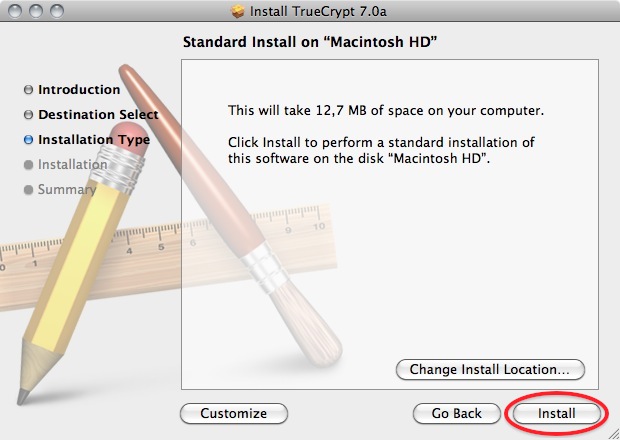
3. Open the installation package, and click away through the dialogues.
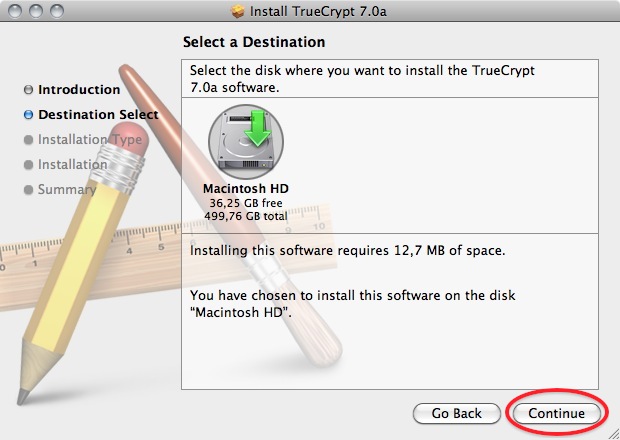
4. Choose the standard installation. (you can choose to do a customized installation and deselect FUSE, but why would you? You need it!)
6. After the installation finishes you can find the program in your Applications folder

Installing on Windows
To install TrueCrypt on Windows first visit the download page (http://www.truecrypt.org/downloads) and press the download button under the Windows section.

Download this to your computer and then double click on the file. You will see a license agreement.

Click on 'I accept and agree to be bound by the license terms' and then click 'Accept'.

Leave the above screen with the defaults and press 'Next >' and you will be taken to the Setup Options window:

You can leave this with the defaults. If you want to set up TrueCrypt just for yourself then consider not selecting the 'Install for all users'. However if you are installing this on your own machine and no one else uses the computer then this is not necessary. You may also wish to consider installing TrueCrypt in a folder other than the default. In which case click 'Browse' and choose another location. When you are done click 'Install' and the process will proceed:

When the installation is complete you will get a verification popup that it was successful. Close this window and click 'Finish' and all is done. Now proceed to the chapter on Using TrueCrypt.
Securely destroying data
Just hit the delete button and you are done! No it's not that easy. To understand how to securely delete data, we have to understand how data is stored. In an analogy to the real world, an explanation of how data is stored follows:
Assume you have a small notebook with 10 pages and you want to write some data in this notebook. You just start writing on the first page up to the end of the notebook. Maybe you decide the information on page 5 must be destroyed. Probably you will just take out the page and burn it.
Unfortunately data on a harddisk doesn't work this way. A harddisk contains not ten but thousands or maybe even millions of pages. Also it's impossible to take out a "page" of a harddisk and destroy it. To explain how a harddisk work, we will continue with our 10-page notebook example. But now we will work a little bit different with it. We will work in a way similar to how a harddisk works.
This time we use the first page of our notebook as an index. Assume we write a piece about "WikiLeaks", then on the first page we write a line "piece about WikiLeaks: see page 2". The actual piece is then written on page 2.
For the next document, a piece about "Goldman Sachs" we add a line on page 1, "Goldman Sachs: see page 3". We can continue this way till our notebook is full. Let's assume the first page will look like this:
- WikiLeaks -> see page 2
- Goldman Sachs -> see page 3
- Monstanto scandal -> see page 4
- Holiday pictures -> see page 5
- KGB Investigation -> see page 6
- Al Jazeeraa contacts -> see page 7
- Iran nuclear program -> see page 8
- Sudan investigation -> see page 9
- Infiltration in EU-politics -> see page 10
Now, let's decide you want to wipe the "Goldman Sachs" piece, what a harddisk will do, it will only remove the entry on the first page, but not the actual data, your index will be:
- WikiLeaks -> see page 2
- Monstanto scandal -> see page 4
- Holiday pictures -> see page 5
- KGB Investigation -> see page 6
- Al Jazeeraa contacts -> see page 7
- Iran nuclear program -> see page 8
- Sudan investigation -> see page 9
- Infiltration in EU-politics -> see page 10
What we did, we removed only the reference to the article, but if we open page 3, we will still able to read the Goldman Sachs piece. This is exactly the way what a harddisk does when your "delete" a file. With specialized software it still able to "recover" page 3.
To securely delete data, we should do the following:
- Open the "Goldman Sachs" page (page 3)
- Use an eraser to remove the article there, if done return to page 1
- Delete the reference in the index on page 1
Well you will be surprised by the similarity between this example and the real world. You know when you removed the article on page 3 with an eraser, it is still possible to read the article slightly. The pencil leaves a track on the paper because of the pressure of the pencil on the paper and also you will be unable to erase all of the graphite. Small traces are left behind on the paper. If you really need this article, you can reconstruct (parts) of it, even if it's erased.
With a harddisk this is very similar. Even if you erased every piece of data, it is sometimes possible with (very) specialized hardware to recover pieces of the data. If the data is very confidential and must be erased with the greatest care, you can use software to "overwrite" all pieces of data with random data. When this is done multiple times, this will make the data untraceable.
Securely delete data under Windows
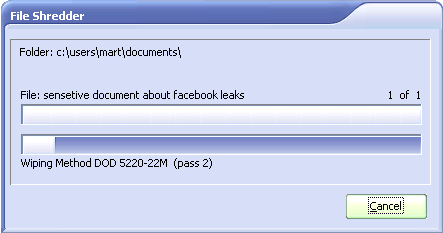
For Windows there is a good open source tool called "File Shredder". This tool can be downloaded from http://www.fileshredder.org
The installation is very straightforward, just download the application and install it by hitting the next button. After installation this application will automatically start. You can then start using it for shredding files. However the best part of the program is that you can use it from within windows itself by right clicking on a file.
- Click right on the file you want to shred, and choose File Shredder -> Secure delete files
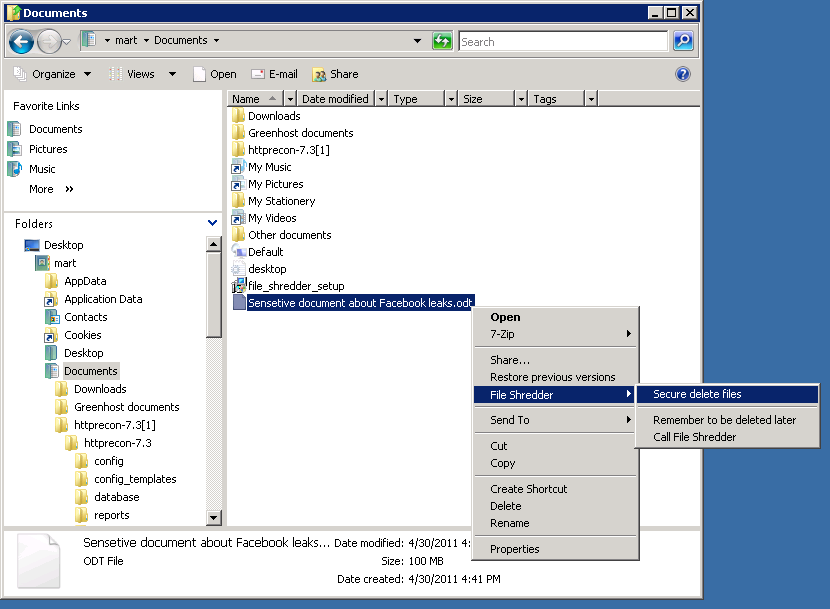
- A pop-up asks if you really want to shred this file
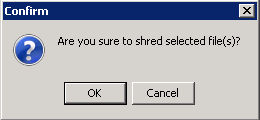
- After confirming, there your file goes. Depending on the size of the file this can take a while
Securely delete data under MacOSX
There are basically to build-in steps to make to securely delete your data on Mac OSX.
1. Erase the free-space on your hard-drive containing all the data of items which are deleted in an unsecure way.
2. Make sure that every file from then on is always securely deleted.
We start with the first one:
Erasing Free Space
1. Open Disk-Utility which resides in the Utilities folder inside the Applications folder.

2. Select your hard drive and click on 'Erase Free Space'.
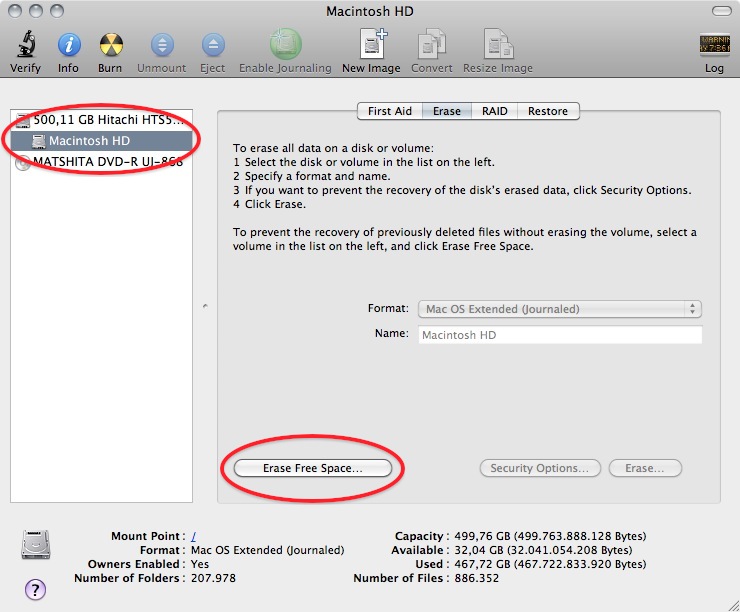
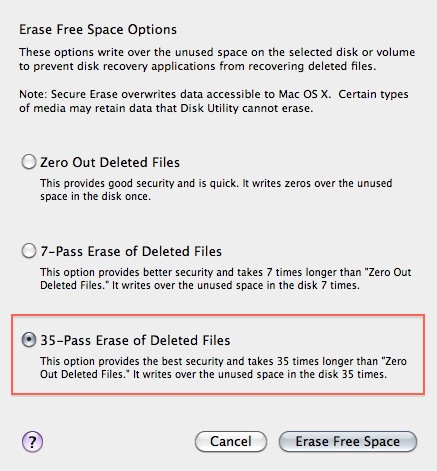
3. Three options will appear, from top to bottom more secure, but also they take much more time to complete. Read the descriptions on each one of them to get an idea from what will happen if you use them and then choose which one might suite your needs the best and click 'Erase free Space'.
If time is no issue, then use the most secure method and enjoy your free time to get a good coffee while you Mac crunches away on this task. If the crooks are already knocking on your front-door you might want to use the fastest way.
Securely Erasing Files
Now that your previously deleted data is once and for ever securely erased you should make sure that you don't create any new data that might be recovered at a later date.
1. To do this open the finder preferences under the Finder Menu.
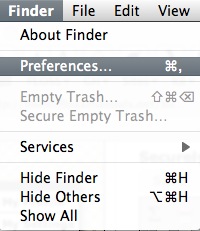
2. Go to the advanced tab and tick 'Empty trash securely'. This will make sure that every time you empty your trash all the items in it will be securely deleted and are really gone!
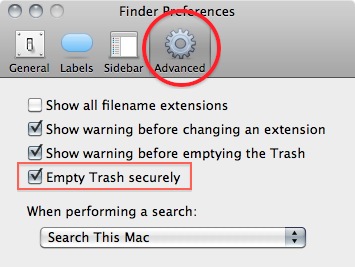
Note 1: Deleting your files securely will take longer then just deleting them. If you have to erase big portions of unimportant data (say your movie and mp3 collection) you may wanna untick this option before doing so.
Securely delete data under Ubuntu/Linux
Unfortunately currently there is no graphical user interface available for Ubuntu to delete files secure. There are two command-line programs available though.
Shred is installed in Ubuntu by default and can delete single files. Wipe is not installed by default but can easily be installed with using Ubuntu Software Center or if you understand the command line you can install it with apt-get install wipe. Wipe is a little more secure and has nicer options.
It is possible make access to these program's easy by adding it as an extra menu option
- We assume you are familiar with the Ubuntu Software Center. To add the securely wipe option, it's required to install these two programs wipe and nautilus-actions
If the two programs are installed follow the following steps. If they are not installed use the Ubuntu Software Center to install them or on the command line simply type apt-get install nautilus-actions wipe
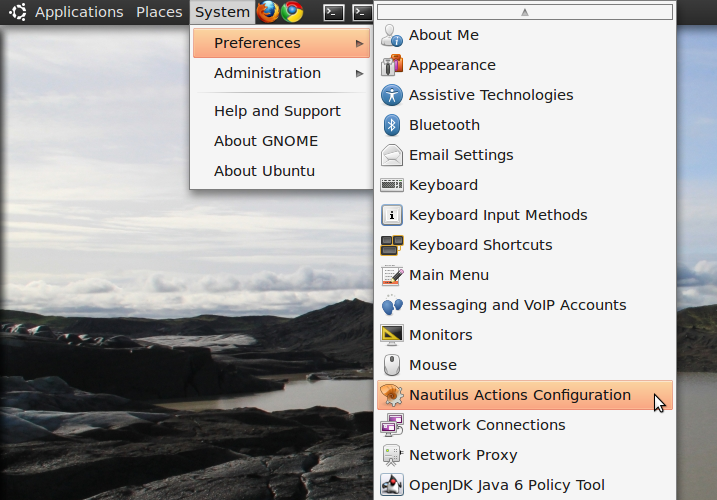
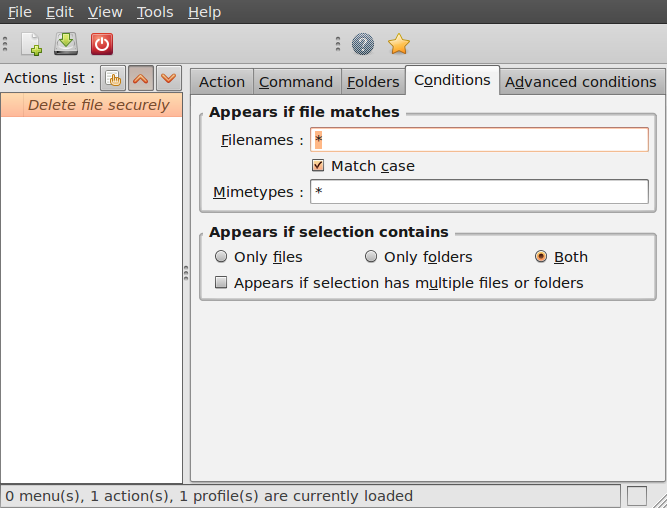
- Open the "Nautilus Actions Configuration" from the System -> Preferences menu
- We have to add a new action. To do this, start clicking on the "create new action button", the first option in the toolbar
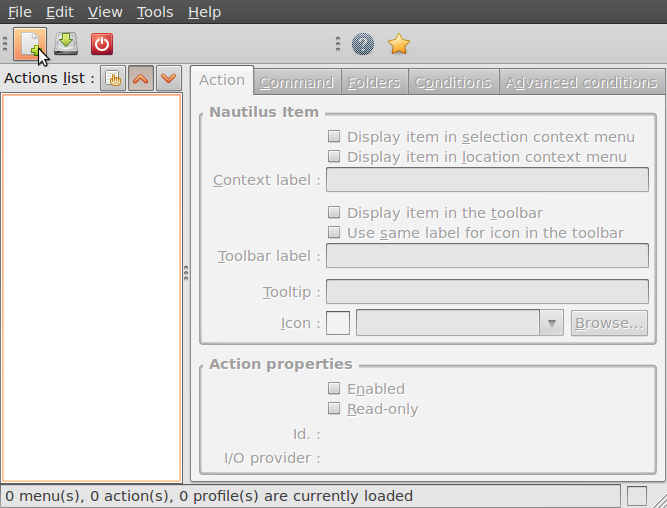
- Next is describing the new action. You can give the action every name you wish. Fill out this title in the "Context label" field. In this example we used "Delete file securely"

- Click on the second tab ("Command"), here is how we specify the action we want. In the field "Path", type "wipe", in the field parameters type "-rf %M", please be sure about the capitalisation of all characters here, this is very important.

- Next is specifying the conditions, click on the conditions tab and choose the option "Both" in the "Appears if selection contains..." box. With this option you can wipe both files and folders securely. If done, click the save button (second item on the icon bottom toolbar) or use the menu File->Save
- Now close the Nautilus Actions Configuration tool. Unfortunately, after this, you have to re-login into your system, so ether reboot or logout/login.
- Now browse to the file you want to securely delete and right click:
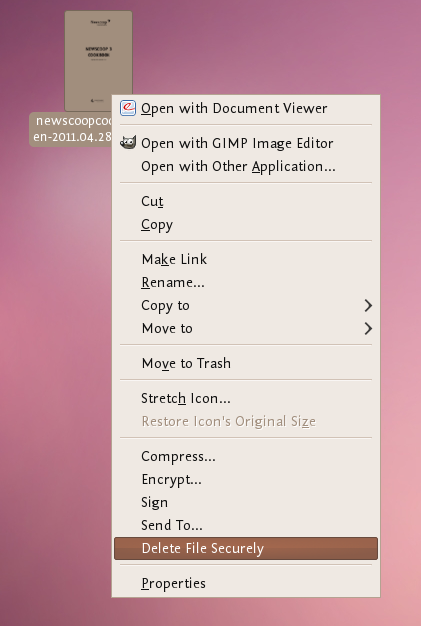
Choose 'Delete File Securely'. The file will then be wiped 'quietly' - you do not get any feedback or notice that the process has started or stopped. However the process is underway. It takes some time to securely delete data and the bigger the file the longer it takes. When it is complete the icon for the file to be wiped will disappear. If you would like to add some feedback you can change the parameters field in Nautilius Actions Configuration tool to this:
-rf %M | zenity --info --text "your wipe is underway please be patient. The icon of the file to be wiped will disappear shortly."
The above line will tell you the process is underway but you will not know the file is deleted until the icon disappears.
Setting up a hidden volume
A TrueCrypt hidden volume exists within the free space of a typical TrueCrypt volume. Given then the 'outer volume' is accessed it is (almost) impossible to determine if there is a hidden volume within it. This is because TrueCrypt always fills the empty space of an encrypted volume with random data. So a hidden volume looks the same as an empty TrueCrypt volume.
To create and use a hidden volume you need two passwords - one each for the outer and inner (hidden) volumes. When you mount (open) the volume you can use either password and that will determine which of the two is opened. If you want to open just the hidden volume you use one password, and if you want to access just the non-hidden encrypted volume you use the other password.
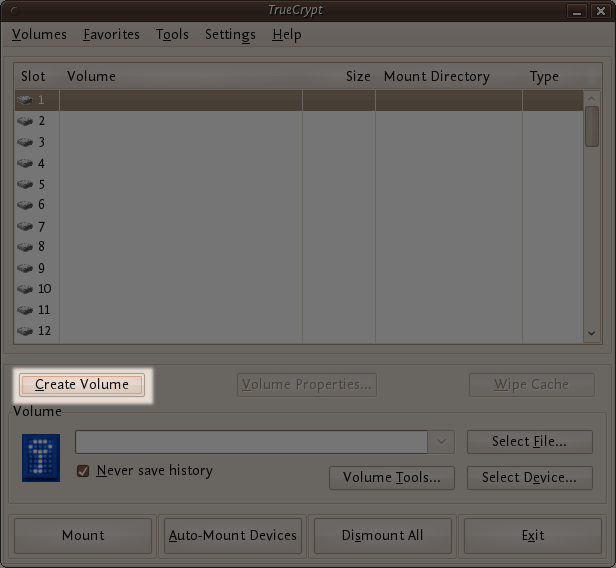
To create a hidden volume open TrueCrypt and press the 'Create Volume' button:
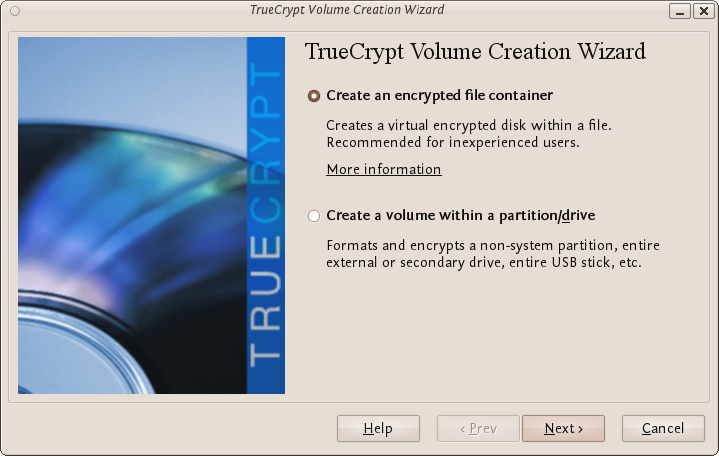
The options for half of this process are almost the same as for setting up a standard TrueCrypt volume and then the process continues for setting up the hidden volume but lets go through the entire process step by step anyway. In the screen shown below you just want to stay with the default setting 'Create an encrypted file container':
Press 'Next >' and continue to the next screen.

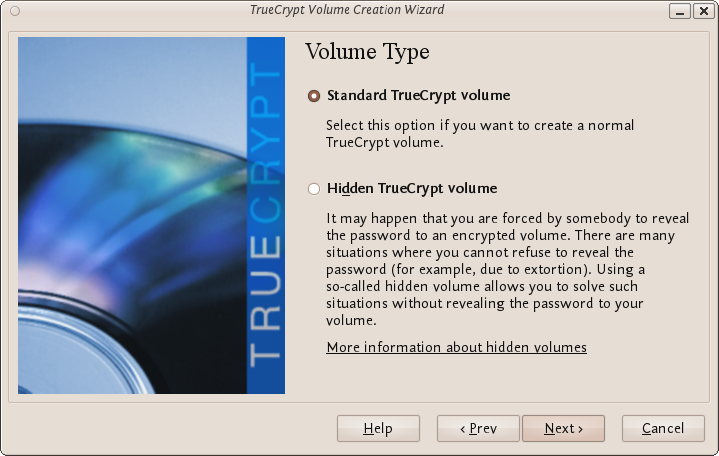
In the above screen you want to be sure that you choose the second option 'Hidden TrueCrypt Volume'. Select this and click on 'Next >' you will then be asked to choose the location and name of the TrueCrypt outer volume.

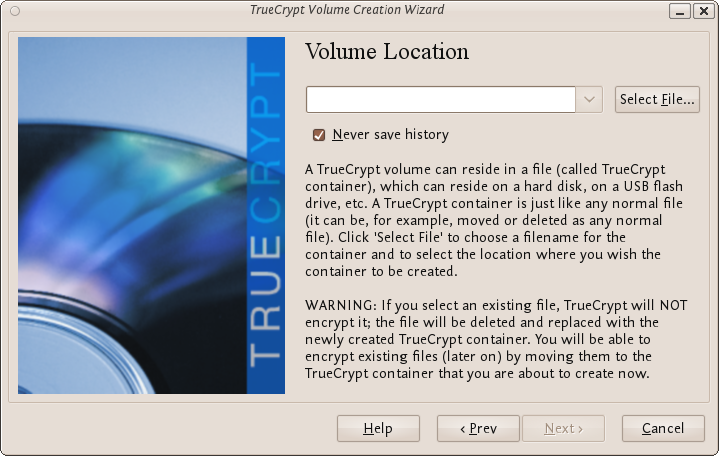
Click 'Select File...' and browse to a location for a new TrueCrypt volume. We will use the name 'myencryptedfile' in this example. Its the same name as we used in the last example so be aware that if you have just followed those instructions you must now create a new volume with a new name.
Browse to the directory where you want to put the outer volume and enter the name of the volume in the field named 'Name' as in the example above. When you are satisfied all is well click on 'Save'. The file browser will close and you return to the Wizard. Click 'Next >'. Here you are presented with some very technical choices. Don't worry about them. Leave them at the defaults and click 'Next >'. The next screen asks you to determine the size of the outer volume. Note that when you do this the maximum inner 'hidden' volume size is determined by TrueCrypt. This maximum size will of course be smaller that the size you are setting on this screen. If you are not sure what the ratio of outer volume size to inner (hidden) volume size is then go through the process now as a 'dummy' run - you can always trash the encrypted volume and start again (no harm done).
So choose the size of the outer volume, I will choose 20MB as shown below:

You cannot set the outer volume size to be larger than the amount of free space you have available on your disk. TrueCrypt tells you the maximum possible size in bold letters so create a volume size saller than that. Then click 'Next >' and you will be taken to a screen asking you to set a password for the outer (not the hidden, this comes later) volume.

Enter a password that is strong (see the chapter on creating good passwords) and press 'Next >'. Next TrueCrypt wants you to help it create the random data it will fill the volume up with. So wave your mouse around, browse the web, and do whatever you want for as long as you can. When you feel TrueCrypt should be happy then press 'Format'. You will see a progress bar zip by and then you will be presented with the next screen:

You can open the outer volume if you like but for this chapter we will skip that and go ahead to create the hidden volume. Press 'Next >' and TrueCrypt will work out how the maximum possible size of the hidden volume.

When you see the above screen just press 'Next >'. Now you must choose the encryption type for the hidden volume. Leave it at the defaults and press 'Next >'.

Now you will be asked to choose the size of the hidden volume.

I have set (as you see above) the maximum size as 10MB. When you have set your maximum size press 'Next >' and you will be promoted to create a password for the hidden volume.

When creating the password for the hidden volume make sure you make it substantially different fro the password for the outer volume. If someone really does access your drive and finds out the password for the outer volume they might try variations on this password to see if there is also a hidden volume. So make sure the two passwords are not alike.
Enter your password in the two fields and press 'Next >'.

Leave this window at the defaults and press 'Next >' and you will be presented with the same screen you have seen before to generate random data for TrueCrypt. When you are happy click 'Format' and you should see the following :
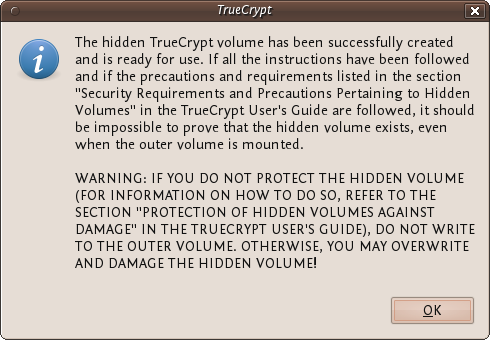
The TrueCrypt manual it is referring to is not this manual. They mean this manual : http://www.truecrypt.org/docs/
Click 'OK' and keep and exit TrueCrypt. You can now mount the volume as noted in the previous chapter.
Using TrueCrypt
The following are step-by-step instructions on how to create, mount, and use a TrueCrypt volume.
Creating a TrueCrypt Container
Step 1:
Install TrueCrypt. Then launch TrueCrypt by
- double-clicking the file TrueCrypt.exe in Windows
- opening Applications->Accessories->TrueCrypt in Ubuntu
- on MacOSX open it by clicking Go > Applications. Find TrueCrypt in the Applications folder and double click on it.
Step 2:
When the main TrueCrypt window appears. Click Create Volume.

Step 3:
You should see the TrueCrypt Volume Creation Wizard window appear on screen.
 Where do you want to create the TrueCrypt volume? You need to choose now. This can be in a file, which is also called a container, in a partition or drive. The following steps will take you through the first option creating a TrueCrypt volume within a file.
You can just click Next, as the option is selected by default,
Step 4:
Next you need to choose whether to create a standard or hidden TrueCrypt volume. We will walk you through the former option and create a standard TrueCrypt volume.
You can just click Next, as the option is selected by default.
Step 5:
Now you have to specify where to have the TrueCrypt volume (file container) created. Note that a TrueCrypt container behaves like any normal file. It can be moved or deleted as any normal file.
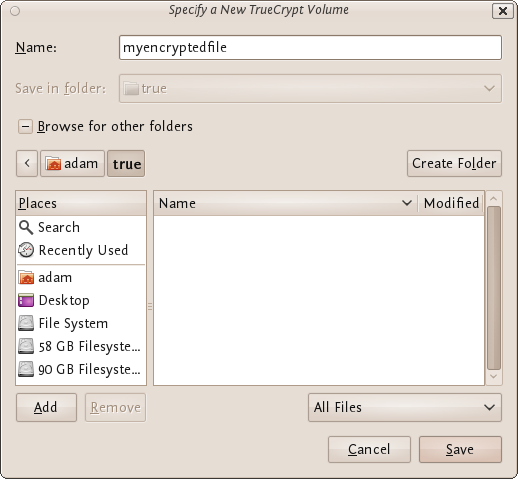
Click Select File.
The standard file selector will now appear on screen (the TrueCrypt Volume Creation Wizard remains open in the background). You need to browse to the folder that the file should be created in and then type into the 'name' field the name for the file you wish to create.

We will create our TrueCrypt volume in the folder 'adam/true' and the filename of the volume (container) will be 'myencryptedfile'. You may, of course, choose any other filename and location you like (for example, on a USB stick). Note that the file 'myencryptedfile' does not exist yet - TrueCrypt will create it. Press 'Save' when you are ready. The file selector window should close.
IMPORTANT: Note that TrueCrypt will not encrypt any existing files. If an existing file is selected in this step, it will be overwritten and replaced by the newly created volume (the contents of the existing file will be lost). You will be able to encrypt existing files later on by moving them to the TrueCrypt volume that we are creating now.
Step 6:
In the Volume Creation Wizard window (which was previously running in the background), click Next.
Step 7:
Here you can choose an encryption algorithm and a hash algorithm for the volume.

The TrueCrypt manual suggests that if you are not sure what to select here, you can use the default settings and click Next (for more information about each setting have a look at the TrueCrypt documentation website).
Step 8:
Now choose the size of your container. You should be fine with 1 megabyte but for this example we will enter '20' into the available field.
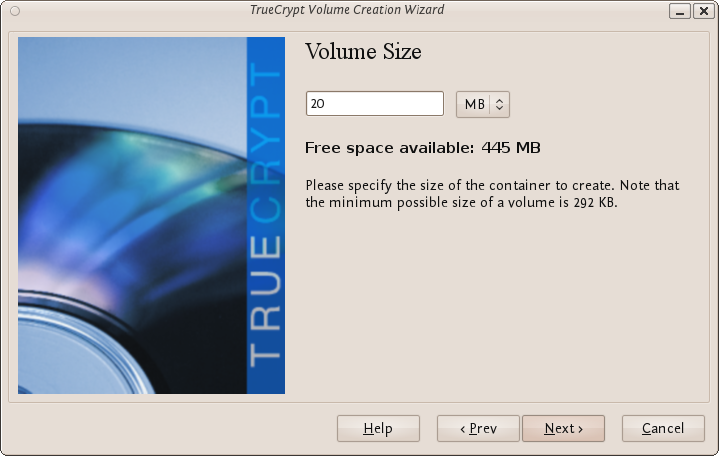
You may, of course, specify a different size. After you type the desired size in the input field, click Next.
Step 9:
This step is really important, choosing a password.
The information displayed in the Wizard window about what is considered a good password, should be read carefully.
Choose a strong password, type it in the first input field. Then re-type it in the input field below the first one.

When you are done click Next.
Step 10:
Now you must choose the format of your partition (this step may not be available for you under windows or OSX). If using Ubuntu you can choose a Linux file type or FAT (Windows) for simplicity leave it at the default.

Then press Next.
Step 11:
Next TrueCrypt tries to generate random information to help encrypt your container. For 30 seconds move your mouse as randomly as possible within the Volume Creation Wizard window. Move the mouse as much as possible for up to a minute. This significantly increases security by increasing the cryptographic strength of the encryption keys. security). Move your mouse around until you are bored.
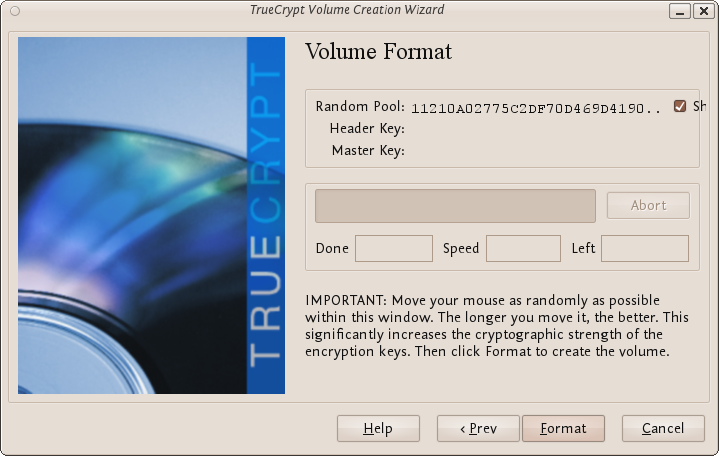
Then Click Format.
TrueCrypt will now create a file in the folder you selected with the name you chose. This file will be a TrueCrypt container, containing the encrypted TrueCrypt volume. This may take some time depending on the size of the volume. When it finishes this should appear:
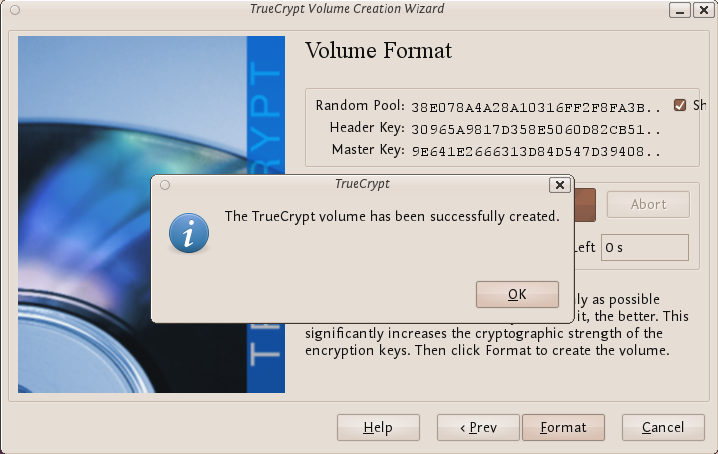
Click OK to close the dialog box.
Step 11:
Well done! You've just successfully created a TrueCrypt volume (file container).
In the TrueCrypt Volume Creation Wizard window, click Exit.
Mounting the Encrypted Volume
Step 1:
Open up TrueCrypt again.
Step 2:
Make sure one of the 'Slots' is chosen (it doesn't matter which - you can leave at the default first item in the list). Click Select File.
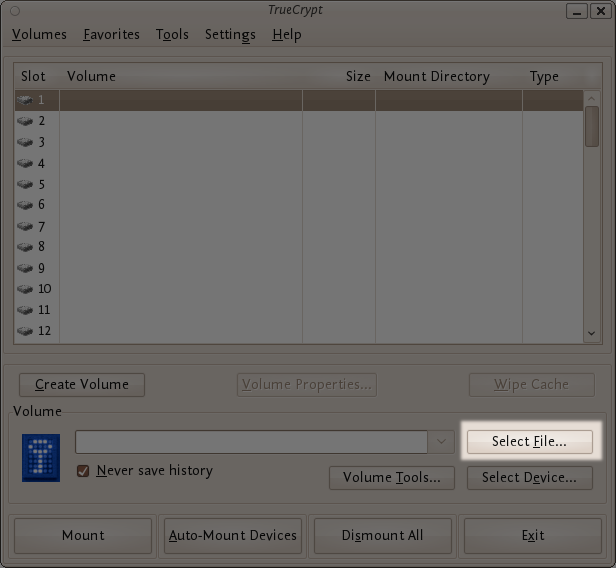
The standard file selector window should appear.
Step 3:
In the file selector, browse to the container file (which we created earlier) and select it.
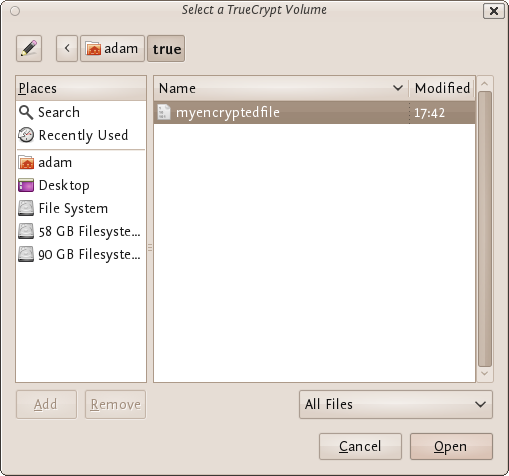
Click Open (in the file selector window).
The file selector window should disappear.
Step 4:
In the main TrueCrypt window, click Mount.
Password prompt dialog window should appear.
Step 5:
Type the password in the password input field.
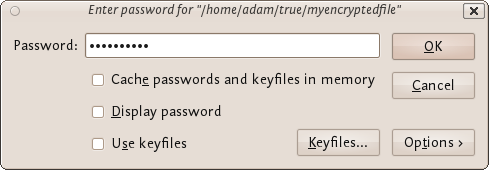
Step 6:
Click OK in the password prompt window.
TrueCrypt will now attempt to mount the volume. If the password is correct, the volume will be mounted.
If the password is incorrect (for example, if you typed it incorrectly), TrueCrypt will notify you and you will need to repeat the previous step (type the password again and click OK).
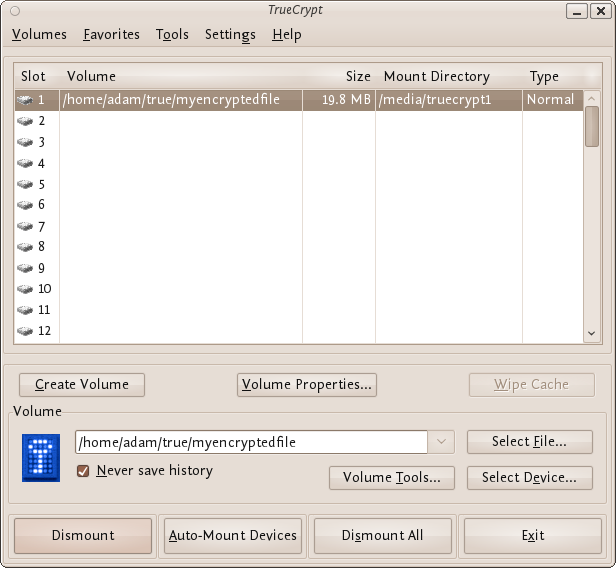
Step 7:
We have just successfully mounted the container as a virtual disk 1. The container will appear on your Desktop or you will see it in your file browser.

What does this mean?
The disk that you have just created is completely encrypted and behaves like a real disk. Saving (moving, copying, etc) files to this disk will allow you to encrypt files on the fly.
You'll be able to open a file which is stored on a TrueCrypt volume, which will automatically be decrypted to RAM while it is being read, and you won't need to enter your password each time. You'll only need to enter this when your mounting the volume.
Remember to dismount!
To do this right click on the drive and select unmount. This will automatically happen when you turn off your computer but will not happen if you just put the computer on sleep.