


Illusions
Can you Imagine that what you see is not what is there? Illusions furnish many examples of “the world is not as it seems”, and many of them are quite startling when done dynamically. When we look at a scene, we think we are seeing the lights and shades and colors accurately, but in fact, both our lower level and higher level mental mechanisms are reformulating what our retina senses. For example, the apparent brightness of a gray tone is quite conditioned by the brightness of the background around it. We can show this both statically and dynamically. Invent some illusions using the computer in this chapter and let them Inspire you to challenge your senses in different ways.

In this project we use:
supplies bin, rectangle, coloring, writing a script, increase by, heading, composting tiles
Project
In this project we use ready-made Etoys objects which you can find in the supplies bin, change their color and write a script to move them. So let's start with the supplies.
How to use the Supplies Bin
![]()
First, find the Supplies icon on the Navigation Bar and click it. This will open the Supplies bin, which provides you with a variety of ready-made objects to use in your projects. Also, there is the Object Catalog in the Supplies, which you can drag out to find many more objects to use.
For this project, we'll use the rectangle, which you can find directly in the Supplies. Drag it out on your screen.

We want to change the color of the rectangle to be a neutral gray.

How to use the rectangle
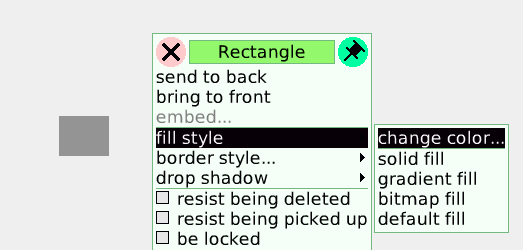
To change the color of your rectangle, bring up the halo of the rectangle. You might notice, that you get a purple icon here. It is only available for certain objects and can be used to change the color of an object. Clicking the purple halo icon transforms your cursor into an eyedropper. Move it over the color you want and click to choose this color. Choose a neutral gray.
The rectangle still has a black border, for our project we need to remove it. You can do this by bringing up the halo for the rectangle, clicking on the white menu icon and then changing the border color to the same color as the body of the rectangle.
To create the contrast illusion, you need to get another rectangle out of the supplies. Change it's size to become bigger using the yellow halo icon. Click on the yellow icon and hold it while moving the mouse until it is the size you want.
Color the big rectangle black. Then copy it and change the color of the copy to white. Now move the two smaller gray rectangles: one onto the black rectangle and one onto the white one as you can see in the picture below.
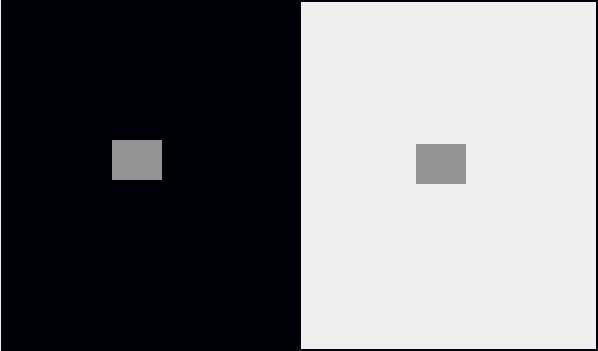
You can already see that the right hand rectangle on the white background looks darker than the copied rectangle with the same gray color on the black background. This is called the Mach Illusion, and it serves to help animals to see things that are almost the same color (because it makes the difference more apparent).
When clicking on the big rectangles, it can happen that they stick to your mouse and suddenly are in front of the smaller ones. To find the smaller rectangles again, just move the bigger one away to find the rectangle underneath.
We can also make a dynamic version that seems to change colors, and also proves that the two squares are the same color. To do that, we write a script that moves the rectangle from the black background over to the one on the white background.
Get the halo for the gray Rectangle on the black background (named Rectangle1 in the example project) and click on the blue eye to open the Viewer. In the viewer, you'll see the tile "Rectangle1's x".
![]()
Drag the tile onto the Etoys world, using the white arrow, and it will create a Script Editor around it the moment you drop it. If that doesn't happen, try again and make sure, you grab it at the white arrow.
Now you can change the command to let it perform the action you want. The world in Etoys is a two-dimensional coordinate system with x being the value of the horizontal position of an object (starting with 0 at the left side). In order to move the left gray rectangle towards the right one, we need to increase it's x value. Clicking on the arrow in the command tile will bring up a menu of operations where you choose "increase by".
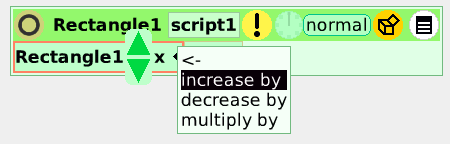
The value in the tile means how many pixels the rectangle's x will increase in each run of the script. Choose "1" to let it move slowly. You can change the value by clicking on it and typing in the number you want.
Start the script and watch how the rectangle moves over from the black to the white side and finally reaches the other gray rectangle. You'll see that it has indeed the same color.
Now let's do another kind of illusion.
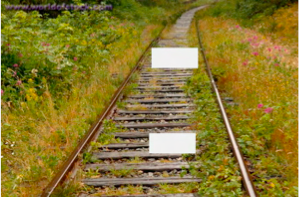
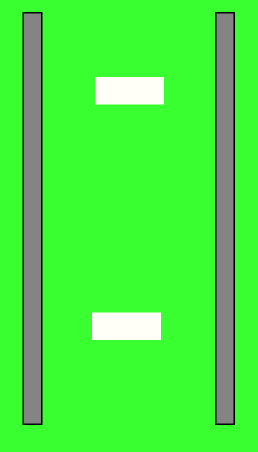
The basic idea is that the same sized object placed on a picture of railroad tracks will look larger when placed higher where the tracks appear narrower. The mental calculation is that things of a certain visual angle in a context that whispers “farther away” are perceived to be larger. Here are two rectangles placed on a picture of railroad tracks.
We can make a dynamic version of this illusion in Etoys, and also learn something about angles, negative numbers, and how much convergence is required to manifest the illusion.
Get a rectangle out of the supplies and color it. Give it roughly the shape as you can see in the picture of the railroad tracks. Copy it, because we need two rectangles with exactly the same size and shape.
Now we need to create the tracks. Get another rectangle from the supplies. Make it tall and skinny, using the yellow halo icon and then copy it. Arrange the rectangles as seen in the picture below.
What we want to do now, over and over again, is rotate the left track the opposite direction but same amount as the right track. To change the angle of an object, in Etoys we can change its heading.
How to use heading
Open the viewer for one of the tracks. In the basic category you can see the tile with the heading set to 0 by default. Go and change that number in the viewer and see what happens to your object. Try setting the heading to 90 and watch your object.
You can also do it the other way around. Turn around your object and watch the number in the heading tile. Drag the blue spiral on the halo around to turn the track around. This will give you an idea what heading means.

Did you discover that the number for heading is in degrees? As you can see from the explanation above, the direction of one track depends on the direction of the other. Here we need to composite an assignment using tiles from more than one object.
How to composite tiles
Open a viewer for all the objects you need tiles from. For our example we need the viewer for track1 and track2. We want the heading for track1 being always the "opposite angle" of track2. Start assembling the script by dragging the track1's heading tile onto the Etoys world.
Now, instead of setting the heading to zero, you want to set the heading to track2's heading. In order to do this, go to the viewer for track2 and drag out a tile with track2's heading.
Note: here you need only the value for the heading, not an assignment tile. So you need to grab the tile on the left corner and NOT on the white arrow.
Move the track2's heading over the number 0 in the script and let it drop once you see a green frame around the number. Now the tile will replace the number and will look like this:

This would cause the heading of track1 be exactly the same as track2 whenever you turn track2 around. We want it to be in the opposite direction but same angle, so we need to make some additions to the assignment. You can achieve this by multiplying the direction of track2 by -1 and so get as a result the number of the opposite direction but same angle.
Click on the green arrow at the end of the assignment to extend the assignment. Now it looks like this:

Click on the "+" to change the operation to "*" and then click on the "1" and change it to -1. The final script should look like this:

Click on the clock to set the script ticking and then use the blue spiral on the halo of track2 to turn track2 around. Watch how track1 changes it's direction accordingly.
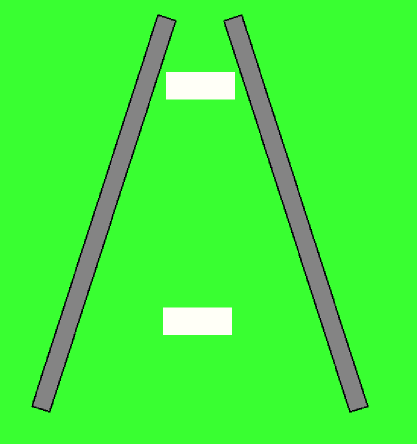
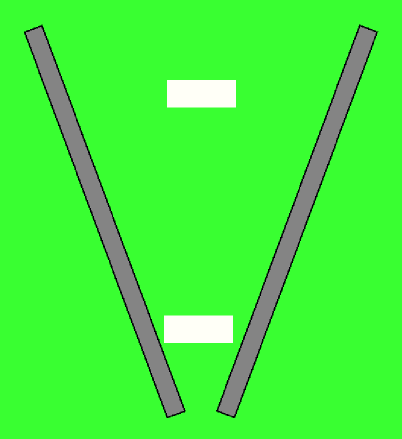
We see that the “enlarge effect” is similar to that in the picture of the railroad tracks, and that there is very little effect when the Etoys “tracks” are rotated outwards
More Inspiration
You can find the projects used in this chapter here: http://etoysillinois.org/library?sl=2145 and http://etoysillinois.org/library?sl=2146.
Try out more illusions like the ones you can find here: http://www.scientificpsychic.com/graphics/
Now that you know how to composite tiles, try the Steering The Car project from the Etoys gallery of projects.