


How to set rules for data display
- How to define and change labels
- How to define and change lookup options
- How to specify that fields be mandatory and/or hidden
- How to define and change additional fields
How to define and change labels
When you or an administrator configured Mifos, you chose the language that the software uses for its display. All the labels for fields, boxes, commands, etc., are in that language. In addition, at any time you can change some of these labels to terms that are more familiar to your users and clients. For example, you might call a Subregion a Division, or you might call a Center a Centre. You might also define labels for office hierarchies and the names of account statuses. If you change a label, every instance of that label in Mifos is also changed.
Follow these instructions to change labels:
- Click Admin > Define Labels.
A screen appears showing all current labels, with a box to type any changes. The whole screen (in two pieces) looks like this:

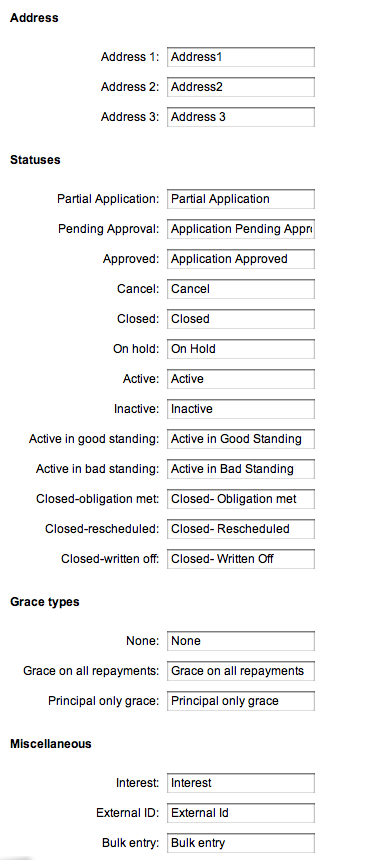
- For any labels you want to change, type the new label in the box to the right.
- When you are satisfied with the changes, click Submit. (If you decide not to change any labels at this time, click Cancel.)
How to define and change lookup options
In many procedures within Mifos, you choose among items in a list. These are called "lookup options." For some of these lists, you can control the items that appear there to fit your local circumstances, either by adding new options or editing the existing ones. For example, in the list of salutations, you might want to add "Sri" or "Rev."
Note: You can add new lookup options or edit the ones that appear there, but you may not delete any.
Follow these instructions to change lookup options:
- Click Admin > Define Lookup Options.
A screen appears showing all current lookup options for lists that you can change. This screen (in two pieces) looks like this:
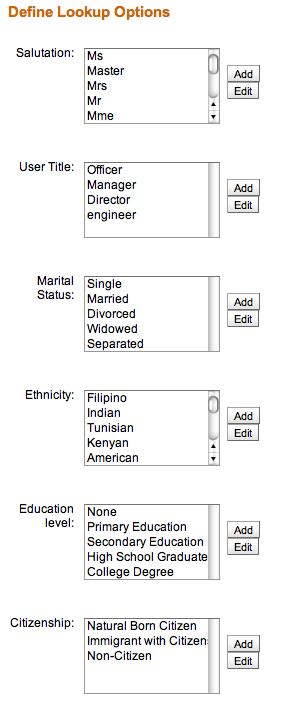

- To add a lookup option, click that option and click Add.
A screen appears with an empty box for that option. - Type the new option and click Submit.
- To edit a lookup option, click that option and click Edit.
A screen appears with a box showing the current option. - Type the changed option and click Submit.
For many of the fields in Mifos, if you have the appropriate permissions, you can decide whether a field is mandatory (meaning that the procedure cannot be completed until this field is filled in) and also whether a field is hidden. For example, if it is essential to fill in the purpose of a loan before that loan is granted, you can mark the "Purpose of loan" field as mandatory. If a field such as "Address 3" is unnecessary, you can mark it as hidden.
Note: Before marking a field as hidden, be sure that you will not need it later. MFI records that were created when the field was hidden may be different from those that are created later when the field is visible, and this can create problems.
Follow these instructions to make the specifications:
- Click Admin > Define Mandatory/Hidden Fields.
A screen appears showing all fields for which you can make these specifications. These are grouped:
- Fields that are systemwide (they appear everywhere in Mifos)
- Fields that are filled with information about clients and system users
- Fields that are filled with information about groups
- Fields that are used for loan accounts
The screen looks like this:
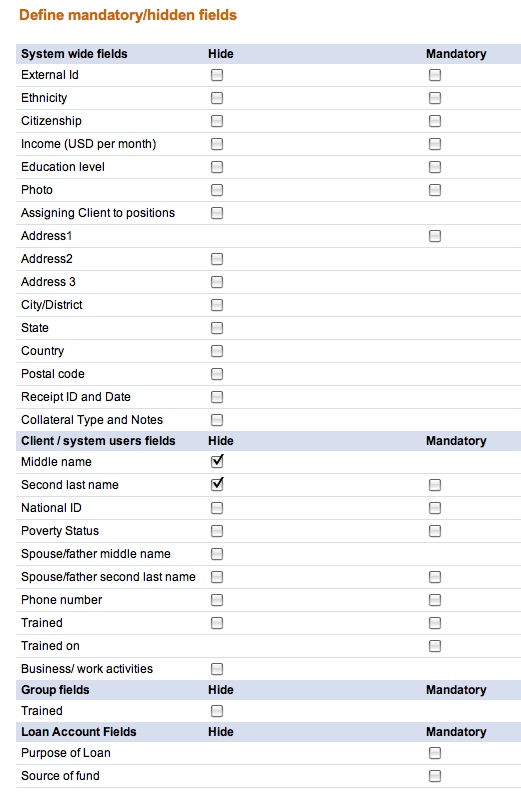
- Check and uncheck the boxes according to your preferences.
- When you are satisfied with your specifications, click Submit. (If you decide not to change the status of any fields at this time, click Cancel.)
Note: If you make a field mandatory, it will always have an asterisk (*) next to it.
How to define and change additional fields
You may find that you need additional fields in Mifos; for example, you might need to gather additional information about a client’s business. If you have appropriate permissions, you can create new fields and give them certain characteristics, such as making those fields mandatory or assigning them default values. Not all properties of fields can be changed.
TIP: Consider adding additional fields if you want the information to be collected as part of the regular MFI workflow. For example, perhaps you want the client’s mother’s name to be included in any account application. If the information does not need to be collected each time, but you would like to collect it periodically and save it for comparison (such as annual income), consider putting this information in a survey. See "How to create a survey" for details.
Note: You can add new fields or edit the ones that appear there, but you may not delete any.
Follow these instructions to create new fields:
- Click Admin > Define Additional Fields.
- The following screen appears:
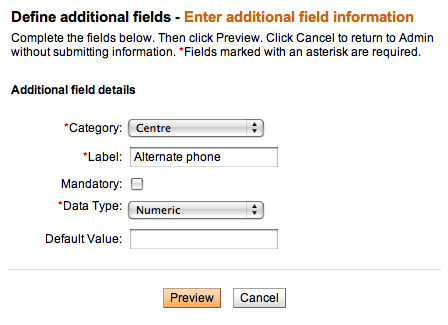
- Enter information using the descriptions in the following table:
|
Field |
Description |
|
Category |
The category that fits this field. |
|
Label |
The label that will appear for this field in Mifos. |
|
Mandatory |
If you want this field to be mandatory (meaning that the procedure cannot be completed without filling in this field), check this box. |
|
Data Type |
Numeric or Text. If you click Numeric and the user types text in this field, they will see an error message. |
|
Default Value |
The value that will appear if the field if the user does not alter it. |
- When you have made all specifications, click Preview.
- Review the specifications; if you want to change them, click Edit Additional Field, make the changes, and click Preview again.
- When you are satisfied with all the specifications, click Submit. (If you decide not to add an additional field at this time, click Cancel.)
You can also change these additional fields later. Click Admin > View Additional Fields, click the group in which this field appears, and click Edit for the specific field you want to change. Follow the instructions above to make your changes.