


How to manage Variable Loan Installments
- How to create a variable installment loan product
- How to create a new loan account with variable installments
- How to create a new loan account with variable installments and cash flow comparison
How to create a Variable Installment Loan product
Configuring variable installments when defining a new loan product.
- Mifos should have the LSIM feature turned ON. LSIM stands for Loan Schedule Independent of Meeting and if this feature is enabled, repayment schedules and loan disbursals no longer need to coincide with meeting schedules. LSIM is set at the database level.
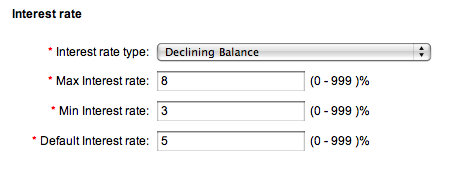
In other words, when the LSIM feature is ON and the selected interest rate type is other than ‘declining’, ‘can configure variable installment’ checkbox will get disabled.
How to configure variable installments when defining a new loan product.
1. Under section Repayment Schedule, check the 'Can configure variable installments' checkbox.
2. The following parameters will be displayed:
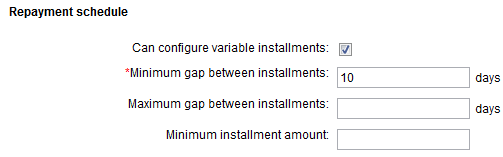
Minimum Gap between Installments - This is the minimum gap, in days, that is required between two consecutive installments. This is a required field.
Maximum Gap between Installments - This is the maximum gap, in days, between installments. This value is optional.
Minimum Installment Amount - The minimum amount that needs to be repaid at each installment. This value is optional.
Compare with Cash Flow settings:
Mifos provides MFIs the option to compare loan installments with customer's cash flow. This option allows MFIs to specify conditions with regard to customers' cash flow and loans are created in accordance with these conditions. This feature is available for loans with variable installment and without.
To enable comparison with cash flow, mark the checkbox 'Compare with Cash Flow'. The following parameters will be displayed:
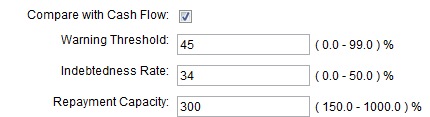
Warning Threshold - This value, expressed as a percentage, is the fraction of a customer's cumulative cash flow and the upper limit for loan installment for any period. In other words, this field will be used to alert a user if the loan installment for any period is above a certain percentage of the cumulative cash flow (cash flow calculation explained is explained in the following section). The warning threshold can be between 0 and 99% (It cannot be a 100% because it would then mean that loan installments for any period can be equal to a customer's cumulative cash flow).
Indebtedness Ratio - This value specifies the range within which a client's indebtedness rate can fall (Formula for calculation of indebtedness rate is explained in the following section). Mifos allows loans to be created only if the calculated Indebtedness Rate for a client is lesser than this pre-specified value. This value is expressed as a percentage and can be between 0 and 50%.
Repayment Capacity - This value specifies the range within which a client's repayment capacity can fall (Formula for calculation of repayment capacity is explained in the following section). Mifos allows loans to be created only if the calculated Repayment Capacity for a client is is between the pre-specified range. This value is expressed as a percentage and can be between 150 and 1000%.
How to create a new loan account with variable installments
To have variable installment configured for an existing loan product, follow these steps:
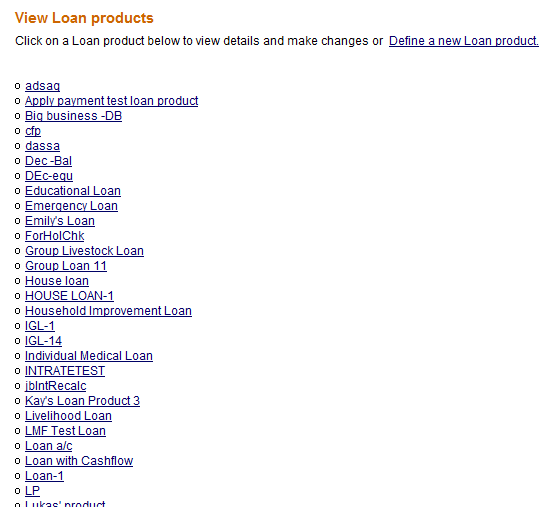
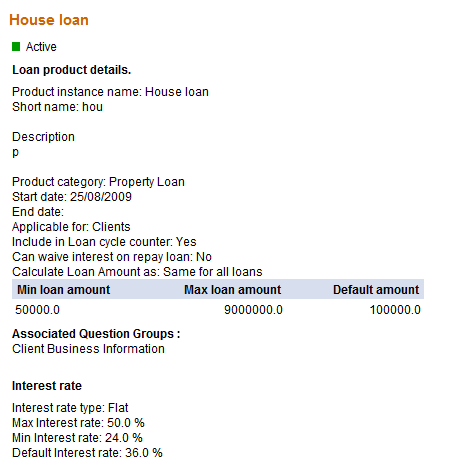
2. Select the loan product which needs to be modified by clicking on it. The loan product's details are displayed as shown in the screenshot below.
3. Click 'Edit Loan Product Information' on the top right of the page. The loan product details page appears in Edit mode. Scroll down to section 'Repayment Schedule'.
4. Check the 'Can configure variable installments' checkbox and fill in the installment details as explained in the previous section.
Grace period in variable installments: To specify grace period for variable installment loans, the grace period should first be set at the product level. While creating the loan product, under section Repayment Schedule, fill in the grace period details as explained in the How to Define and Change New and Existing Loan Products section. This is how grace period is implemented in the case of variable installment loans:
if Grace period duration = 3 installments
frequency of installments for variable installment loan product = 1 week.
Then, only after the completion of 3 installments of one week each will the loan move to active in bad standing.
Creating New Loan Account with Variable Installments
For a detailed explanation on how to create new loan, refer to section section "How to Create a Loan Account" under chapter "Loan Accounts". The loan creation process is also explained below briefly, including the variable installment feature.
Loans can be created for individual clients or groups. The process of creating loans is the same for both clients and groups.
1. Click Clients & Accounts on the main panel. The following screen appears.
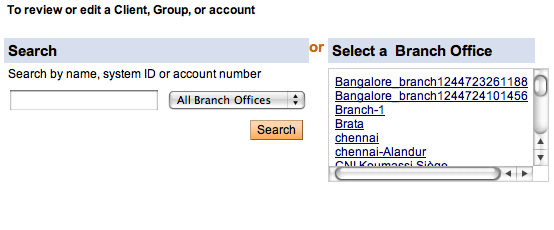
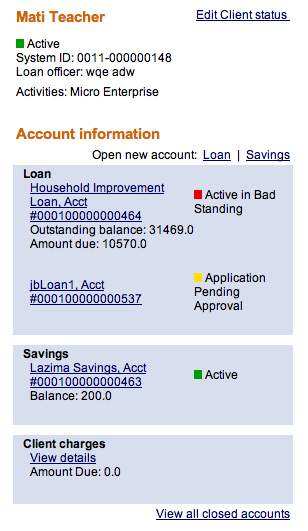
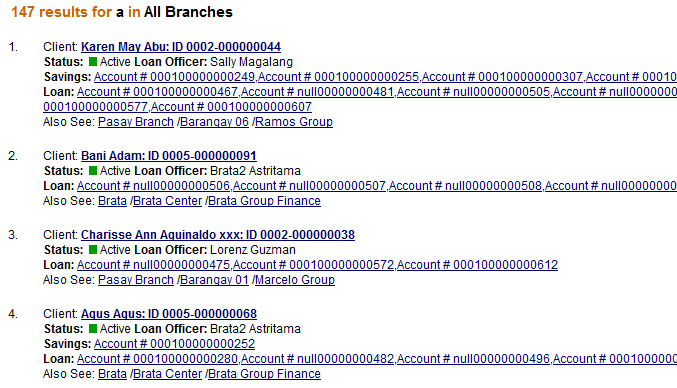
2. Client/ group search can be done with the name, system ID, phone number or account number. When you type this information and click Search, a list of all possible choices matching the search information is displayed. Click the correct one, or (if you don't see the customer you were expecting) try retyping the search information carefully and then click Search again. A screen similar to the following is displayed:
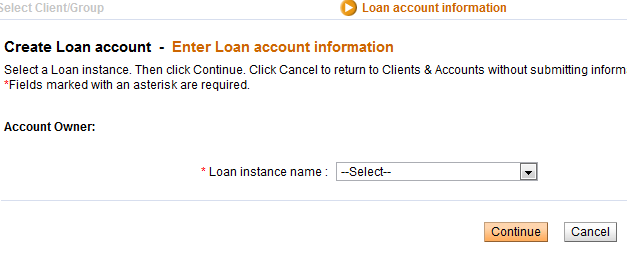
4. To create a new loan, click on Loan on the top right of the Account Information section. The following screen is displayed. Select the required loan product (the product with variable loan installment in this case). Click Continue.
5. The Loan Account information page is displayed. The loan product summary shows the variable installments configuration details (minimum and maximum gap between installments, etc).
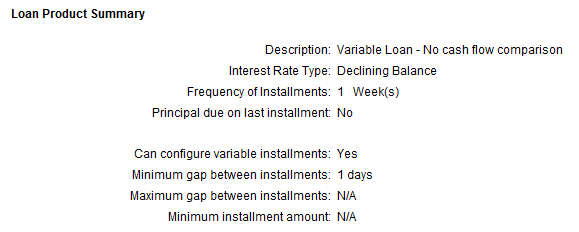
6. In the account details section, enter the account details.
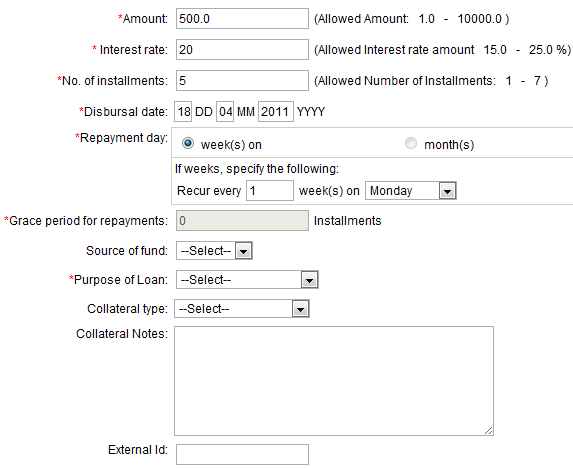
7. Enter information using the descriptions in the following table (note that these fields may vary somewhat, depending on the details of the loan product itself.):
-
Field name
Description
Example
Amount
The loan amount for the client, limited to the minimum and maximum amounts shown in brackets.
100.00
Interest Rate
Applicable interest rate, limited to the minimum and maximum values shown in brackets. If a default field was defined for the product, this field shows the default interest rate value.
The rate field can be zero but cannot be left blank.
You may not change the interest rate once the loan has been paid out to the client.
18
No. of Installments
The number of installments in which the loan will be repaid, limited to the values shown in brackets.
12
Disbursement Date
The date when the loan is likely to be disbursed (paid out). If the client/group has a meeting date, the date must be one of the meeting dates.
This date will be used as a Loan Start Date to generate the repayment schedule. This field can be updated with the Actual disbursement when the loan is actually disbursed to the client. ?? This date can be in the past. The repayment schedule will be regenerated when this date is updated.
If a client has no meeting date, this date will not be checked against the meeting date schedule.
History information about the date change will not be available except in the change log.
You may not change this date after the account is set to "active in good standing" status.
02/07/2006
Grace Period for Payments
Type how long to wait for late repayment: that is, how many installments.
If the loan product specifies "No grace" or if interest is automatically deducted at the time of disbursal, this field cannot be used.
You can extend or reduce the length of the grace period if the grace period has not yet expired.
The grace period starts as of the day the loan is disbursed to the client.
Source of Funds
Click the applicable source of funds for the loan as defined by the MFI.
Tsunami
Purpose of Loan
The purpose for which the loan has been disbursed
Material Purchase Business work activities
The type of activity the client is engaged in.
Farming
Collateral type
The type of collateral the client has provided for the loan.
Type 1
Collateral notes
Explanatory notes about the collateral type applicable to the loan.
Land title deed verified by loan officer
External ID
If this loan has an ID number from some other system, type it here.
Additional information: Custom fields
Enter any additional information required by your MFI in the custom fields.
Administrative Set Fees
Apply any set fees for this loan, as defined by your MFI.
If you want to change the default fee amount for any fee displayed, type the amount in the box. If you want to remove this fee, check the Check to Remove Box.
Additional Fee type
Apply up to a maximum of 3 different fee types, as defined by your MFI.
Click Submit after entering the required details.
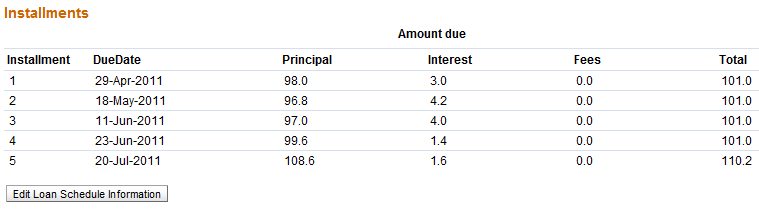
8. The loan installment schedule for the client is summarized and displayed. The screen looks something like this.
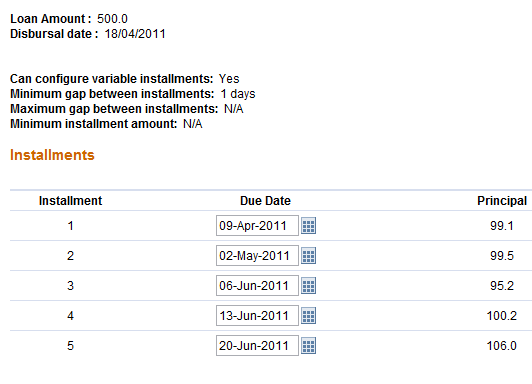
The installments table displays the following fields:
- Installment - The installment month
- Due Date - The date when the installment is due. This field can be edited, as explained below.
- Principal - The principal amount for that particular installment
- Interest - The amount of interest for that particular installment.
- Fees - Fees, if any, imposed on the loan repayment for that particular installment
- Total - The total repayment amount for that particular installment. (Principal + Interest + Fees)
Editing Installment Due Dates and Installment Amounts
The Due Date field is editable and the dates can be modified, in keeping with the variable installment conditions specified while creating the loan (specifically the minimum gap between installments field which is the required field).
Similarly, the total installment amount field is also editable - all installment amounts except the last installment are editable. The installment amounts can be modified, in keeping with the conditions specified at the time of creation of the loan product (minimum installment amount). Also ensure that the installment amount entered for a period is not any lesser than either the sum of Fee and Interest for that period or the Minimum Installment Amount specified during product creation, whichever is greater.
After the edits are done, click Validate. This function will check if the modified due dates and modified installment amounts are in accordance with the conditions specified. Possible errors are as follows:
- The first installment date could be before the loan disbursal date.
- The gap between two installments is less than the allowed minimum.
- The due date falls on a pre-specified holiday.
- The installment amount is less than either the minimum installment amount or sum of fee and interest for that period, whichever is greater.
Below are two sample error screens:
Error Type - Gap between installment due dates less than allowed minimum

Error Type - Installment due date falls on holiday

9. After the errors are resolved and the due dates adjusted, click Preview. A screen similar to this will be displayed.

10. If any of the above details need to be edited, click Edit account information or Edit Loan Schedule Information depending on what needs to be edited.
11. When you are satisfied with all changes, click Submit for Approval (or, if you want to wait to submit this loan, click Save for Later). (If you decide not to create the loan at all at this time, click Cancel.)
Creating New Loan Account with Variable Installments and Cash Flow Comparison configured
1. Click Clients & Accounts on the main panel. The following screen appears.
2. Client/ group search can be done with the name, system ID, phone number or account number. When you type this information and click Search, a list of all possible choices matching the search information is displayed. Click the correct one, or (if you don't see the customer you were expecting) try retyping the search information carefully and then click Search again. A screen similar to the following is displayed:
3. Select the required client by clicking on the client's name in the list. The client's details are displayed, similar to the screenshot below.
4. To create a new loan, click on Loan on the top right of the Account Information section. The following screen is displayed. Select the required loan product (the product with variable loan installment in this case). Click Continue.
5. The Loan Account information page is displayed. The loan product summary shows the variable installments configuration details (minimum and maximum gap between installments, etc).
6. In the account details section, enter the account details and click Continue. To cancel and return to the previous page, click Cancel.
7. The Cash Flow Details screen is displayed. The screen will look something like this.
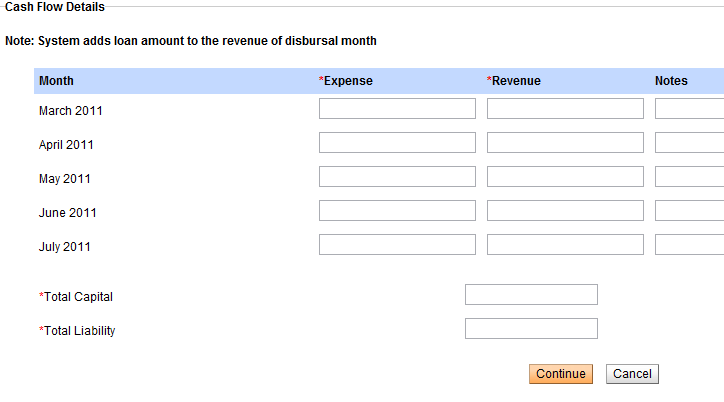
All the months which fall between the first and the last installments, including the first and the last installment months are displayed. In addition, the month immediately preceding the first installment month and the month immediately following the last installment are displayed.
Example 1: Disbursal date: 26-Aug-2010, No. of Installments: 3, Frequency of Loan Installments: 1 month
Installment Months: September, October and November.
Cash flow months will be captured for months : August, September, October, November, December.
Example 2: Disbursal date: 26-Aug-2010, No. of Installments: 8, Frequency of Loan Installments: 2 Weeks
Installment Months: September, October, November and December.
Cash flow months will be captured for months : August, September, October, November, December, January.
Cash Flow Data
Enter the client's expense and revenue for each of the listed months, in the fields "Expense" and "Revenue" respectively. In the notes column, enter any comment/ note about the client's revenue/ expense for that particular month. Also enter the client's Total Capital and Total Liability. Click Continue. The client's cash flow is calculated, as explained below.
Cash Flow Comparison calculation
In general, cash flow is captured starting one month before the first installment month to allow the MFI to enter cash in hand thus far leading into the installment month. On the disbursal month, the loan amount is added to the the cumulative cash flow for comparison.
The month immediately following the last installment month is added to allow the MFI to see what sort of an impact loan payment will have on the customer. If there is a sudden drop of cash of the customer into the month right after the loan payment, then it may lead to a situation where the customer may default. Thus, to better understand the customer's position after repayment of loan, MFIs capture the cash flow for the following month as well.
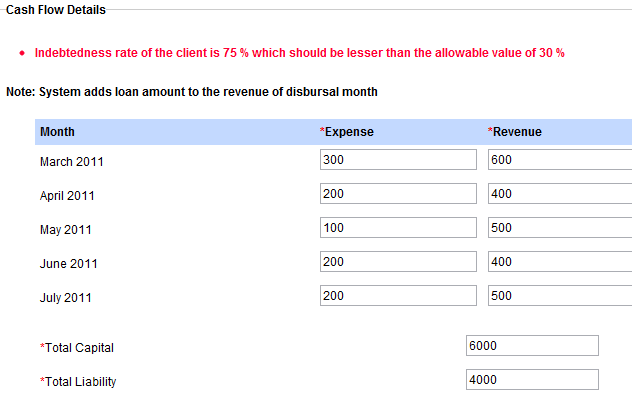
After the revenue and expenses for each month are entered and you click Continue, the system calculates the indebtedness rate and repayment capacity of the client with the information provided in the cash flow capture page. If the client's indebtedness rate is greater than the allowed value specified during creation of the loan product or if the client's repayment capacity is less than the threshold value specified during creation of the loan product, the loan account cannot be created.
Formula for calculation of Indebtedness Rate:
Indebtedness Rate= (Total liability + loan amount)*100/Total capital
Example:
During loan product definition, the indebtedness rate has been set as 100.
Assume a Rs.1000 loan is being applied for.
Total liability = Rs.5000, Total capital = Rs.4000 (entered by the user)
Indebtedness rate = (5000 + 1000)*100/4000 = 150.
The client's indebtedness rate is greater than the permissible limit, hence Mifos will not allow the loan to be created. An error message will be displayed as follows.
Formula for Calculation of Repayment Capacity:
Repayment Capacity=[(Total revenues-Total expenses)+Loan Amount]*100 / Sum of Installments amount
Example:
During loan product definition, the Repayment Capacity limit has been set as 150.
Assume a Rs.1000 loan is being applied for.
Assume sum of all expenses entered by the user on the cash flow page is Rs.5000 and the sum of all revenues entered is 10000. Assume the sum of all installment amounts is 1500.
Repayment Capacity = [(10000 - 5000) + 1000] * 100/ 1500 = 400.
The Repayment Capacity of 400 is over the required minimum capacity of 150. Thus, Mifos allows the loan to be created.
8. After the cash flow details have been entered and the system allows the loan to be created, the Review Installments page is displayed. The page contains details of the installments and a summary of the cash flow. A screen similar to this will be displayed.
Please refer to the previous section "Creating new loan with variable installments" for details on how to edit the installment dates and total installment amount.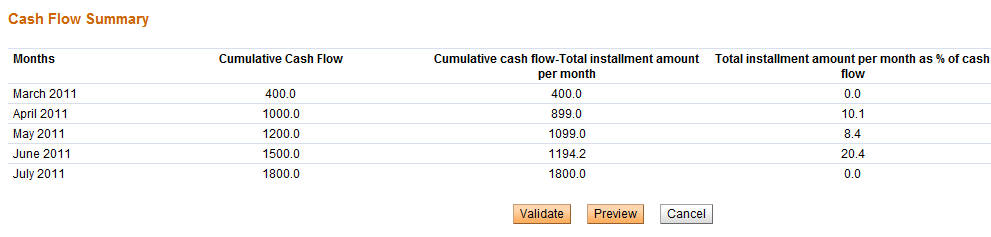
The Cash Flow summary table displays the following fields:
Months - Name of the installment month
Cumulative Cash Flow - This is calculated as: Cash flow for present installment + Sum of cash flows for all previous installments
Cumulative Cash Flow - Total Installment Amount per month - This value is the difference between the cumulative cash flow for a particular installment month and the total installment amount for that month.
Total installment amount per month as % of cash flow - If this value exceeds the warning threshold specified at the time of loan product creation, then Mifos will not allow the loan to be created.
Notes - Any notes recorded in the system for that particular installment month.
9. To proceed with the loan creation, click Validate. This will validate the edited installment data against the conditions specified at the time of loan product creation. (please refer previous section on "Creating new loan with variable installments" for the various validations performed and possible errors).
10. Click Preview to click the loan account information. A screen similar to this will be displayed.
If any of the above details need to be edited, click Edit account information or Edit Loan Schedule Information depending on what needs to be edited.
11. When you are satisfied with all changes, click Submit for Approval (or, if you want to wait to submit this loan, click Save for Later). (If you decide not to create the loan at all at this time, click Cancel.)