Adding Text and Images
In the pane to the right of the Site Manager is where all the content of the page is entered. To enter text, simply click on the window and start typing. Don't worry about fonts or other formatting issues just yet, we'll get to that a little later. After entering a few lines of text, you need to save the file. Since this is the first, or default page of the site, it should be called index.html. Saving the page is only a matter of clicking on the Save button in the upper left corner of the NvU Window. Since this is the first time the page is to be saved, a dialogue box will pop up asking you to provide a title for the page.
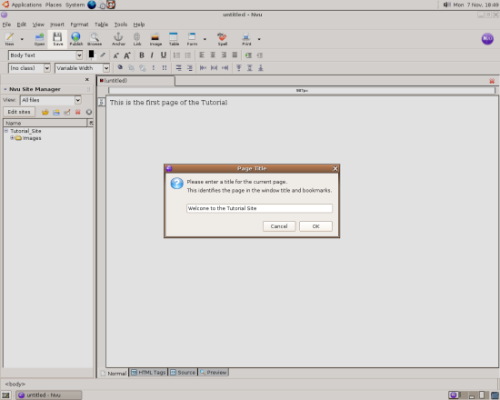
You can enter any text you like here. The text you enter will appear in the title bar of the web browser when the page is viewed. You can always change this later if you would like. After clicking OK, another dialogue box will appear asking you to save the file. It is important to make sure that the file is saved in the folder you created when you defined the site. Save the file as index.html inside the Tutorial_Site folder that you created earlier. Most likely, the web server that you will later upload your site to will automatically display the page named index.html when a visitor enters a web address with naming a specific file. There will be more about this in a bit, but for now make sure that the first page that you want visitors to see when they come to your site is called index.html (no CAPITAL LETTERS).
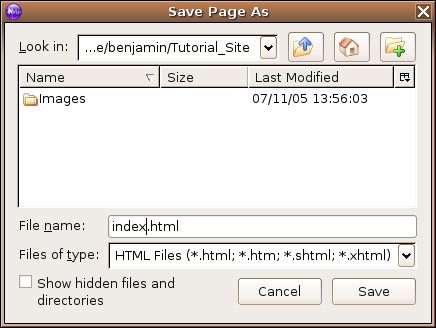
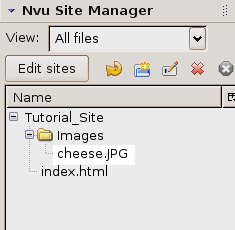
Click Save. You should see the the file, index.html in the Site Manager. If you don't click on the refresh button and it should appear. If it's not there, its likely that you did not save it in the folder that contains your site. If you need to make sure that you repeat the steps above until you see the file appear in the Site Manager.

Let's add an image to the page. Before inserting an image, it's necessary to place the image file in the Images directory. Before copying the image into the directory, make sure that it is an appropriate size for viewing on the web. Keep in mind that large files take longer to download that small files do, and that all images displayed on the web are measured in pixels. Take a look at the Gimp tutorial for more detailed instructions on how to do this. Save the file as jpeg image and be certain that the file name ends with .jpg or .jpeg . If you would rather, you can use any of the images I've provided here to use for the exercise.
If the file is not in the Images directory, copy it there now.
You should now see the file in the Images directory in the Site Manager pane of the NvU window. If it's not there, try the refresh button.
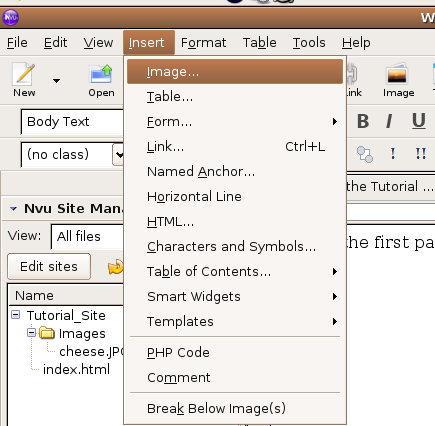
It's time to place the image in the page. From the drop down menu at the top of the NvU window, click on Insert -> Image.
A dialogue box will appear. Click on the Choose File button, select the file that is inside the Images directory for your site, and click on the Open button.
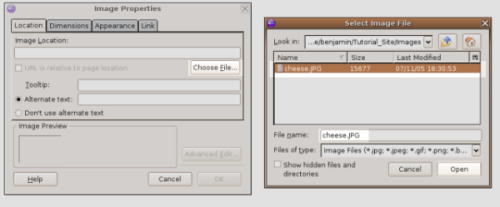
Before clicking on OK, there are a few important things you need set first. First, check to make sure that the text under Image Location Starts with the Images directory for your site. Also, if it is not already, check the box URL is relative to page location. Finally add some text to the Alternate text section of the window.
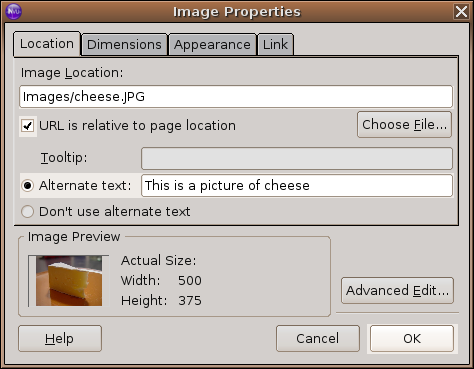
Once all set correctly click the OK button. The Image should appear on the page. Now would be a good time to save the page with the image inserted. Just click the Save button in the upper left corner. If you did not hit the Return key before inserting the image it will appear at the end of the text. If you did press the Return key the image will appear on its own line as if it were beginning a new paragraph. Don't worry about getting the position of the image just right quite yet. We'll get to that later. Right now, the important thing is that the image is in the proper directory, and that you have given enough information for the web browser to find it. That it why it was necessary to enter all the information in the Image Properties window. When NvU "inserted" the image, what is actually did was write instructions for the browser on where to find the image file and a little information about how to display it. To see this in action, click on the source tab at the bottom of the NvU window. This will display the HTML code that NvU has written for you. Don't worry, you're not going to have to edit any of the code directly but it's nice to see what NvU is doing for you and what and image looks like in HTML. Clicking on the Normal tab at the bottom of the NvU window will return you to more familiar territory.
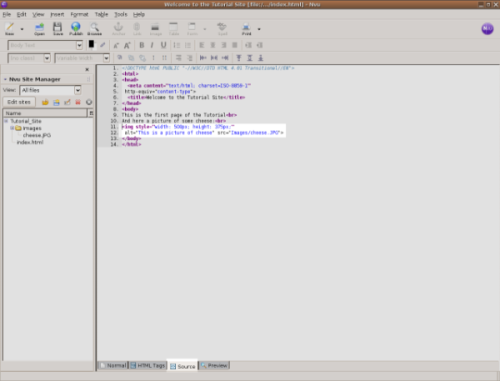
Look for the bit of code that looks like this:
<img style="width: 500px; height: 375px;" alt="This is a picture of cheese" src="..//bin/edit/images/cheese.JPG">
This is HTML code for telling the browser: "Display an image dimensioned 500x375 pixels. You can find it in the Images directory in the same place that this page is, and the name of the file is called cheese.JPG.
The important bit is the src="/bin/edit/images/cheese.JPG". This is where the HTML tells the browser where to find the image file. These instructions are called the URL (an acronym for Universal Resource Locater) and the way that the URL is written tells the browser how many steps it needs to get to its destination (a file). There are two types of URL's, relative and absolute. Before getting into the differences between relative and absolute paths, lets make a couple of links to other pages one relative, one absolute.
Website Anatomy
At the most basic level a website is nothing more than a set of files written in a specific way that can be interpreted (or parsed, in web lingo) by a web browser. In order for all browsers to interpret the files all web pages must be written in a consistent manner. This consistency of form is HTML, or Hypertext Mark-up Language. Because HTML is nothing more than a text file written in a specific format, all that is needed to write web pages is a text editor. Creating pages this way requires knowledge of the HTML format, and while HTML is not all that hard to learn, most people prefer a more visual way of designing pages. Applications such as NvU allow people to make functional websites by "writing" the HTML for you.
The design of NvU makes the experience of web page design more akin to using a word processor. While this makes learning the software easier for most, there are a few traps that lurk in the shadows of this kind of approach. The Hypertext part of HTML is what makes linking possible in web pages, and understanding how links work is crucial before successfully creating a website. I'll give you a brief introduction here, but I recommend further reading for more detail of how all this works.
Organise Your Files
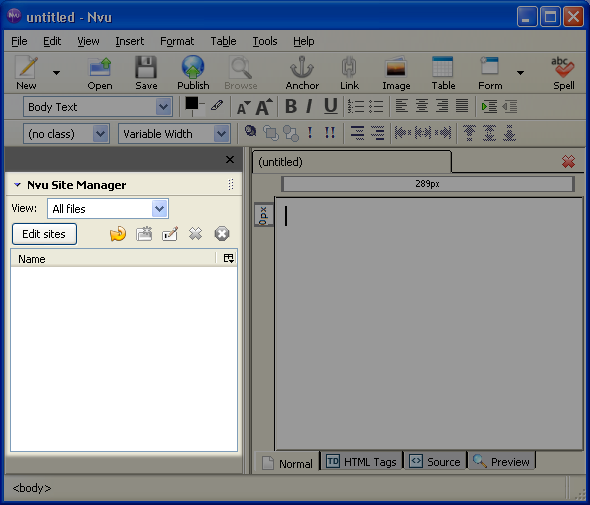
The most important thing to do when setting up a site is to make sure that you are consistent in where you keep all your files for your site. Being diligent in good file management will save you countless hours as your sites grow and become more complex. Let's take a look at the anatomy of file structure of this tutorial. You can see this structure in NvU using the Site Manger on the left side of NvU window.
You should keep a separate folder for the images and styles associated with the site. As you'll soon see keeping things categorized in this way will make expansion and revision of the site relatively painless.
When setting up a site for the first time in NvU the best practice is to set up a folder on the hard drive of your computer that will hold all the files you'll need for your site. This folder should contain nothing but what you actually need to display your site. By keeping everything contained in a folder in this way it will make transferring your site to a server very easy. You can set this up without having to leave NvU.
When you first open NvU you will be presented with a screen that looks like this:
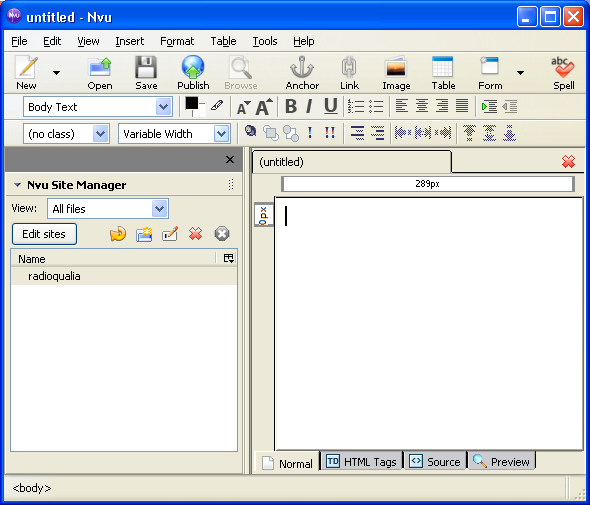
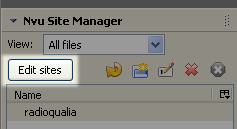
Click on the "Edit Sites" button in the site manger:
Another window will appear called publish settings.
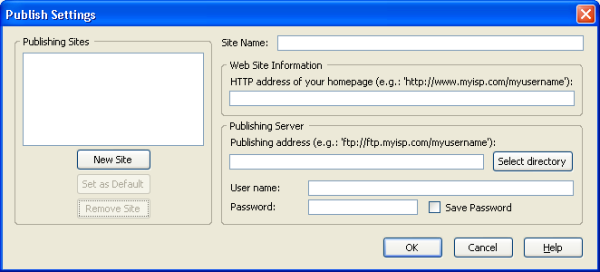
Click on the button "Select Directory" in the Publishing Server section:

Create a new folder (also called a 'directory') and select it in the dialogue box that appears. I've called mine Tutorial_Site. Note the underscore in the directory name. As a general rule, spaces are a bad thing in the names of files and directories in websites. If you would like to have a space, use the underscore (_) character.
In the Publish Setting window add a name for the site in the Site Name section. You should also see the name of the directory you created in the Publishing Server section of the window. Don't worry about the rest of the boxes, those need to be filled in when it comes time to publish your site on the web. For the time being, all we are doing is setting up your site on your computer.
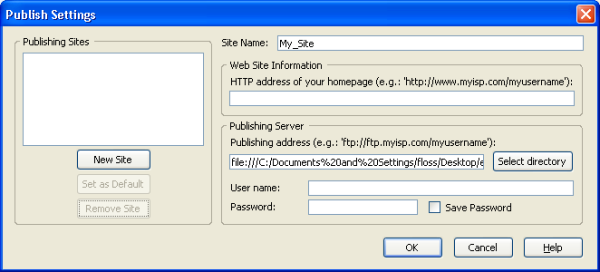
If it all looks good, click "OK".
You should now see the name of your site in the site manager. All the files that you create as you build your site (and nothing else) belong in this directory.
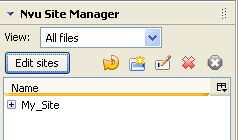
Now its time to make a directory that will hold all the images that will appear on the site. Click on the site name in the site manager so that it is highlighted and you will see the icons in the Site Manager become coloured. Click on the icon that looks like the folder.
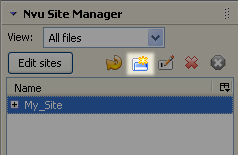
A dialogue box will appear. Enter 'Images' as the directory name.
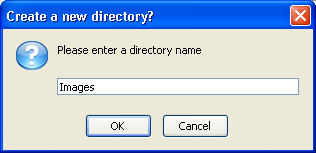
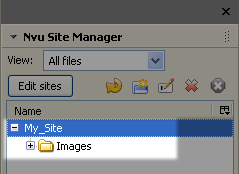
Click 'OK'. You should now see the 'Images' directory appear under the site name in the Site Manager pane. If it's not there, just click on the refresh icon next to the folder icon you clicked when adding the directory. It should look something like this:
Congratulations. You now have the basic directory structure for a successful website. It's now time to add a little content.
Creating Links
To switch back to the normal view (get out of the source view), click on the Normal tab at the bottom of the NvU window.
First, there needs to be another page to link to. To make another page in your site, just click the New button in the upper left corner of the NvU window. A new blank page will appear in a new tab. For now just enter some new text in the page, Click the Save button, give the page a title, and save the page in the Tutorial_Site directory. These are the same steps that were used to save the first page. This time when it comes time to name the HTML file, you need to name it something other than index.html. In order for the browser to follow a URL correctly no files in the same directory are allowed to share the same file name. Remember to avoid spaces in the file name. In the example, the file for the second page is called second_page.html (Note the underscore). If all is well, you should see the second page in the Site Manger pane. If it's not there, you guessed it, the refresh button should do the trick.
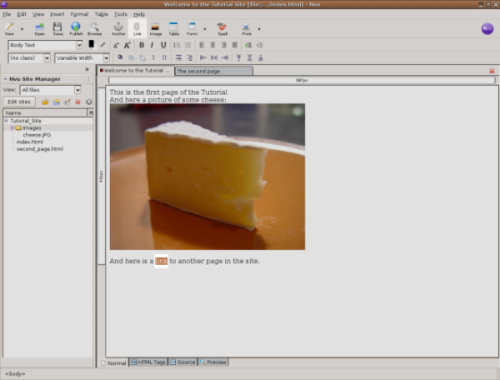
Note that the first page is still there in its own tab. Clicking on the tab will allow you to edit the page the tab belongs to. Click on the tab for the first page, and select some text that will server as a link to the second page. (Text is selected by clicking and dragging the mouse, in much the same way you would in a word processor.) Links can be associated with words, sentences, paragraphs, individual letters or even spaces. This example will just use one word as a link. Highlight (select) the word that will contain the link, then click on the "Link" button near the top centre of the NvU window.
The Link Properties dialogue box will appear. To link to the second page, click the "Choose File..." button and choose the html file of the second page.
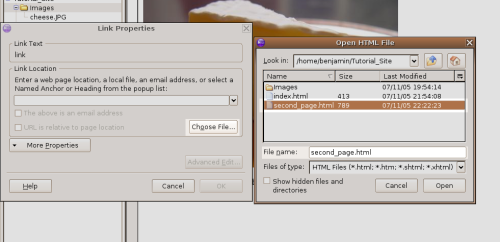
The way that the the path of the link is written tells the browser if the link is relative or absolute. When creating websites, it's a very good idea to understand how this works.
When using a graphical computer interface, files and directories are represented with icons which represent files and directories on your computer. HTML needs to represent this using text only and uses the slash (/), full stop (.) and the colon (:) in conjunction with directory and file names to describe where any given file lives. The order that the text is written describes the order of directories that the browser should go through to find the file. The URL /ben/web/tutorial/index.html is pointing to a file, (index.html) which is inside a directory, (tutorial) which is inside another directory, (web), which is inside another directory, (ben). If you were to look at this URL in a graphical interface, it might look like this
If a image file named foo.png was added to the web directory, its path would be /ben/web/foo.png and would look like this:
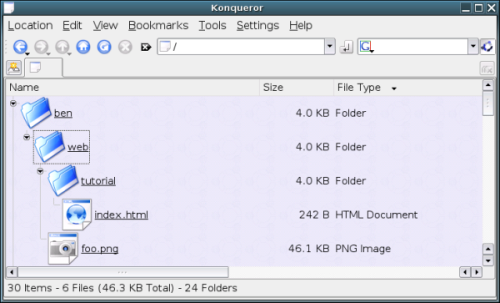
As you may have figured out, directories are separated by (/)'s and files are usually indicated by having a suffix (like '.png') placed at the end.
The topmost directory is called the root directory and is indicated by a / all to itself. /ben is the URL for the ben directory which is inside the root directory. If a URL starts with a /, it is an absolute URL. URL's to external sites are also absolute, such as http://www.google.com. In this case the http is telling the browser what language (called a protocol) it should use to ask for the file. Web pages use the http protocol. The //www.google.com part is the address of where the root directory lives on the web. Everything after http://www.google.com is the root directory for the google site. The URL http://www.google.com/mac points to the mac directory in the root directory of Google's website.
Absolute URL's contain all the information needed to find a file, and contain the following parts:
- The protocol
- The address
- The path to the file being requested
A common example of a web pages URL is 'http:// www.google.com': http: is the protocol, and: //www.google.com is the address of the server.
anything after is the path to the file being requested. In this case, there is no path specified, and Google's server must decide what to send to the browser.
Another example of an absolute URL is http://www.dembroski.net/Desktops/photos.html
In this case the URL is asking for the file photos.html which is found in the Desktops directory in the root directory of the site.
It is possible to make all the links in your site absolute in this way when adding making your site. There is a serious drawback to doing this, however. If at a later time you decide to move the location of site to a different web address or change the location of a directory within a site, you would have go back and change all the links in the site to point to the new location. Web pages can easily have tens to hundreds of links, so having to change all of them each time a directory is moved would make managing a web site almost impossible.
Relative URL s help solve this problem. Instead of starting with a protocol and an address, the path of relative URL s start wherever the document is located. They are indicated by starting without a protocol indicator in the URL name. In the example of the Tutorial site we are building, entering second_page.html without http://www.tutorial_site.com/ in front of it tells the browser that the URL is relative and it should look for the file second_page.html URL in the same directory as the file that contains index.html (this is the file that contains the link).

Let's add a link to an absolute URL to see the difference. In general, absolute URL s should only be used when linking to an external website.
Add some text describing the link, and select the text that you want to contain the link, and click on the link button at the top of the NvU window. When presented with the Link Properties window enter the absolute URL for the link.
You can also add links to images. To make the image of the cheese link to the site with the desktop images, single click on the image. It will become highlighted by little white squares (called "handles").

With the image selected, adding a link to an image is the same as adding it to text. Click the link button, and follow the same steps outlined above. Just to keep things simple, give the link the same URL (http://www.dembroski.net/Desktops/photos.html).
Now would be a good time to take a look at the site in a web browser and see how it looks and make sure that all the links work.
Depending on which operating system you are using, and how it is set up, there are a number of ways this can be done. Near the top of the NvU window there is a browse button. Pressing this should open your default web browser with the the page loaded. However, it may not for a number of reasons. Fortunately, there is a way that will work regardless of the browser and operating system you are using.
Open your favourite web browser. This tutorial is using Firefox, which can be downloaded for free at www.mozilla.org and is easily installed on Linux, OS X, and Windows XP. Once the browser is running, it is simply a matter of opening the index.html file as you would any other file in an application. From the application's menu bar click on File > Open File. A dialogue box will appear. Navigate to the Tutorial_Site folder and select the index.html file. You should see something like this:
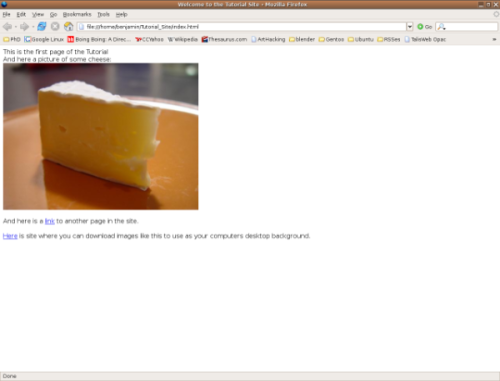
If you've set up all the links correctly, they should work when you click them in the browser. Clicking on the image should open the same page as the last link (the one contained in the word "Here").
That's it! You have now made a functional (but not very exciting) website.
Let's see if we can't dress it up a little.
A Brief Introduction to Styles
At the moment, the way that web pages are constructed is going through a transition. HTML is well suited to setting up links to different pages, images and locations on the net. It is not all that well suited to telling a browser how that information should look. Until recently, web designers had to do the best they could using layout tables, frames and other trickery to get there pages to look the way they wanted. While this does work more or less, the problem with such an approach was each browser would interpret the HTML slightly differently. This means that a page might look great in Safari for OS X, but look terrible or even be unusable in an older version of Internet Explorer running on Microsoft Windows.
The solution was to create a standard that would be read the same in all browsers. This standard is called CSS, or Cascading Style Sheets. It is certainly beyond the scope of this tutorial to explain the intricacies of how this works. Fortunately NvU does a lot of this work for you. All you really need to know at this point is that HTML handles the content of the site (text, links, images, etc.) and styles determine how that content should look. So, content first, then worry about how it looks. This approach has two distinct advantages. First, there is a much greater chance of your site looking the same no matter which browser it is viewed on. Second, if you decide that you want to change the look of your site, all that is required is changing the style associated with the site's content, without having to re-do the whole site from scratch.
For a more detailed explanation of how CSS works check out the links section of the tutorial.
To use styles to define the layout of a page, you need to instruct NvU to do so. This is set in the preferences which can be found in by selecting Tools > Preferences in NvU's menu bar. A window will pop up. Make sure box labelled "Use CSS styles instead of HTML elements and attributes" is ticked. That's it, you are now ready to start defining how the pages are laid out.
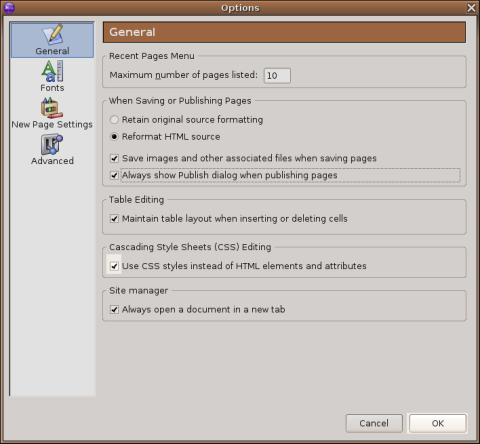
Click "OK" and you are all set up to start using styles.
Using Inline Styles
You now have a choice on how to use styles in your site. The most basic way is to use inline styles. Which is to mean that you assign each element in the site it's own specific style as it differs from the default. This is how most people use a word processor. For example, selecting a bit of text that you want to be bold, and then clicking the "Bold" button. In this sense, NvU operates in much the same way. Looking at the example of our index.html page, let's change the colour of the background and the text. This is done from the NvU menu bar. Click on Format > Page Colours and Background. You will be presented with the following window:
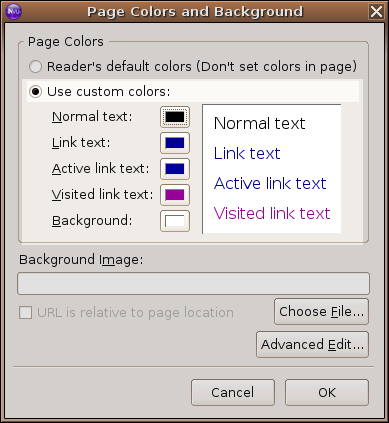
By clicking on the Use Custom colours button, you are able to set the defaults for all the text on the page. You'll notice three types of link colours:
Link is the colour of text which contains a link that has not been visited yet by the browser
Active defines the colour of link as it is clicked
Visited defines the colour of a link which has been previously visited by the browser
Go ahead and change the colors. (Just remember that if you choose text colour that is too similar to the backround colour, its going to be hard, if not impossible, to read it) Click OK, save the page and take a look at the page in your web browser. (If it looks the same, make sure to click on the refresh button in the browser to load the latest version of the page.

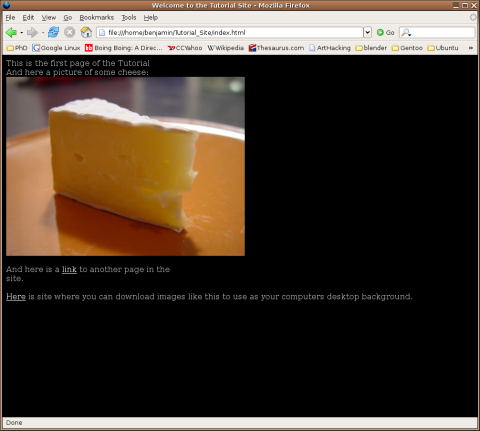
Now lets change the font of the text on the page.
First select all the text on the page by pressing ctrl+a. You should see all the text on the page highlighted:

You can select the font you want to use either by clicking on Format > Font in the NvU menu bar, or by choosing the font in the drop down menu in the upper right hand corner of the NvU window.
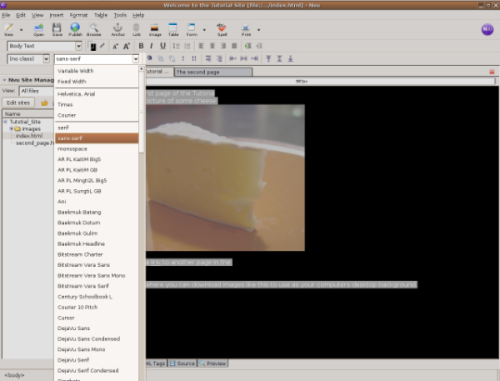
Once again, if you save the page and load it into your browser you can see what it looks like. All changes (Text size, Bold, Italic, Underline) to text are made the same way.
Time to change the position of the image on the screen and get the text to wrap around it. This is done by clicking on the image once to highlight it, and clicking on Format > Image and Link Properties from the NvU menu bar. (Double clicking on the image does the same thing.) Another pop up window demands your attention. Click on the Appearance tab, and you are presented with the following options:
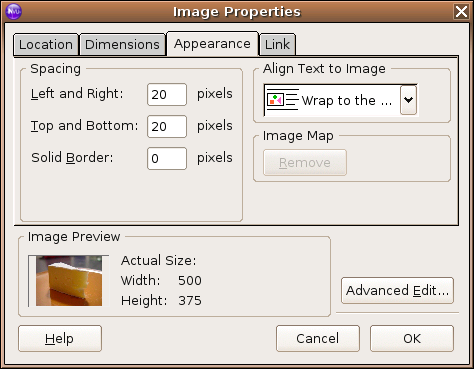
The pull down menu, "Align text to Image" gives you the option to have the text wrap around the image to the right or to the left. Selecting "Wrap to the right" will give you some thing that looks like this:

You'll notice the text next to the image is just touching the edge of the image. To add a little space between the image and the text, use the spacing options in the Image Properties window. Experiment with different numbers until you get something that you like. This is an example of what 20 pixel spacing looks like:
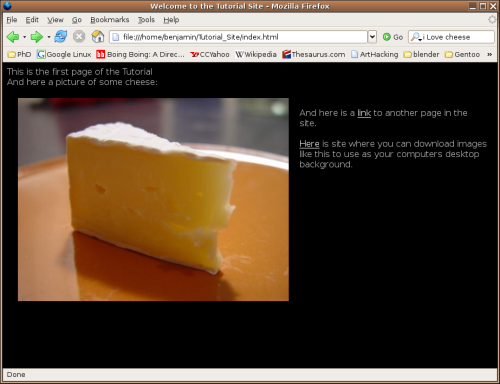
That's the basics of using styles to control the appearance of individual elements of a web page. It's fairly straightforward, but with a little planning, the use of style sheets can make your life even easier.
Cascading Style Sheets
Using in line styles is a quick way to get your web page to look the way that you want it to. However, once your site contains more than a few pages, if you want to uniformly change the appearance of your site, you will have to go back and change the style attributed to each element one by one. Not much fun.
There are a couple of ways around this problem in. Both involve centralizing all the style instructions in one location. Doing this makes changing styles easier. These central instruction sets are called Cascading Style Sheets, and if used properly, they will make designing web page much easier.
The first way to centralize this information is to put it all in the head of the document. This is done in the HTML code of the page. NvU does this for you, but it's a good idea to look at the HTML code to see what NvU is doing.
For this section of the tutorial, I am going to concentrate on the second page of the Tutorial_site.
When using this method of assigning styles to elements of a page, two things need to happen. First, you need to "name" all the elements of the page that you want to share a particular style. This name can be anything that you want. Just keep in mind that depending on the style you assign, the element can look totally different. Therefore, it's generally considered good practice to use a name that describes the elements function or content rather than what it is supposed to look like. NvU calls these names classes.
There are elements in every HTML document which are already named which you can also assign styles to. These are called tags and are best looked at in the HTML code itself.
Time to make some classes for the second page of the Tutorial_Site. This is done in the CSS editor of NvU, which is found by clicking on Tools > CSS Editor in the main menu bar.
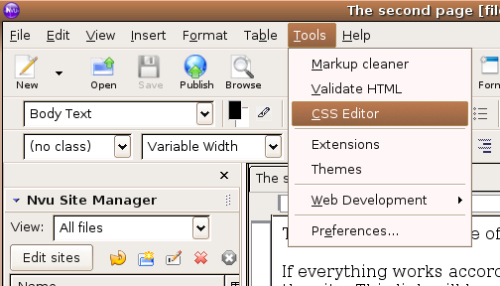
A pop-up window will appear. Click on the "Style elt." button. To the left, a dialogue will appear. Leave the Media list section blank, but it is a good idea to give the style sheet a name. In this example, I used My_style sheet (notice the underscore). After entering the title, click on the "Create Stylesheet button".
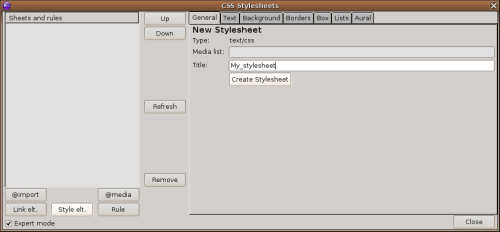
Now it's time to add some rules to the style sheet. There are two ways that you can do this. You can create your own classes, or you can use the tags which already exist in the HTML code. You can aslo mix and match these methods as you see fit. There is no right or wrong answer to this, and the best thing to do is experiment a bit. We'll start by making a class, later on, I'll show you the other option. Making a rule in NvU is just a matter of clicking on the rule button, naming the class that the rule will apply to and then making some choices about how things will look. It might seem complicated at first, but it's really not that hard.
Go ahead and Click on the rule button. Under the General Tab, you'll see a section called "New Style Sheet" with three options. Select the first option, named style and give the style a name. It's a good idea to name the style something which describes the class' content rather than what it will look like. For now, just give the class a simple name, "important_text".
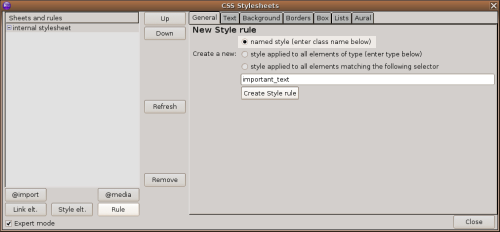
You will now see the named rule appear under the internal style sheet in the left panel of the CSS Stylesheet window. All that's left to do is tell NvU what we want all the elements assigned to this class to look like. There are a great deal of options here, many more than can be covered in this tutorial. I'll cover just the basics here. All the options are located in the tabs at the top of the CSS Editor window. Since this style is called important_text, it would make sense to start with the "Text" tag. Select the tag by clicking it. You'll be presented with a large number of possible ways to modify your text.
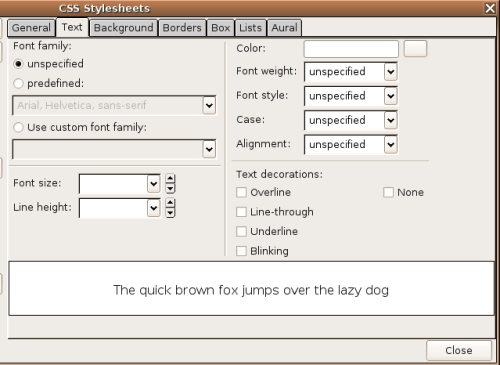
Most of this is similar to what you would see in a word processing or page layout application, but there are a few differences that you need to be aware of. The final display of any HTML web page is the result of a negotiation between the HTML and CSS code of the web page and the browser displaying the page. Generally speaking, in order for a certain font to be displayed, it needs to be available to the browser. If the font is not there, then the text will be displayed using the browsers default setting. (Which might be something that would make your page look terrible.) To get around this, web designers use font families instead naming specific fonts.
Nvu has three of the most common font families included, which is what we will use here. Font sizes also are a little different in web design. Because webpages are seen on a computer monitor, the basic measurement unit is the pixel. However, in the case of CSS there are also tons of other options (this is because you can use CSS to do formatting for more than just web pages.) There are other issues with using absolute units of measure in web design. This also has to do with the fact that the browser the web pages is being viewed in has the last word as to how the page will be displayed. You can set a font to be exactly 23 pixels, but if the rest of the page is being rendered with 50 pixel fonts as the default, all the text assigned the important_text class is going to look not so important in comparison. This is a common problem, and there is a simple solution, use relative measurements instead. This can be done with descriptors like "larger" or "smaller". In all cases, when you are using the CSS editior, any values that you don't provide (like the Font style in the example here) will simply use the browsers default when it is rendered. Go ahead and enter the values so that they match the image below.
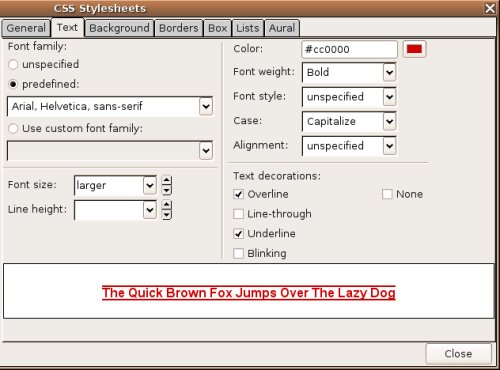
Then click on the "Close" button on the CSS editor.
Make sure that you have the second_page.html of the tutorial open in the main window. Below is all the text used in the example, if you don't feel like typing it all out, you can copy and paste it in:
This is the second page of the tutorial site.

If everything works according to plan there should be a link to this page from the front page of the site. This link will be relative, rather than absolute, as this is generally considered to be better practice and will save work later if the structure of the site needs to be changed.

This page has a style sheet embedded in the head of the document and the paragraphs and images below will each have a variety of classes and style rules assigned to them.

This paragraph is just a normal paragraph with no special class assigned to it. This should look like all the other text on the page.

This line has the tag <h1>

This one had the tag <h2>

and this one, <h3>

This is paragraph that is assigned the class "important_text". This means that we can assign this text a different font, or location or both to differentiate it from the rest of the text on this page.

This paragraph is assigned the class "quote". Any other parts of this page that are assigned the same class should look the same as this paragraph. I'll put a quote later in the page that will demonstrate this.

There are several other things that can be done with styles, but this should be enough to get you started, for more information, you should check out the links page of the tutorial.
Replace anything you might have on second_page.html with this text. (Don't forget to save the page.)
Select the paragraph that says that it is assigned the important_text class. Near the upper left corner of the main NvU window is a pull-down menu which says "(no class)". Click on it, an you should see important_text listed.
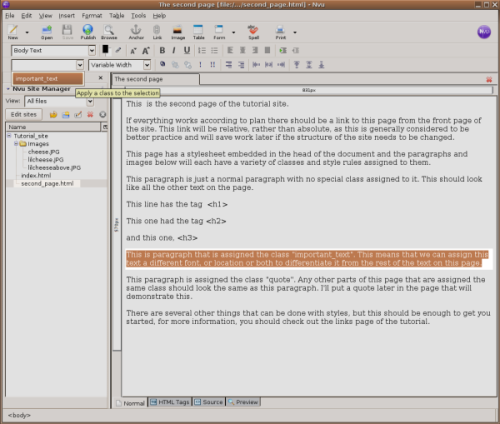
The text should now look something like this:
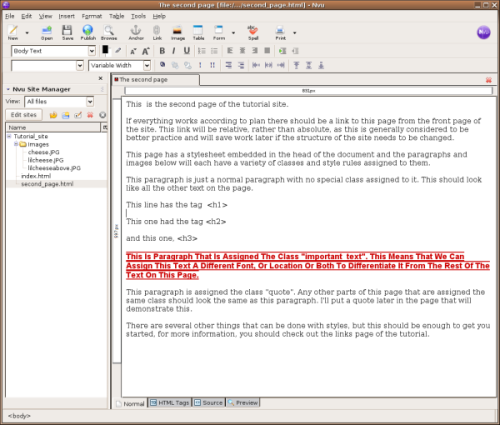
Now would be a good time to take a look at the HTML code just to see how all this looks. Click on the source tab at the bottom of the page. First, take a look at the top of the page. You should see something that looks like this:
<head>
    <meta content="text/html; charset=ISO-8859-1" http-equiv="content-type">

    <title>The second page</title>
    <style title="My_style sheet" type="text/css">
        .important_text { font-family: Arial,Helvetica,sans-serif;
            color: rgb(204, 0, 0);
            font-weight: bold;
            text-transform: capitalize;
            text-decoration: underline overline;
            font-size: larger;
        }     </style>
</head>
This is the Style sheet which is nested in the head of the document. Notice the bit with the .important_text, all the options you entered in the CSS editing dialogue is contained in inside the curly brackets. When we add another class, it will have its own set of attributes inside its own set of curly brackets. When we move on to using an external style sheet, we'll come back to this part of the code.
Now take a look a little further down the page, around line 39. You should the following:
<span class="important_text">This is paragraph that is assigned the class "important_text". This means that we can assign this text a different font, or location or both to differentiate it from the rest of the text on this page.</span>
This is the code that tells the browser what bit of text should use the important_text class. Notice the bits with <> symbols around them. These are called "tags" every part of HTML belongs to a tag, and any tag can be assigned a style rule. In the example above example, NvU used a special set of tags called 'span', which is just HTML speak for "between these two points". This is used when NvU needs to identify a specific section of code to assign a style to. You don't need to assign a class to use style rules. You can assign these rules to any tag. Using tags to assign styles means that any code that falls in between those tags will be affected by the style rule automatically. In particular, the heading tags are pretty useful in this respect, so that what this example uses. Just keep in mind that you can use this technique for pretty much any tag you would like.
OK, you can stop looking at all that code now. Click on the "Normal" tag at the bottom of the page.
Let's make a couple of styles for headings.
First, we need to assign some text with heading tags. Select this line:
This line has the tag <h1>
We're going to assign this the the <h1> tag. Near the upper left corner of the NvU window is a pull-down menu that currently has " Body Text" in it. Click on it and change it to "Heading 1". You'll notice the font becomes larger and the line spacing changes.
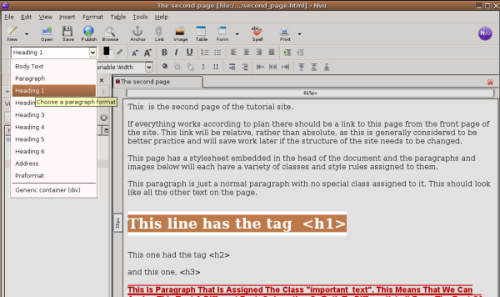
Even though we have not established a style rule for the heading yet, the appearance of the text changed. This happened because NvU is using the settings used by most web browsers, and most web browsers have a setting for rendering headings. In a little bit, we'll get things to look how we want. Before we do, go ahead and assign the two lines with their corresponding tags. When you are done, it should look something like this:
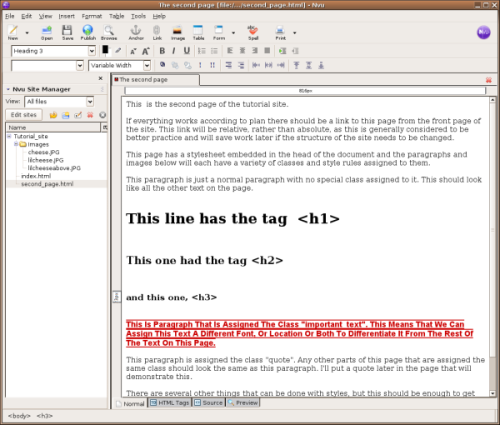
Just to make sure that we have the names of the tags correct, let's take another look at the HTML code, as it doesn't lie. Click on the Source tab at the bottom of the window, and look for something like this:
!!!! FIX !!! <h1>This line has the tag <h1></h1> <br> <h2>This one had the tag <h2></h2> <br> <h3>and this one, <h3></h3>
Don't worry about all the weird "<" stuff. All we need to do is make sure that the tags are indeed <h1>, <h2>, and <h3> respectively. Good. Time to assign some rules to these tags. Click on the Normal tab at the bottom of the window, and we'll get to business. Open the CSS editor by clicking on Tools > CSS Editor. Make sure that internal style sheet is selected to the left.

Follow the same steps as before. Click on the Rule button to bring up the New Style Rule dialogue. Instead of selecting the "named style" option, as you did before, select "style applied to all elements matching the following selector". Enter h1 into the entry field and click on the Create New Style button. You can now assign all the style attributes that you would like to apply to any part of the page that falls within <h1> tags, (heading 1 in the pull down menus). Notice that you should enter h1 and not <h1> in the entry field.
Go ahead and click on the tabs running along the top of the CSS window. You will be presented with a number of style options in each category that you can assign to each style. The best way to see what all these do is just to try them out and see what happens. In this example, I used to following settings.


Which results in text that looks like this:
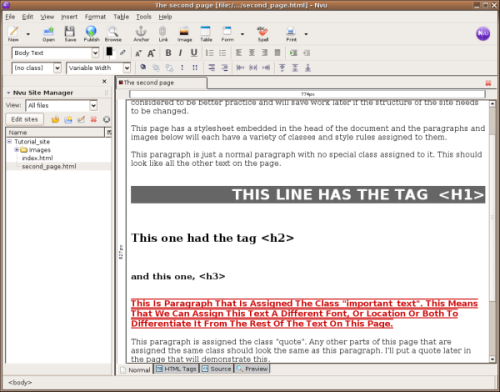
Go ahead and assign the other two headings with your own style rules and see if you can get close to the image below.
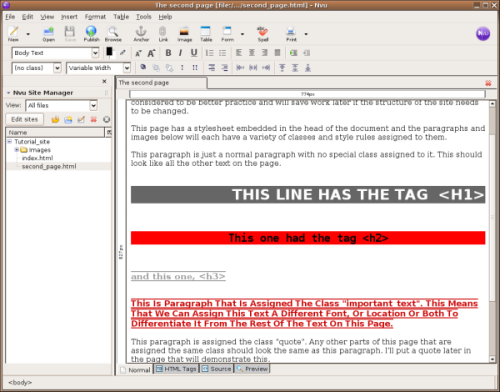
If you get stuck, the image below might give you a hint.
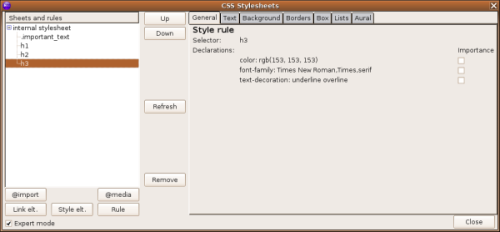
There is one important detail to note in the above image. The window "Sheets and rules" lists all the style sheets and rules associated with this page. You'll notice that all the rules assigned to the heading elements do not begin with a dot, but the important_text entry does. That little dot indicates that the rule is to be applied to a named class (The first example on this page). The absence of the dot is saying that rule is applied to elements which are contained in HTML tags. If you are having trouble getting the results you think you should, this would be a good place to look for answers.
Just to drive home the difference between these two ways to assign style rules to a page, let's make a class and a rule for text which is a quote. I won't describe all the steps in detail again. Instead just follow the images below in order if you need a little reminder.
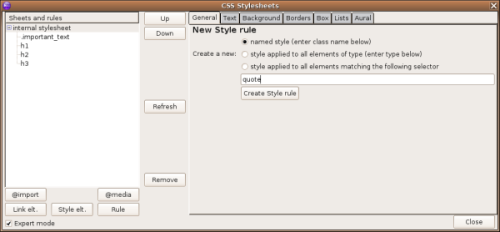
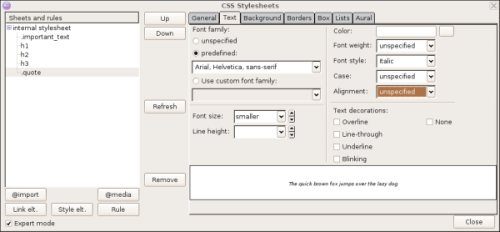
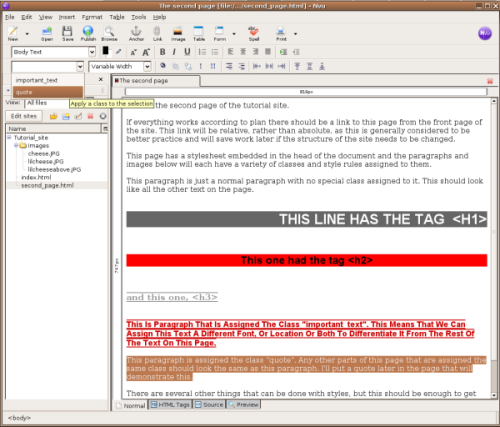
In the end, it should look like this:
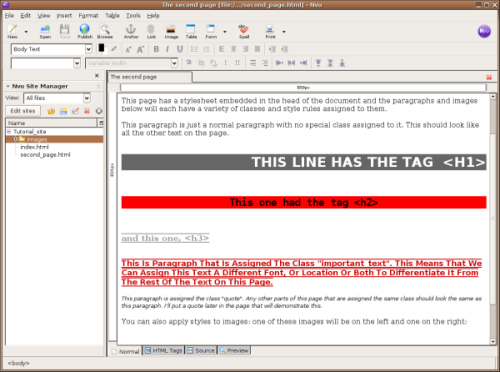
You can also apply styles to images as well as text. While styles are not typically used to change the appearance of images, they are effective at controlling the layout of the images. While you can do this image by image as you did earlier in the tutorial, if your site contains a number of images that you want to layout similarly, Styles are a great time saver.
First, you need to add some images to the page. To do this, follow the steps you used earlier in the tutorial. In this case the images are going to be displayed with text wrapping around them, either to the left, or to the right, with an area of padding around them. This means the images need to be a little smaller. I'd suggest you use images with pixel dimensions of about 320 x 240. There are two images you can use already in the image directory of the Tutorial_site.
To better demonstrate how this wrapping works, you need more text to see the effect. Below is copy of the paragraph that you can copy and paste into the page.
This is a longer paragraph that is only here to show how text can be wrapped around an image using style sheets. Other than this, there is no reason for this text to be here at all (much like the rest of this page). If you are still reading this, I strongly suggest that you stop. You are doing nothing but wasting your time. Still, you continue. If nothing else, you should be admired for your commitment in reading every last detail of this page. If you are really interested in reading something, the actual NvU tutorial might be a little more helpful. Just a few more lines of text are all that will be needed to effectively show how different settings in the CSS editor used in NvU can affect the positioning of images. In actuality, you can assign the same layout parameters to any "box" element, including text. If you want to see this in action, just give this text a named style and see what happens as you select different settings in the box tab of the CSS editor. This information is also in the actual tutorial, so there was really no need to for you to read it here.
Inserting the text above at least twice should be enough. Next, insert the images so page looks like this:
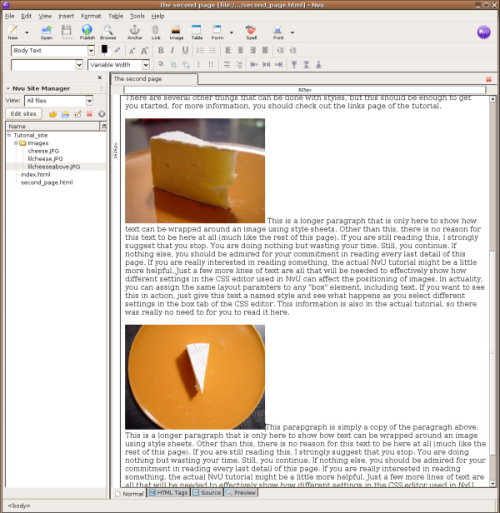
To get these images to behave how we want them to, two classes are needed; one for images which will be displayed on the left, one for the right. This is done the same way as making any other class in the CSS editor. Start with naming a class for images that should be positioned to the left of the page, with text "wrapping" around it.
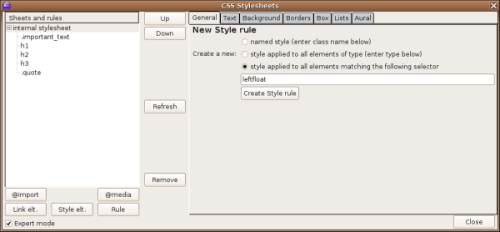

In the image above, you see the the box tab being used. Boxes are how CSS describes the separation of each element on the page. Generally, all items named with a style are contained in it's own box. The box tab allows you to manipulate how boxes are displayed, and how they relate to each other. Boxes are powerful and complex layout tools, but they can be used effectively for simple layout as well. For now the important thing is to understand what the different parts of boxes do in CSS. Take a look at the Diagram below:
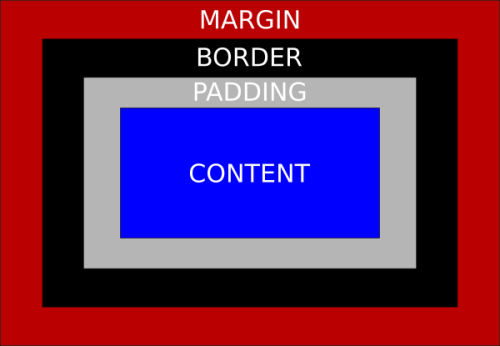
This describes how the different elements of a box are arranged. CSS allows you to control each of the elements separately; top, bottom. left and right. In the example above, I have set the box to have a 10 pixel space of padding and a 10 pixel space of margin around the image. I did this because if I later decide that I want a border around the image, there will still be a 10 pixel margin surrounding the border (no other element will touch the border). Also notice that I set the "Float" option to "left". This will put the image on the left side of the page and allow other elements to wrap around it.
Now do create another named class, called rightfloat. Use the same settings, except set the float option in the Box tag to right.

Now all that is left to do is assign the class to each image. Click on the image once. You will see a bounding box with small white squares appear. With the image selected, select leftfloat from the list of named classed in the upper right area of the NvU window.
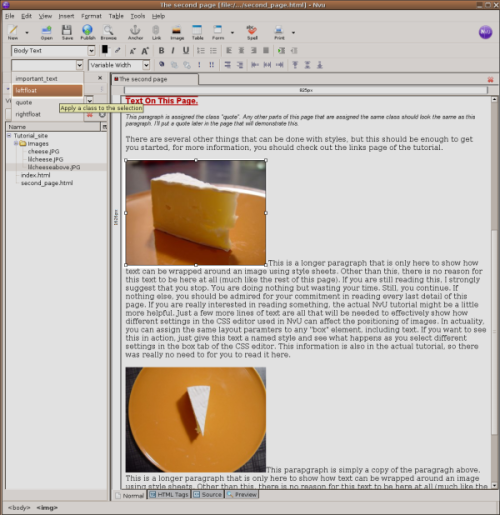
This is the result.
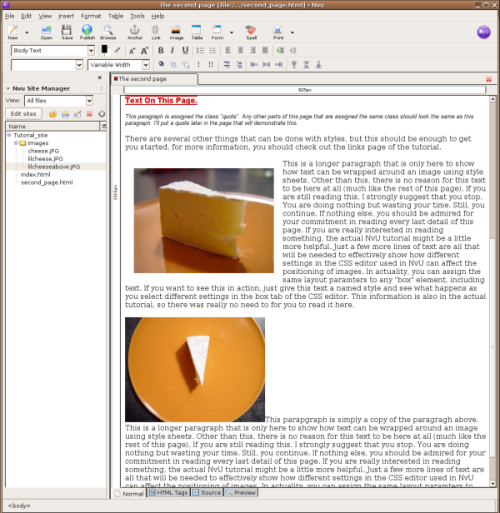
Apply the rightfloat text to the next image using the same method. If done correctly, you should see something like this:
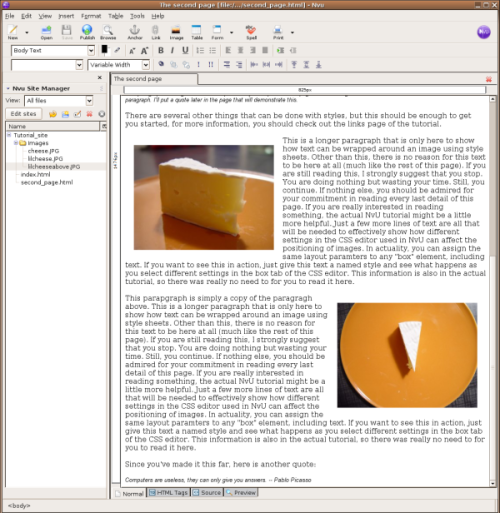
That is the basics of using an embedded style sheet to layout a web page. While more efficient than setting the style of each element individually, it's still a bit of work if you want to apply the same style sheet to more than one page. To do this you would either have to re-enter all the settings for each page using the CSS editor, or copy and paste the style sheet code manually into the HTML code of each page. There is a better way. It is possible to separate the style sheet into it's own document and link to it in any page that you want that style applied to. This method has a number of advantages. The biggest one is that you only need to set up a style sheet once, regardless of how many pages are on your site. Also, if you decide that you want to change any of the style elements, all you need to do is make the changes in one central document, and they will be automatically applied to any page that uses that style. Setting this up is straightforward, however the current version of NvU has a bug that needs to be addressed when using stylesheets in this manner.
Using External Stylesheets
Creating an external style sheet in NvU is straightforward enough. Open the CSS editor window, and select "internal style sheet". Next click on the button "Export style sheet and switch to exported version"
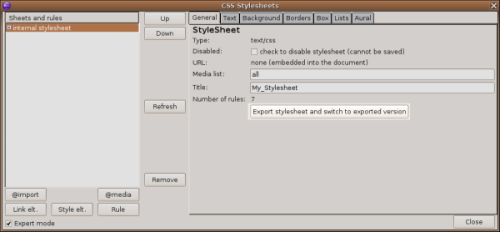
A dialogue box will appear, prompting you to save your external style sheet. You can name it anything you like, provided you follow a couple of rules. The file must end with the suffix .css. Also, spaces are not a good idea for names of files that will be served on the web. If you want have a space in the name, use an underscore ( _ ) For this example, I named the file My_style sheet.css. When saving your file, make sure that it is in the same directory as the rest of your site.
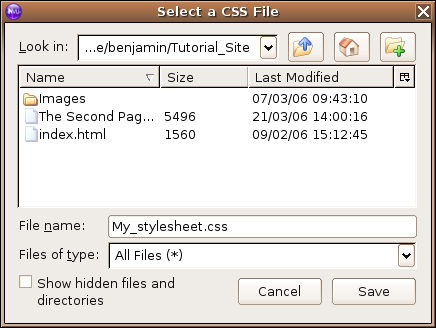
You will see in the "sheets and rules" window of the css editor the entry for your style sheet has changed from "internal style sheet" to something a little longer starting with file:///.

I mentioned before that there is a bug in NvU that causes problems when using external style sheets. Fortunately, it's easy to correct by changing a single line of the HTML code of the page. At this point, it might be a good idea to review the section of the tutorial dealing with the difference between absolute and relative links.
Click on the "Source" tag at the bottom of the NvU window.
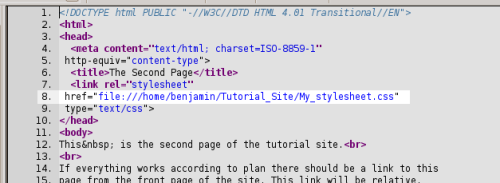
All you need to do is locate the line that contains the link to your external style sheet (highlighted above). When you create an external style sheet with NvU, it always creates an absolute link to the CSS file on your computers hard drive. This will not cause any problems as long as you are loading your site directly from your computer. However, when you upload your site to a web server, the absolute link will not function properly. You need to change the link to a relative one.

To do this, simply delete everything up to and including the / in front of the file's name. That's it; you can click on the "Normal" tag. Now would be a good time to save the page. You will have to do this each time you link to an external style sheet in NvU.
To show how much time you can save using an external style sheet, we'll add a third page to the Tutorial_site, and change it's layout with just a couple of clicks of the mouse (and changing that one line of HTML code).
Click on the "New" button in the upper left corner of the NvU window. A new blank tab will appear. This is a good time to add the link to the style sheet to the page. Open the CSS editor by clicking on Tools > CSS editor. This time instead of clicking on the "Style elt." button, click on the "Link elt." button.
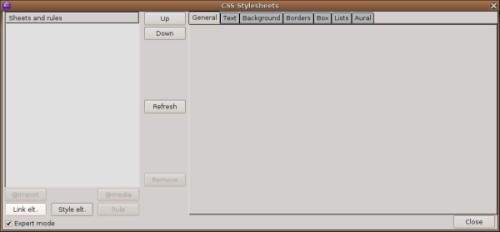
Click the "Choose File" button.

A dialogue box will appear asking you to select the CSS file you would like to link to. Select the My_style sheet.css file.

Next, click on the "Create style sheet" button. (You can ignore the warning about saving the page before linking the file, you will save the file after you do the HTML code fix.)

Now, close the the CSS editor window, and click on the "Source" tab at the bottom of the NvU window. Repeat the same steps as when you changed the link to the style sheet from absolute to relative. When you are done, the code should look something like this:

After applying the fix. Save the page. Make sure it is saved in the same directory as rest of the site.
All that is left to do now is add some content to the page. Below, I've provided some latin that you can use as sample text.
Here is some Latin (this line is h1)

Vestibulum ante ipsum primis in faucibus orci luctus et ultrices posuere cubilia Curae; Aliquam ultricies lacus eu dui. Duis viverra risus et eros. Aenean odio dolor, tristique quis, commodo id, posuere sit amet, dui. Pellentesque velit. Aliquam erat volutpat. Duis sagittis nibh sed justo. Sed ultrices nisl sed pede. Sed tempor lorem in leo. Integer gravida tincidunt nunc. Vivamus ut quam vel ligula tristique condimentum. Proin facilisis. Aliquam sagittis lacinia mi. Donec sagittis luctus dui. Maecenas quam ante, vestibulum auctor, blandit in, iaculis in, velit. Aliquam at ligula. Nam a tellus. Aliquam eu nulla at turpis vulputate hendrerit. Proin at diam. Curabitur euismod.

And a little more latin (h2)

Lorem ipsum dolor sit amet, consectetuer adipiscing elit. Pellentesque habitant morbi tristique senectus et netus et malesuada fames ac turpis egestas. Quisque vel erat eget diam consectetuer iaculis. Cras ante velit, suscipit et, porta tempus, dignissim quis, magna. Vivamus viverra, turpis nec rhoncus ultricies, diam turpis eleifend nisl, a eleifend ante felis ac sapien. Integer bibendum. Suspendisse in mi non neque bibendum convallis. Suspendisse potenti. Sed sit amet purus at felis adipiscing aliquam. Vivamus et nisl sit amet mauris aliquet molestie. Integer tortor massa, aliquam a, lacinia nonummy, sagittis nec, eros. Nunc non mauris id eros venenatis adipiscing. Cras et lectus ut nisl pharetra ornare. Proin leo risus, elementum eget, ultrices vitae, molestie sed, erat. Curabitur et lectus in tellus egestas hendrerit. Sed dapibus ipsum. Quisque sit amet ligula. Suspendisse odio dolor, semper id, feugiat quis, sodales id, mauris. Curabitur id ligula ac libero malesuada pharetra.

And still more latin... (h3)

Suspendisse potenti. Cras ut mi sit amet quam consequat consequat. Aenean ut lectus. Cum sociis natoque penatibus et magnis dis parturient montes, nascetur ridiculus mus. Suspendisse vel sapien. Nullam non turpis. Pellentesque elementum pharetra ligula. In rhoncus. Aliquam vel enim consequat sem aliquet hendrerit. Lorem ipsum dolor sit amet, consectetuer adipiscing elit. Nam felis.

Cum sociis natoque penatibus et magnis dis parturient montes, nascetur ridiculus mus. Maecenas tortor metus, pellentesque nec, vehicula vitae, suscipit sed, quam. Aenean scelerisque sodales tortor. Sed purus. Curabitur turpis est, bibendum tristique, porttitor tempor, pulvinar vitae, tortor. Nullam malesuada dapibus orci. Vivamus aliquet tempus velit. Curabitur interdum posuere risus. Duis egestas, ipsum sit amet molestie tincidunt, ligula libero pretium risus, non faucibus tellus felis mattis sapien. Ut eu velit at massa auctor mattis. Nam tristique velit quis nisl. Vivamus neque velit, ornare vitae, tempor vel, ultrices et, wisi. Cras pede. Phasellus nunc turpis, cursus non, rhoncus vitae, sollicitudin vel, velit. Vivamus suscipit lorem sed felis. Vestibulum vestibulum ultrices turpis. Lorem ipsum dolor sit amet, consectetuer adipiscing elit. Praesent ornare nulla nec justo. Sed nec risus ac risus fermentum vestibulum. Etiam viverra viverra sem. Etiam molestie mi quis metus hendrerit tristique.
In the example below, I've also added an image.
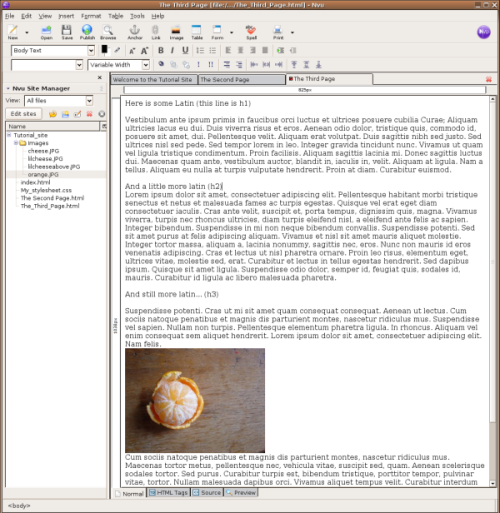
Now apply some classes to different elements of the text using the pull down menu in the right of the NvU window. All the classes from your style sheet should be there. If they are not there, you may have to refresh the page by closing and opening it, just don't forget to save it first. As an excersise, see if you can match the image below.
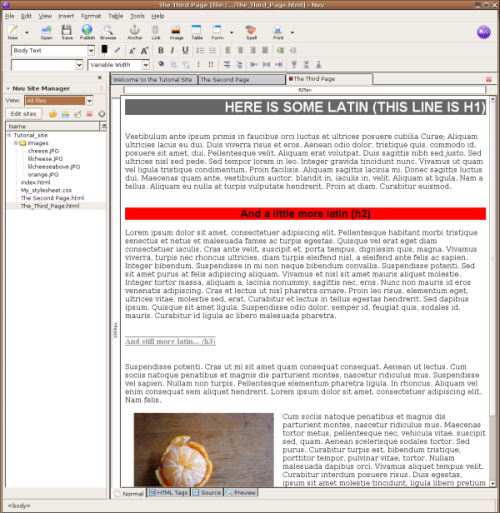
As you can see, the look of the two pages which link to the style sheet are the same. Unfortunately, this look is a little ugly. Because these pages use a single style sheet, any change that you make to that the style sheet will affect both pages.
To see this in action open the CSS editor dialogue one more time. You are going to add one more style rule that will help you determine how the default text and background will look on both pages. In an HTML document, all the content displayed is contained between the tags <body> and </body>. If you apply a style rule to that selector, any settings contained in that rule become the default for the page. All the other rules you made can be considered "exceptions" to this default rule. So, inside the CSS editor:
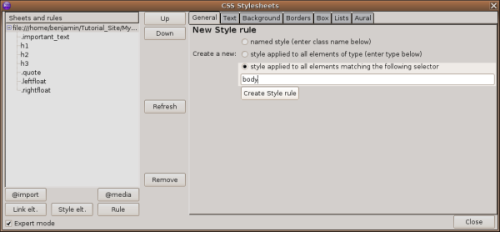
And give it the following attributes under the "Text" and "Background" tabs:
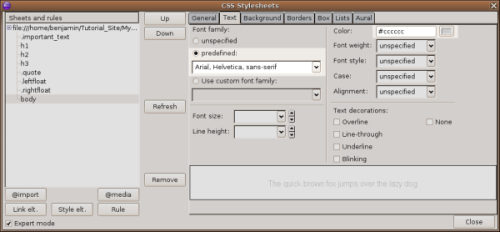
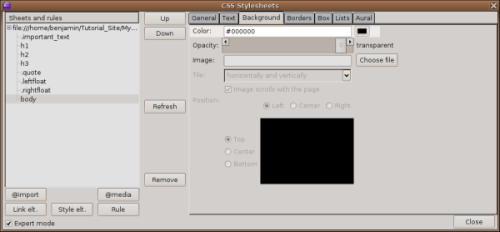
Make sure you save the page after you have made the changes. You might need to refresh the view to see the effect the changes have on the pages. In the end the pages should look something like this:

The second page:

You now have all the basic skills needed to create and style a website using NvU. This tutorial is only an introduction however. There is much much more that you can do with NvU, HTML and Cascading Style Sheets. To move on from here, take a look at some of the resources on the links page.
License
All chapters copyright of the authors (see below). Unless otherwise stated all chapters in this manual licensed with GNU General Public License version 2
This documentation is free documentation; you can redistribute it and/or modify it under the terms of the GNU General Public License as published by the Free Software Foundation; either version 2 of the License, or (at your option) any later version.
This documentation is distributed in the hope that it will be useful, but WITHOUT ANY WARRANTY; without even the implied warranty of MERCHANTABILITY or FITNESS FOR A PARTICULAR PURPOSE. See the GNU General Public License for more details.
You should have received a copy of the GNU General Public License along with this documentation; if not, write to the Free Software Foundation, Inc., 51 Franklin Street, Fifth Floor, Boston, MA 02110-1301, USA.
Authors
This manual originally forged at Your Machines :
http://www.yourmachines.org/ . Check out Your Machines for other very interesting and well written manuals! Many thanks for to Simon Yuill for porting the manual from Your Machines and agreeing to re-licensing it under the GPL.
ADDING TEXT & IMAGES
© Ben Dembroski 2007
Modifications:
adam hyde 2007, 2008
Andrew Lowenthal 2008
Thomas Middleton 2008
CASCADING STYLE SHEETS
© Ben Dembroski 2007
Modifications:
adam hyde 2007, 2008
Andrew Lowenthal 2008
Thomas Middleton 2008
CREATING LINKS
© Ben Dembroski 2007
Modifications:
adam hyde 2007, 2008
Thomas Middleton 2008
CREDITS
© adam hyde 2006, 2007, 2008
INTRODUCTION
© Ben Dembroski 2006, 2007
Modifications:
adam hyde 2007, 2008
Andrew Lowenthal 2008
Fred Clausen 2008
Gustav Delius 2009
Thomas Middleton 2008
INTRODUCTION TO STYLES
© Ben Dembroski 2007
Modifications:
adam hyde 2007, 2008
Andrew Lowenthal 2008
Thomas Middleton 2008
WEBSITE ANATOMY
© Ben Dembroski 2007
Modifications:
adam hyde 2007, 2008
Andrew Lowenthal 2008
Rene Snel 2008
Thomas Middleton 2008
EXTERNAL STYLE SHEETS
© Ben Dembroski 2007
Modifications:
adam hyde 2007, 2008
Andrew Lowenthal 2008
Thomas Middleton 2008
USING INLINE STYLES
© Ben Dembroski 2007
Modifications:
adam hyde 2007, 2008
Andrew Lowenthal 2008
Thomas Middleton 2008

Free manuals for free software
General Public License
Version 2, June 1991
Copyright (C) 1989, 1991 Free Software Foundation, Inc.
51 Franklin Street, Fifth Floor, Boston, MA 02110-1301, USA
Everyone is permitted to copy and distribute verbatim copies
of this license document, but changing it is not allowed.
Preamble
The licenses for most software are designed to take away your freedom to share and change it. By contrast, the GNU General Public License is intended to guarantee your freedom to share and change free software--to make sure the software is free for all its users. This General Public License applies to most of the Free Software Foundation's software and to any other program whose authors commit to using it. (Some other Free Software Foundation software is covered by the GNU Lesser General Public License instead.) You can apply it to your programs, too.
When we speak of free software, we are referring to freedom, not price. Our General Public Licenses are designed to make sure that you have the freedom to distribute copies of free software (and charge for this service if you wish), that you receive source code or can get it if you want it, that you can change the software or use pieces of it in new free programs; and that you know you can do these things.
To protect your rights, we need to make restrictions that forbid anyone to deny you these rights or to ask you to surrender the rights. These restrictions translate to certain responsibilities for you if you distribute copies of the software, or if you modify it.
For example, if you distribute copies of such a program, whether gratis or for a fee, you must give the recipients all the rights that you have. You must make sure that they, too, receive or can get the source code. And you must show them these terms so they know their rights.
We protect your rights with two steps: (1) copyright the software, and (2) offer you this license which gives you legal permission to copy, distribute and/or modify the software.
Also, for each author's protection and ours, we want to make certain that everyone understands that there is no warranty for this free software. If the software is modified by someone else and passed on, we want its recipients to know that what they have is not the original, so that any problems introduced by others will not reflect on the original authors' reputations.
Finally, any free program is threatened constantly by software patents. We wish to avoid the danger that redistributors of a free program will individually obtain patent licenses, in effect making the program proprietary. To prevent this, we have made it clear that any patent must be licensed for everyone's free use or not licensed at all.
The precise terms and conditions for copying, distribution and modification follow.
TERMS AND CONDITIONS FOR COPYING, DISTRIBUTION AND MODIFICATION
0. This License applies to any program or other work which contains a notice placed by the copyright holder saying it may be distributed under the terms of this General Public License. The "Program", below, refers to any such program or work, and a "work based on the Program" means either the Program or any derivative work under copyright law: that is to say, a work containing the Program or a portion of it, either verbatim or with modifications and/or translated into another language. (Hereinafter, translation is included without limitation in the term "modification".) Each licensee is addressed as "you".
Activities other than copying, distribution and modification are not covered by this License; they are outside its scope. The act of running the Program is not restricted, and the output from the Program is covered only if its contents constitute a work based on the Program (independent of having been made by running the Program). Whether that is true depends on what the Program does.
1. You may copy and distribute verbatim copies of the Program's source code as you receive it, in any medium, provided that you conspicuously and appropriately publish on each copy an appropriate copyright notice and disclaimer of warranty; keep intact all the notices that refer to this License and to the absence of any warranty; and give any other recipients of the Program a copy of this License along with the Program.
You may charge a fee for the physical act of transferring a copy, and you may at your option offer warranty protection in exchange for a fee.
2. You may modify your copy or copies of the Program or any portion of it, thus forming a work based on the Program, and copy and distribute such modifications or work under the terms of Section 1 above, provided that you also meet all of these conditions:
- a) You must cause the modified files to carry prominent notices stating that you changed the files and the date of any change.
- b) You must cause any work that you distribute or publish, that in whole or in part contains or is derived from the Program or any part thereof, to be licensed as a whole at no charge to all third parties under the terms of this License.
- c) If the modified program normally reads commands interactively when run, you must cause it, when started running for such interactive use in the most ordinary way, to print or display an announcement including an appropriate copyright notice and a notice that there is no warranty (or else, saying that you provide a warranty) and that users may redistribute the program under these conditions, and telling the user how to view a copy of this License. (Exception: if the Program itself is interactive but does not normally print such an announcement, your work based on the Program is not required to print an announcement.)
These requirements apply to the modified work as a whole. If identifiable sections of that work are not derived from the Program, and can be reasonably considered independent and separate works in themselves, then this License, and its terms, do not apply to those sections when you distribute them as separate works. But when you distribute the same sections as part of a whole which is a work based on the Program, the distribution of the whole must be on the terms of this License, whose permissions for other licensees extend to the entire whole, and thus to each and every part regardless of who wrote it.
Thus, it is not the intent of this section to claim rights or contest your rights to work written entirely by you; rather, the intent is to exercise the right to control the distribution of derivative or collective works based on the Program.
In addition, mere aggregation of another work not based on the Program with the Program (or with a work based on the Program) on a volume of a storage or distribution medium does not bring the other work under the scope of this License.
3. You may copy and distribute the Program (or a work based on it, under Section 2) in object code or executable form under the terms of Sections 1 and 2 above provided that you also do one of the following:
- a) Accompany it with the complete corresponding machine-readable source code, which must be distributed under the terms of Sections 1 and 2 above on a medium customarily used for software interchange; or,
- b) Accompany it with a written offer, valid for at least three years, to give any third party, for a charge no more than your cost of physically performing source distribution, a complete machine-readable copy of the corresponding source code, to be distributed under the terms of Sections 1 and 2 above on a medium customarily used for software interchange; or,
- c) Accompany it with the information you received as to the offer to distribute corresponding source code. (This alternative is allowed only for noncommercial distribution and only if you received the program in object code or executable form with such an offer, in accord with Subsection b above.)
The source code for a work means the preferred form of the work for making modifications to it. For an executable work, complete source code means all the source code for all modules it contains, plus any associated interface definition files, plus the scripts used to control compilation and installation of the executable. However, as a special exception, the source code distributed need not include anything that is normally distributed (in either source or binary form) with the major components (compiler, kernel, and so on) of the operating system on which the executable runs, unless that component itself accompanies the executable.
If distribution of executable or object code is made by offering access to copy from a designated place, then offering equivalent access to copy the source code from the same place counts as distribution of the source code, even though third parties are not compelled to copy the source along with the object code.
4. You may not copy, modify, sublicense, or distribute the Program except as expressly provided under this License. Any attempt otherwise to copy, modify, sublicense or distribute the Program is void, and will automatically terminate your rights under this License. However, parties who have received copies, or rights, from you under this License will not have their licenses terminated so long as such parties remain in full compliance.
5. You are not required to accept this License, since you have not signed it. However, nothing else grants you permission to modify or distribute the Program or its derivative works. These actions are prohibited by law if you do not accept this License. Therefore, by modifying or distributing the Program (or any work based on the Program), you indicate your acceptance of this License to do so, and all its terms and conditions for copying, distributing or modifying the Program or works based on it.
6. Each time you redistribute the Program (or any work based on the Program), the recipient automatically receives a license from the original licensor to copy, distribute or modify the Program subject to these terms and conditions. You may not impose any further restrictions on the recipients' exercise of the rights granted herein. You are not responsible for enforcing compliance by third parties to this License.
7. If, as a consequence of a court judgment or allegation of patent infringement or for any other reason (not limited to patent issues), conditions are imposed on you (whether by court order, agreement or otherwise) that contradict the conditions of this License, they do not excuse you from the conditions of this License. If you cannot distribute so as to satisfy simultaneously your obligations under this License and any other pertinent obligations, then as a consequence you may not distribute the Program at all. For example, if a patent license would not permit royalty-free redistribution of the Program by all those who receive copies directly or indirectly through you, then the only way you could satisfy both it and this License would be to refrain entirely from distribution of the Program.
If any portion of this section is held invalid or unenforceable under any particular circumstance, the balance of the section is intended to apply and the section as a whole is intended to apply in other circumstances.
It is not the purpose of this section to induce you to infringe any patents or other property right claims or to contest validity of any such claims; this section has the sole purpose of protecting the integrity of the free software distribution system, which is implemented by public license practices. Many people have made generous contributions to the wide range of software distributed through that system in reliance on consistent application of that system; it is up to the author/donor to decide if he or she is willing to distribute software through any other system and a licensee cannot impose that choice.
This section is intended to make thoroughly clear what is believed to be a consequence of the rest of this License.
8. If the distribution and/or use of the Program is restricted in certain countries either by patents or by copyrighted interfaces, the original copyright holder who places the Program under this License may add an explicit geographical distribution limitation excluding those countries, so that distribution is permitted only in or among countries not thus excluded. In such case, this License incorporates the limitation as if written in the body of this License.
9. The Free Software Foundation may publish revised and/or new versions of the General Public License from time to time. Such new versions will be similar in spirit to the present version, but may differ in detail to address new problems or concerns.
Each version is given a distinguishing version number. If the Program specifies a version number of this License which applies to it and "any later version", you have the option of following the terms and conditions either of that version or of any later version published by the Free Software Foundation. If the Program does not specify a version number of this License, you may choose any version ever published by the Free Software Foundation.
10. If you wish to incorporate parts of the Program into other free programs whose distribution conditions are different, write to the author to ask for permission. For software which is copyrighted by the Free Software Foundation, write to the Free Software Foundation; we sometimes make exceptions for this. Our decision will be guided by the two goals of preserving the free status of all derivatives of our free software and of promoting the sharing and reuse of software generally.
NO WARRANTY
11. BECAUSE THE PROGRAM IS LICENSED FREE OF CHARGE, THERE IS NO WARRANTY FOR THE PROGRAM, TO THE EXTENT PERMITTED BY APPLICABLE LAW. EXCEPT WHEN OTHERWISE STATED IN WRITING THE COPYRIGHT HOLDERS AND/OR OTHER PARTIES PROVIDE THE PROGRAM "AS IS" WITHOUT WARRANTY OF ANY KIND, EITHER EXPRESSED OR IMPLIED, INCLUDING, BUT NOT LIMITED TO, THE IMPLIED WARRANTIES OF MERCHANTABILITY AND FITNESS FOR A PARTICULAR PURPOSE. THE ENTIRE RISK AS TO THE QUALITY AND PERFORMANCE OF THE PROGRAM IS WITH YOU. SHOULD THE PROGRAM PROVE DEFECTIVE, YOU ASSUME THE COST OF ALL NECESSARY SERVICING, REPAIR OR CORRECTION.
12. IN NO EVENT UNLESS REQUIRED BY APPLICABLE LAW OR AGREED TO IN WRITING WILL ANY COPYRIGHT HOLDER, OR ANY OTHER PARTY WHO MAY MODIFY AND/OR REDISTRIBUTE THE PROGRAM AS PERMITTED ABOVE, BE LIABLE TO YOU FOR DAMAGES, INCLUDING ANY GENERAL, SPECIAL, INCIDENTAL OR CONSEQUENTIAL DAMAGES ARISING OUT OF THE USE OR INABILITY TO USE THE PROGRAM (INCLUDING BUT NOT LIMITED TO LOSS OF DATA OR DATA BEING RENDERED INACCURATE OR LOSSES SUSTAINED BY YOU OR THIRD PARTIES OR A FAILURE OF THE PROGRAM TO OPERATE WITH ANY OTHER PROGRAMS), EVEN IF SUCH HOLDER OR OTHER PARTY HAS BEEN ADVISED OF THE POSSIBILITY OF SUCH DAMAGES.
END OF TERMS AND CONDITIONS


