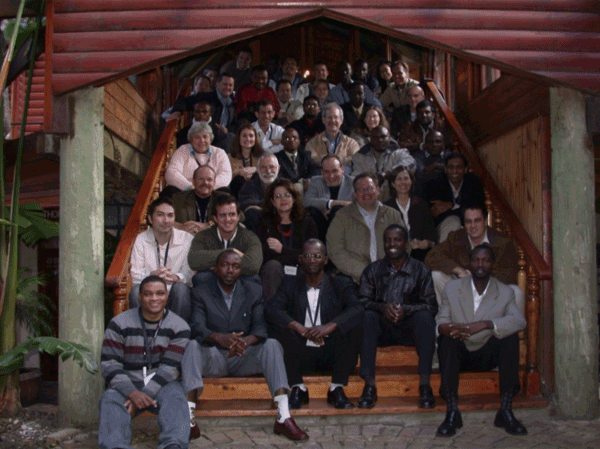
A Brief History

One of OpenMRS's birthplaces--Moi University Teaching and Referral Hospital, Eldoret, Kenya (2004)
Throughout the 1990s, an academic partnership flourished between Indiana University School of Medicine in the United States and Moi University in Eldoret, Kenya, providing Kenyan medical students with access to health care training. This program continued to grow for several years until a severe outbreak of HIV/AIDS in Western Kenya caused the program to rethink its goals, at which point the Academic Model for Prevention and Treatment of HIV/AIDS (AMPATH) was created. The number of patients in Kenya continued to grow, and basic IT systems including Microsoft Access were used to monitor patient care.
In February 2004, the amount of data had become too large for AMPATH's existing systems, so their medical director invited Burke Mamlin, from the Regenstrief Institute in Indianapolis, United States, to visit the site and evaluate how improvements in medical informatics technology could improve AMPATH's data management. Regenstrief had long been recognized as a leader in medical informatics research, and Burke brought his colleague Paul Biondich along with him on the visit to Kenya. It quickly became apparent that a new system was needed. Paul and Burke began to design the data model for a new medical record system for AMPATH, which would go on to become OpenMRS.
At the same time, a Boston-based non-profit named Partners In Health (PIH) was pioneering the use of web-based EMRs in developing countries. They had built the PIH-EMR, which they were using to support the treatment of multi-drug resistent tuberculosis in Peru, and HIV in Haiti. But Hamish Fraser, PIH's director of the EMR project, was worried: PIH was about to expand into Rwanda, Lesotho, and Malawi, and he feared it would be difficult to maintain their home-built system in 5 countries.
In September 2004, Paul and Burke met Hamish at the World Congress on Medical and Health Informatics (MedInfo) conference in San Francisco. It became apparent that the three shared similar goals and needs, so they agreed to work collaboratively to develop a system that would be suitable for the various needs of humanitarian work in African nations and beyond.
Paul and Burke hired developer Ben Wolfe to begin work on programming an early prototype of OpenMRS, based on their previous work at AMPATH and Regenstrief. Several months later, PIH's lead developer Darius Jazayeri joined the project, merging PIH-EMR's functionality into the new system. The previous systems at AMPATH focused on data entry, while at PIH, the focus was more on clinical workflow. The new system combined features of both the AMPATH and PIH systems.
Because of the strong cooperation between PIH and Regenstrief and the long distances involved, it became clear that an open source software model of development was the best way to sustain and grow the platform, and the OpenMRS project was born.
While the collaboration between Regenstrief and PIH continued and the new system was being designed, the groups were looking for additional support in Africa. They turned to their colleague Chris Seebregts, from the South African Medical Research Council (MRC). Chris was already heavily involved in the field of medical informatics throughout sub-Saharan Africa, and brought with him a wealth of knowledge about the needs of informatics implementations. Seebregts had been adapting OpenMRS for use in South Africa and started to build up a community of implementers of the software around the world. His work led to massive growth of the OpenMRS community (now nearly 2,000 strong as of late 2011). In February 2006, AMPATH launched OpenMRS in Kenya, and PIH brought it to Rwinkwavu, Rwanda, in August of the same year. The South African MRC first switched on the system at Richmond Hospital in KwaZulu-Natal at the end of 2006.
As both the OpenMRS application and open source community grew, they gathered the attention of many other large projects and agencies. Some of these have extended both financial and consulting support over the past several years, including:
- The United States Center for Disease Control (CDC)
- Canada's International Development Research Centre (IDRC)
- National Institutes of Health Fogarty International Centre
- The Millennium Villages Project of the Earth Institute, Columbia University
- The Rockefeller Foundation
- World Health Organization
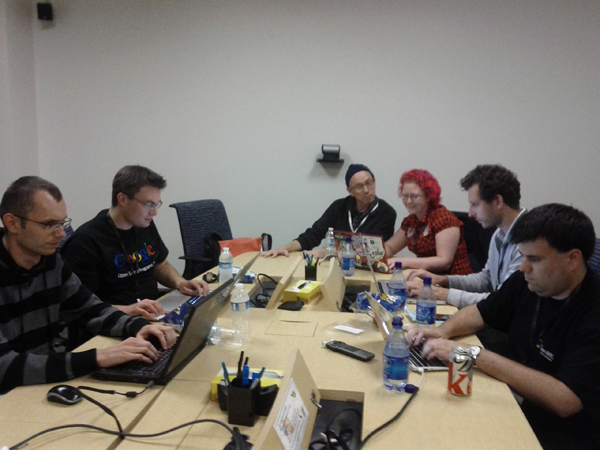
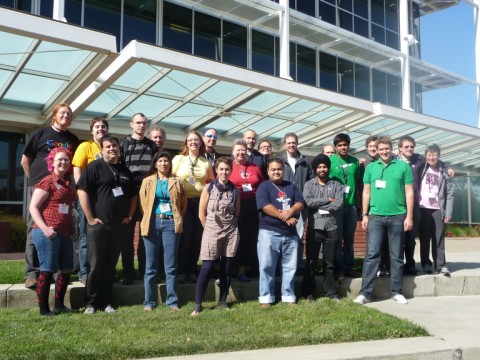
In an effort to broaden participation in the project around the world, OpenMRS began participating in the Google Summer of Code (GSoC) program in 2007. GSoC provides university students who wish to participate in open source development projects with a stipend and a close mentoring relationship with an experienced project team member. Participation in the program has continued since then--OpenMRS is now one of the larger open source projects in the program, boasting a large class of alumni, a number of whom continue to contribute to the project. Many of these alumni come from the developing world, and some have gone on to successful software development careers.
Any early gathering of OpenMRS implementers and developers in Cape Town, South Africa.
One of the aims of the OpenMRS community is to help build local capacity in the places where it is used. To that end, participants in the community are encouraged to develop programs and processes that encourage entrepreneurship and the creation of partnerships to grow the field of medical informatics, particularly in the developing world. For example, in Kigali, Rwanda, Partners In Health jump-started a local training program known as E-Health Software Development and Implementation (EHSDI). This 9-month course conducted in partnership with the Rwanda Development Board and the Kigali Institute of Science and Technology (KIST) was designed to teach students to develop medical information systems. It includes extensive training in using the OpenMRS platform.
The number of individual and organizational volunteers who participate in the OpenMRS community has continued to grow, tripling in size between 2010 and 2011. These individuals participate in various ways, from documentation and bug reports, from training and providing support to other community members. The release of OpenMRS 1.8 was made possible by the assistance of over 50 contributors.
Further, collaborations with other open source software organizations such as Open Data Kit and Pentaho have produced volunteer contributions to OpenMRS, and commercial consulting organizations such as ThoughtWorks Inc. have contributed many hours to developing and improving OpenMRS.
At the close of 2011, the OpenMRS community is preparing to launch an independent not-for-profit organization to help support the project's needs as it grows. The goal of this organization will be to provide technical infrastructure and community management, to assist collaboration and cooperation of project volunteers throughout the world, and to provide training and support to those who seek to implement OpenMRS as a key part of a medical informatics strategy in clinics, hospitals, and government health organizations.
From its humble beginnings as a solution to a problem in a small African town, OpenMRS has become the largest open source health care project on the planet. Between 2006 and 2011, OpenMRS at AMPATH in Kenya has recorded over 111,000,000 points of data for over 180,000 patients, helping to save many thousands of lives. Every day, similar stories are retold somewhere else around the world with the assistance of thousands of volunteers. The OpenMRS community continues to grow, and we are excited that you're interesting in joining us. Regardless of your background or interests, there is a way for you to both contribute and gain from the work of others in the OpenMRS community.
About this Book
This first edition of this book was created in October 2011 during the first Google Summer of Code Documentation Sprint. We are indebted to the Google Open Source Programs Office, the FLOSS Manuals foundation, and Aspiration for organizing this week-long event where four open source projects (OpenMRS, Sahana Eden, OpenStreetMap, and KDE) joined forces to share knowledge and create manuals for their user communities.
The authors for the first version were Rafal Korytkowski (Poland), Glen McCallum (Canada), Nóirín Plunkett (Ireland), Darius Jazayeri (United States), and Michael Downey (United States).
We received proofreading, structural advice, and editing assistance from Paul Biondich (United States), Hamish Fraser (United States), Allen Gunn (United States), Daniel Kayiwa (Uganda), Burke Mamlin (United States), Saptarshi Purkayastha (India), Janet Riley (United States), and Ben Wolfe (Kenya).
Photographs in this book are courtesy of James Arbaugh, Michael J. Downey, Frank Fries, Mathew Ssemakadde, and Stephanie Taylor. The original book cover was designed by Laleh Torabi.
We would also like to thank the countless people who have contributed to OpenMRS documentation over the past seven years, and the writing team of "CivicCRM: A Comprehensive Guide", all of which served as inspiration and the basis for much of this book. The OpenMRS community thanks everyone who participated in making this book a reality. Thank you!
Appendix A: Glossary
administrative staff: Individuals who manage people or data in a clinical setting.
allergy list: A series of allergies from which a patient has or is suffering.
bug: A repeatable problem in OpenMRS.
bug report: A report created describing a repeatable problem to software developers.
bundled module: An OpenMRS module that is included with a downloaded OpenMRS installation.
check digit: An extra digit that is added to the end of an identifier, and depends on the rest of identifier.
clinician: A doctor, nurse, or other clinical officer who provides health care to patients.
cohort: A group of patients that can be defined by one or more common traits.
concept: The idea that encompasses any question which can be asked about a patient, an observable point of data.
concept class: A category of OpenMRS Concepts with associated traits.
concept datatype: A descriptor of the type of data which a given OpenMRS Concept describes (e.g., numeric, text, etc.).
concept dictionary: A list of all the medical and program-related terms used in OpenMRS as questions and answers.
customization: The idea of adapting a system to suit one's specific, particular needs.
data: A small piece of knowledge that can be reduced to a single value.
demographics: Information about a person, typically including items like date of birth, location, name, etc.
drug: A specific formulation of a medication represented in OpenMRS.
electronic medical record: A computer system that allows for recording, storage, and retrieval of information related to the delivery of health care to patients.
encounter: (1) An instance of direct provider/practitioner to patient interaction, regardless of the setting, between a patient and a practitioner vested with primary responsibility for diagnosing, evaluating or treating the patient's condition, or both, or providing social worker services. (2) A contact between a patient and a practitioner who has primary responsibility for assessing and treating the patient at a given contact, exercising independent judgment. http://www.astm.org/Standards/E1384.htm
error: A message in a computer system that describe a problem currently or recently occurring.
flag: A visual indicator of certain criteria on a patient chart.
form: An electronic form that may be used for entering or viewing data.
Groovy: A computer scripting language that allows automation and quick performance of tasks.
implementation plan: A written document which details specific goals and tasks in installing, customizing, and using OpenMRS.
implementation team: A defined group of people working together to deploy OpenMRS in a specific project.
implementer: Someone who has or is in process of deploying OpenMRS in a specific location or context of use.
informatics: The study of information technology applied to a specific domain.
internationalization: The adaptation an information system or pieces of information to be used in multiple locations.
IRC: Short for Internet Relay Chat, an online tool to communicate with others in "real time". OpenMRS uses IRC to allow developers and implementers to collaborate and meet. http://go.openmrs.org/irc
local area network: A method of connecting multiple computers for communication over distances.
location: A physical place where a patient may receive healthcare services.
longitudinal: Having a goal of observing or trending over time.
mailing list: A collection of names and addresses used by a company to send material to multiple recipients. On the internet, mailing lists include each person's e-mail address rather than a postal address. http://www.entrepreneur.com/encyclopedia/term/82424.html
medical informatics: A discipline of studying the use of information technology to the field of medical science.
metadata: A piece of information that describes other information.
module: A software package that extends OpenMRS functionality in specific ways. Often developed by others in the OpenMRS community.
module repository: An online resource to find and maintain community-developed OpenMRS add-on modules. http://modules.openmrs.org/
observation: One atomic piece of information that is recorded about a person at a moment in time.
open source: A method of developing software where the source code is freely available for others to examine, use, and build upon. Also a type of software development community based around sharing of work and collaboration.
order: An action that a provider requests be taken regarding a patient.
patient: A person receiving health care services.
patient dashboard: A visual representation of a patient within OpenMRS, including his or her demographics and other important information.
patient identifier: Any unique number that can identify a patient. Examples are a Medical Record Number, a National ID, a Social Security Number, a driver's license number, etc.
person: Every individual who is referred to in any patient's record in OpenMRS must be stored in the system.
person attribute: store additional pieces of information about the people in your system in addition to those that are natively supported by OpenMRS.
pilot project: Actively planned as a test or trial.
platform: A computer system that is simple by design, intended to be customized and adapted for use in a wide variety of contexts.
privilege: Defines what actions a user is allowed to take within OpenMRS.
problem list: A list of a patient's problems that serves as an index to his or her record. Each problem, the date when it was first noted, the treatment, and the desired outcome are added to the list as each becomes known. Thus the list provides an ongoing guide for reviewing the health status and planning the care of the patient. http://medical-dictionary.thefreedictionary.com/master+problem+list
profile: An OpenMRS user's basic information, including name, user ID, and password.
program: A planned series of administrative or research events.
program enrollment: Represents the fact that a patient is enrolled in one of these Programs over a time period at a Location.
provider: A health care professional, or group of health care professionals who provide a service to patients.
purge: To permanently delete data from the OpenMRS database.
relationship: A description of how two persons in OpenMRS are connected, e.g., mother and child.
retire: To make metadata unusable in the future while retaining it in OpenMRS for past reference.
role: Represents a group of privileges in OpenMRS.
sample data: Fictional, anonymized information representing patient care within OpenMRS. Some versions of the software include this artificial data to make it easier to plan an OpenMRS implementation.
SMART goals: Objectives for a project that are specific, measurable, attainable, realistic and timely.
software developer: A person who is able to program customizations or additional functionality in OpenMRS.
state: A condition or situation; status.
super user: An OpenMRS user with permission to perform all management tasks in the application.
system administrator: A person who is responsible for day-to-day maintenance of a computer system or network.
uninterruptible power supply: A battery-based system that provides instant short-term power to a computer or other devices during a power outage.
unretire: To re-designate metadata as usable.
unvoid: Make data visible in OpenMRS that had previous been voided.
user: A person who uses OpenMRS, or more specifically the data in the system representing that person.
void: To mark data as deleted from a user perspective - but retain it in the OpenMRS database.
wiki: A web site containing documentation and other resources for a project or organization.
workflow: A series of tasks to accomplish a goal.
Appendix B: Example HTML Form Source
<htmlform>
<!-- Autogenerated example form (template from 01-Nov-2010 -->
<macros>
paperFormId = (Fill this in)
headerColor =#009d8e
fontOnHeaderColor = white
</macros>
<style>
.section {
border: 1px solid $headerColor;
padding: 2px;
text-align: left;
margin-bottom: 1em;
}
.sectionHeader {
background-color: $headerColor;
color: $fontOnHeaderColor;
display: block;
padding: 2px;
font-weight: bold;
}
table.baseline-aligned td {
vertical-align: baseline;
}
</style>
<span style="float:right">Paper Form ID: $paperFormId</span>
<h2>Amani Antenatal History (v1.0)</h2>
<section headerLabel="1. Encounter Details">
<table class="baseline-aligned">
<tr>
<td>Date:</td>
<td>
<encounterDate default="today"/>
</td>
</tr>
<tr>
<td>Location:</td>
<td>
<encounterLocation/>
</td>
</tr>
<tr>
<td>Provider:</td>
<td>
<encounterProvider/>
</td>
</tr>
<tr>
<td>Patient Name:</td>
<td>
<lookup class="value" expression="patient.personName"/>
</td>
</tr>
</table>
</section>
<section headerLabel="2. Antenatal History">
<table border="1" cellspacing="0" class="baseline-aligned">
<tr>
<td>
<table border="1" cellspacing="0">
<tr>
<td>
<table>
<tr>
<td>
<b>Reason For Visit:</b>
</td>
<td>
<obs conceptId="1433" style="radio" answerConceptIds="1435,1434,5622" answerLabels="Planning Pregnancy<br \/ >, Currently Pregnant<br \/ >, Other"/>
</td>
</tr>
</table>
</td>
</tr>
<tr>
<td>
<table>
<tr>
<td>
<b>Antenatal Visits #:</b>
</td>
<td>
<obs conceptId="1425"/>
</td>
</tr>
</table>
</td>
</tr>
<tr>
<td>
<table>
<tr>
<td>
<b>If Pregnant, was
<br />pregnancy intended?</b>
</td>
<td>
<obs conceptId="1426" style="radio" answerConceptIds="1065,1066,1067" answerLabels="Yes<br \/ >, No<br \/ >, Unknown"/>
</td>
</tr>
</table>
</td>
</tr>
<tr>
<td>
<table>
<tr>
<td>
<b>Last Menstrual Period:</b>
</td>
<td>
<obs conceptId="1427"/>
</td>
</tr>
</table>
</td>
</tr>
<tr>
<td>
<table>
<tr>
<td>
<b>Date of Delivery:</b>
</td>
<td>
<obs conceptId="1596"/>
</td>
</tr>
</table>
</td>
</tr>
<tr>
<td>
<table>
<tr>
<td>
<b>Blood Type:</b>
</td>
<td>
<obs conceptId="1426" style="radio" answerConceptIds="152674, 152675, 152676, 152677, 152678,152679, 152680,152681" answerLabels="A+, A-<br \/ >, B+, B-<br \/ >, 0+, 0-<br \/ >,AB+, AB-<br \/ >"/>
</td>
</tr>
</table>
</td>
</tr>
</table>
</td>
<td>
<table border="1" cellspacing="0">
<tr>
<td>
<table>
<tr>
<td>
<b>High-Risk Sex:</b>
</td>
<td>
<obs conceptId="1355" style="yes_no"/>
</td>
</tr>
</table>
</td>
</tr>
<tr>
<td>
<table>
<tr>
<td>
<b>HIV Test:</b>
</td>
<td>
<obs conceptId="1356" style="yes_no" dateLabel="<br \/ >Date:"/>
</td>
</tr>
</table>
</td>
</tr>
<tr>
<td>
<table>
<tr>
<td>
<b>Partner's HIV Status:</b>
</td>
<td>
<obs conceptId="1436" style="radio" answerConceptIds="664,703,1067" answerLabels="Negative<br \/ >, Positive<br \/ >, Unknown"/>
</td>
</tr>
</table>
</td>
</tr>
<tr>
<td>
<table>
<tr>
<td>
<b>STI Treatment:</b>
</td>
<td>
<obs conceptId="1428"/>
</td>
</tr>
</table>
</td>
</tr>
<tr>
<td>
<table>
<tr>
<td>
<b>RPR/VDRL:</b>
</td>
<td>
<obs conceptId="299" style="radio" answerConceptIds="1228, 1229" answerLabels="Reactive<br \/ >, NR"/>
</td>
</tr>
</table>
</td>
</tr>
<tr>
<td>
<table>
<tr>
<td>
<b>Last Tetnus:</b>
</td>
<td>
<obs conceptId="1428"/>
</td>
</tr>
</table>
</td>
</tr>
</table>
</td>
<td>
<table>
<tr>
<td>
<b>Recent Contraceptive Use:</b>
<br/>
<obs conceptId="1635" answerConceptId="1107" answerLabel="None" style="checkbox"/>
<br/>
<obs conceptId="1635" answerConceptId="780" answerLabel="Oral Contraception" style="checkbox"/>
<br/>
<obs conceptId="1635" answerConceptId="190" answerLabel="Condoms" style="checkbox"/>
<br/>
<obs conceptId="1635" answerConceptId="5277" answerLabel="Natural Planning / Rhythm" style="checkbox"/>
<br/>
<obs conceptId="1635" answerConceptId="5278" answerLabel="Diaphragm" style="checkbox"/>
<br/>
<obs conceptId="1635" answerConceptId="1378" answerLabel="Depo-Provera" style="checkbox"/>
<br/>
<obs conceptId="1635" answerConceptId="1359" answerLabel="Norplant" style="checkbox"/>
<br/>
<obs conceptId="1635" answerConceptId="1388" answerLabel="Surgery" style="checkbox"/>
<br/>
<obs conceptId="1635" answerConceptId="5622" answerLabel="Other" style="checkbox"/>
<br/>
</td>
</tr>
</table>
</td>
<td>
<table>
<tr>
<td>
<b>Previous Complications:</b>
<br/>
<obs conceptId="1430" answerConceptId="113859" answerLabel="Hypertension" style="checkbox"/>
<br/>
<obs conceptId="1430" answerConceptId="1431" answerLabel="Low Birth Weight Baby" style="checkbox"/>
<br/>
<obs conceptId="1430" answerConceptId="119481" answerLabel="Diabetes Mellitus" style="checkbox"/>
<br/>
<obs conceptId="1430" answerConceptId="48" answerLabel="Miscarriage" style="checkbox"/>
<br/>
<obs conceptId="1430" answerConceptId="1171" answerLabel="Cesarean Section" style="checkbox"/>
<br/>
<obs conceptId="1430" answerConceptId="228" answerLabel="Antepartum Hemorrhage" style="checkbox"/>
<br/>
<obs conceptId="1430" answerConceptId="230" answerLabel="Postpartum Hemorrhage" style="checkbox"/>
<br/>
<obs conceptId="1430" answerConceptId="130" answerLabel="Puerperal Sepsis" style="checkbox"/>
<br/>
<obs conceptId="1430" answerConceptId="113602" answerLabel="Prolonged Labor" style="checkbox"/>
<br/>
<obs conceptId="1430" answerConceptId="127847" answerLabel="Recto-vaginal Fistula" style="checkbox"/>
<br/>
<obs conceptId="1430" answerConceptId="49" answerLabel="Vesico-vaginal Fistula" style="checkbox"/>
<br/>
<obs conceptId="1430" answerConceptId="5622" answerLabel="Other" style="checkbox"/>
<br/>
</td>
</tr>
</table>
</td>
</tr>
</table>
</section>
<submit/>
</htmlform>
Cohort Builder
The Cohort Builder is a tool in the Reporting Compatibility module (included with most OpenMRS installations) that lets you perform ad-hoc queries for patients with defined characteristics, and combines multiple queries into more complex ones.
A cohort query returns a list of patients matching the specified criteria. It is not possible to create lists of data elements other than patients. For example, you can use the cohort builder to search for all patients with any weight observation > 70, but it is not possible to create a list of all observations of weight > 70.
To use this tool, click Cohort Builder at the top of any page.
Cohort definitions, cohorts, and search history
Each Patient Search is added to your search history. This history is preserved until you choose to clear it or the web application is restarted. You may also save your search history to preserve it for future re-use.
You may save any search (simple or combined) as a "Cohort Definition" to make it easier to re-run that same search in the future. When you save a combined search, it includes copies of all its component searches.
You may also save the list of patients resulting from a query as a "Cohort". The list of members in a saved Cohort will never change. On the other hand, re-running a saved search may produce new results.
The initial screen of the cohort builder contains several sections:
- The top tabs allow you to run different kinds of queries.
- Each query you perform goes into the search history.
- The save, load, and clear buttons help keep your entire search organized.
- After running a query, cohort members are displayed here.
- Click this save button to save this cohort for future re-use.
- Click these save buttons to save a previous query as a cohort definition for future re-use.
- Use the link at the top of the cohort builder to load saved cohorts and cohort definitions.

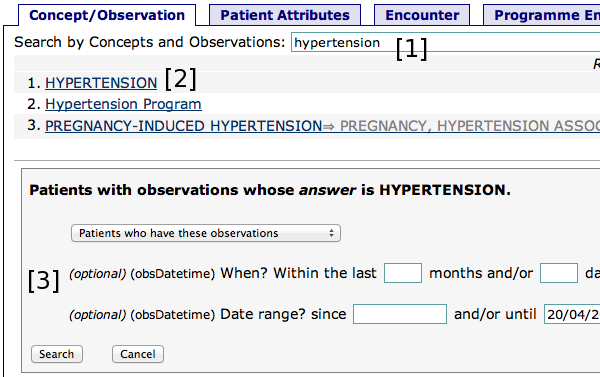
Searching by observation
To search for patients who have observations matching certain criteria, choose the Concept/Observation tab. Start typing the name of a concept that you want to search for [1], and choose that concept from the search results [2].
If you choose a concept whose datatype is anything other than N/A, you can search for observations whose question is the concept you selected [3]. Depending on the datatype, you can limit this to a numeric or date range, or to specific coded answers. You can also choose which observations you are looking for (first, last, min, max, any, none) or combine (average), and you can specify date ranges.
This example will build a cohort of patients whose last systolic blood pressure measurement was above 130 mmHg:

You can also search for any observations that have your chosen concept as an answer. (You'd typically use this for doing a highly selective search, which you'll later filter down to something more specific.)
In this example we search for patients who have any observation whose answer is Hypertension, which might include both confirmed diagnoses of hypertension as well as consults to rule out Hypertension:
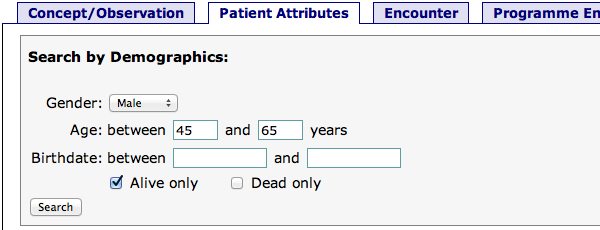
Searching by demographics
Select the Patient Attributes tab to search based on simple demographic characteristics: gender, age, birthdate, and vital status.
In this example, we search for living male patients between 45 and 65 years old:
Searching by encounters
Select the Encounters tab to search for patients based on encounters they have had. You can search by encounter type (control-click to select multiple types), location, the form with which the encounter was recorded, date ranges, and the number of matching encounters to look for.
In this example we search for patients who have had at least 3 encounters whose types were either ADULTINITIAL or ADULTRETURN:

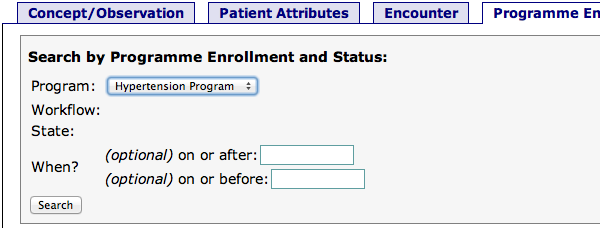
Searching by program enrollments
Select the Program Enrollment tab to search for patients enrolled in a particular program, or patients who have a particular status.
In this example, we search for patients who have ever been in the Hypertension Program:
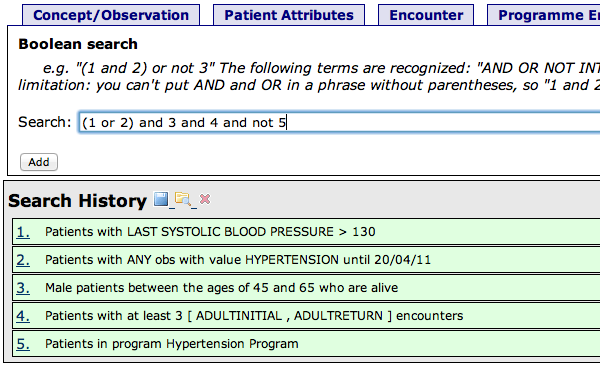
Combining searches
After you have done several searches, the Composition tab allows you to combine them using Boolean algebra. You can use AND, OR, NOT, or parentheses to build complex combinations of the other searches in your history. Refer to your previous searches using the number next to them in the Search History section.
Here, we search for patients who match a combination of the previous example queries:
Customizing OpenMRS with Plug-in Modules
OpenMRS has a modular architecture which allows special functionality to be easily added or removed from the system. Modules have full access to the system and can modify or enhance the behavior of the system. For example, the Sync module adds the ability for an OpenMRS server to synchronize its data with other OpenMRS servers; the HTML Form Entry module provides a way to create web-based forms for collecting data; and the Flowsheet module adds a new way for viewing information. Modules also provide a mechanism for adapting OpenMRS to local needs. For more information about published modules visit the OpenMRS Wiki:
http://go.openmrs.org/book-modules
Module Repository
You can view available modules in the OpenMRS Module Repository:
http://modules.openmrs.org/
It is a place where you can find published modules. Each module has a page with a description, a link for downloading, and a link to the module's documentation.
Some modules may be under development, but not yet published in the module repository. Many of these can be seen by browsing the "modules" section of the OpenMRS Subversion code repository
http://svn.openmrs.org/openmrs-modules/
Managing Modules
You can see available modules under Administration page, Manage Modules. The listing contains all the installed modules. You can see here their status (if they are started, stopped or failed to start) as well as uninstall them.

- Stop the module
- Start the module
- Uninstall the module
A module is distributed as a single file with the .omod extension. You can install it from the dedicated Manage Modules section on the Administration page.
You can either point to a local path to the .omod file or find and install a module directly from the Install from Module Repository section which connects to the module repository.
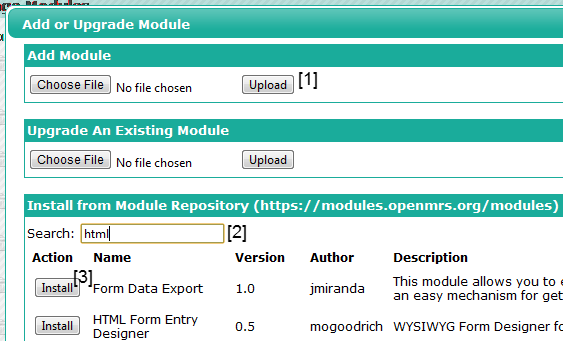
- Choose a file and click Upload
- Search for a module by name
- Install the chosen module
If uploads are not allowed from the web, you can copy the .omod file into the folder:
~/.OpenMRS/modules
(Where ~/.OpenMRS is assumed to be the Application Data directory which the running OpenMRS is currently using. You can find the precise location under Administration > Module Properties.) After moving the file to that location, restart OpenMRS. The module will be loaded and started.
Bundled modules
OpenMRS is delivered with some bundled modules which are included in a standard installation. The list may differ from version to version. OpenMRS 1.8 contains:
HTML Form Entry
Allows anyone with basic HTML programming skills and knowledge of the OpenMRS system to create forms which can be entered without any proprietary tools directly from a web browser. It is a preferred form entry module. HTML Forms allow a lot of control over the form's layout. http://go.openmrs.org/book-htmlform
XForms
Allows data entry to be done directly from any JavaScript enabled browser. The module converts an OpenMRS form to an XForm. XForms are well-suited to forms that will be filled out on mobile devices. http://go.openmrs.org/book-xforms
FormEntry
Allows a form's content to be designed in InfoPath, and then allows end users to fill out the form and submit it to OpenMRS. OpenMRS is moving away from the InfoPath format because InfoPath is proprietary and difficult to troubleshoot. http://go.openmrs.org/book-formentry
HTML Widgets
Provides a set of reusable HTML form field widgets in order encapsulate the common input requirements for OpenMRS. It is meant to be something that developers can utilize in their code. http://go.openmrs.org/book-widgets
Reporting
The Reporting module provides a feature-rich and user-friendly web interface for managing reports within OpenMRS. http://go.openmrs.org/book-reporting
Reporting Compatibility
Was written for the 1.5 and later releases of OpenMRS. It contains pages and features that were previously included into OpenMRS core code itself and are needed to run the Reporting module. http://go.openmrs.org/book-compat
Serialization XStream
Provides an implementation of serialization/deserialization strategy using the XStream library. http://go.openmrs.org/book-serial
Other popular modules
Clinical Summary
Allows you to create clinical summaries. http://go.openmrs.org/book-clinsum
Groovy
Was created as a proof of concept (for embedding Groovy into OpenMRS) and to serve as a base module for other modules that want to use Groovy scripting as well. http://go.openmrs.org/book-groovy
HTML Form Flowsheet
Allows you to generically model a paper flowsheet. Provides basic functionality for embedding small HTML Forms inside of larger HTML Forms, where each small HTML Form represents one row in a patient chart. Additionally, the module allows you to specify any number of tabs in a tab-based layout, each containing a distinct HTML Form. http://go.openmrs.org/book-hff
HTML Form Entry Designer
WYSIWYG Form Designer for the HTML Form Entry Module. http://go.openmrs.org/book-hfed
ID Generation
Provides a facility for managing identifier generation and allocation within an OpenMRS implementation. Introduces different identifier generation strategies including automatic and pooled. http://go.openmrs.org/book-idg
Metadata Sharing
Allows all kinds of metadata (concepts, HTML forms, locations, roles, programs, etc.) to be exchanged between different OpenMRS installations. http://go.openmrs.org/book-mds
Request Account
Allows users to request their own accounts, specifying their own preferred username and preferred password. An administrator can then approve or deny pending account requests. http://go.openmrs.org/book-reqacct
REST Webservices
The module exposes the OpenMRS API as REST web service. http://go.openmrs.org/book-rest
Role Based Homepage
Allows for administrators to define a custom "Home Page" for each defined Role within the system. These Home Pages may be simply pages that already exist, and which particular users would be best served to have as their default. For example, System Administrators may want the Administration page as their default home. Alternatively, administrators can "author" new pages within the running application for their users. http://go.openmrs.org/book-rbh
Synchronization
Fits in scenarios when you have multiple sites using OpenMRS with separate databases and you want them to copy data to each other that is keep them synchronized. http://go.openmrs.org/book-sync
Writing Your Own Module
This section covers basics of writing your own module. We encourage to contribute modules you write to the Module Repository. You can also use our code repository for your module. For more information how to gain access to both please visit this page
http://go.openmrs.org/book-svnrepo
In order to develop and test a module you will need to have OpenMRS installed in a version on which you want to run your module.
To create a new module it is best to use a dedicated Maven archetype. Before you start you will need to have maven installed. See the Maven web site at http://maven.apache.org/ for more instructions.
The next step is to update the settings.xml file to point Maven to the Maven Module Archetype. You can find the file in one of the following locations:
- Linux: ~/.m2
- Windows XP: C:\Documents and Settings\user_name\.m2
- Windows Vista/7: C:\Users\user_name\.m2
If it does not exist you need to create one. Add the following content:
<settings xmlns="http://maven.apache.org/SETTINGS/1.0.0"

  xmlns:xsi="http://www.w3.org/2001/XMLSchema-instance"
  xsi:schemaLocation="http://maven.apache.org/SETTINGS/1.0.0
                      http://maven.apache.org/xsd/settings-1.0.0.xsd">

  <pluginGroups>
    <pluginGroup>org.openmrs.maven.plugins</pluginGroup>
  </pluginGroups>
  <profiles>
    <profile>
      <id>OpenMRS</id>
      <activation>
        <activeByDefault>true</activeByDefault>
      </activation>
      <properties>
        <archetypeCatalog>http://mavenrepo.openmrs.org/nexus/service/local/repositories/releases/content/archetype-catalog.xml</archetypeCatalog>
      </properties>
      <repositories>
        <repository>
          <id>openmrs-repo</id>
          <name>OpenMRS Nexus Repository</name>
          <url>http://mavenrepo.openmrs.org/nexus/content/repositories/public</url>
        </repository>
      </repositories>
      <pluginRepositories>
        <pluginRepository>
          <id>openmrs-repo</id>
          <name>OpenMRS Nexus Repository</name>
          <url>http://mavenrepo.openmrs.org/nexus/content/repositories/public</url>
          <snapshots>
            <enabled>false</enabled>
          </snapshots>
        </pluginRepository>
      </pluginRepositories>
    </profile>
  </profiles>

</settings>
Maven is a command line tool so open a console and enter the folder where you want to have a project for your new module created. The command you need to run is:
mvn module-wizard:generate
Follow the steps of the wizard by answering the questions. In the end you should have a new Maven project generated. To build it you just need to enter the project folder and run:
mvn install
You will find the produced .omod file for your module in the directory omod/target.
Developing a module requires from you to be familiar with the Spring framework. Read the Spring web site at http://www.springsource.com/ for more details. There are also a few things specific to the OpenMRS platform which you will need to remember:
- The Spring web context file can be found at omod\src\main\resources\webModuleApplicationContext.xml.
- Modules are able to add and modify tables in the OpenMRS database. The files omod\src\main\resources\sqldiff.xml and omod\src\main\resources\liquibase.xml hold the SQL commands which can be executed as module is installed.
- Modules can extend OpenMRS core JSP pages via extension points. A module registers an extension in omod\src\main\resources\config.xml for each extension point in the system to which it wants to add content.
You should find extension points in the JSP pages you want to extend. Look for:
<openmrs:extensionPoint pointId="..."
It is best to learn by example, so you should look at some other modules in the OpenMRS code repository for code snippets to reuse in your own work. Consider examining the Webservices.rest module.
Data Entry
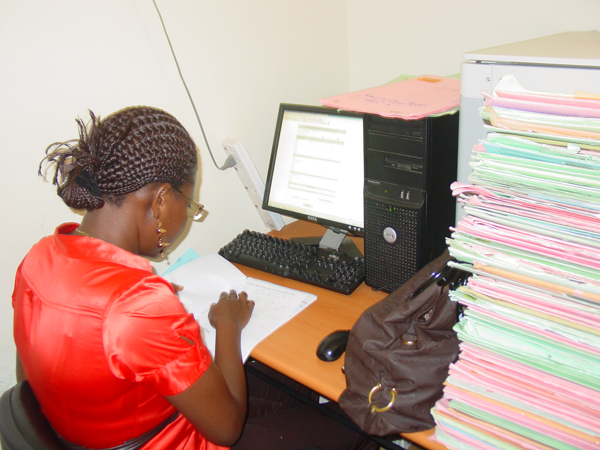
An OpenMRS data entry clerk in Masaka, Uganda.
An electronic medical records system has many advantages compared to a traditional paper-based system. Data is collected using electronic forms, and a standard template means that each user sees the same structure, simplifying the representation of the underlying information structure and complexity. Electronic forms also allow for basic data validation.
There are three technologies for entering form data in OpenMRS. They are compared below.
| Form Type |
Advantages |
Disadvantages |
| HTML Forms |
- Easy to use
- Ongoing development of new features
- Supports complex logic operations
- Extendable
- Allows review of forms after submission
|
- Requires HTML Knowledge
- Not supported on mobile devices
|
| XForms |
- Open source
- Easy to use
- Works well on mobile devices
|
- Does not support some complex logic operations
|
| InfoPath |
- Original approach to data entry via forms
- Others may already be familiar with the technology
|
- Not Open Source
- Runs only on Windows
- Requires payment of license fees
- No new development by the OpenMRS team
|
This chapter will discuss only the HTML Form entry method. This is the simplest and most straightforward approach to data entry. It is supported by the HTML Form Entry module which is included with the default distribution of OpenMRS.
Basic HTML form structure
Every HTML Form must have the following minimal elements:
<htmlform>
    <p>Date of encounter: <encounterDate  /> </p>
    <p>Health center: <encounterLocation /> </p>
    <p>Clinician's name: <encounterProvider role="Provider" /> </p>
...
    <p>Name of observation: <obs conceptId="x" /> </p>
    <p><submit /></p>
</htmlform>
Form header
It is easiest to leave these essential elements in a form header section that you re-use at the top of each form. The mandatory observation element is included below.

Case study: Amani Clinic
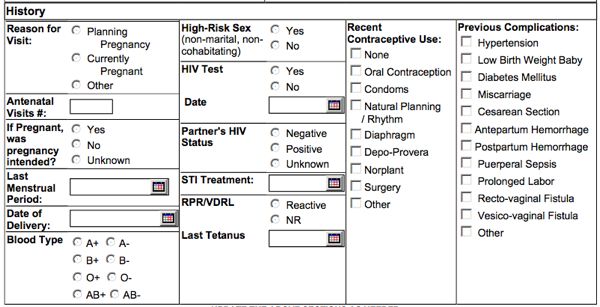
 The clinicians at the Amani Clinic needed a way to capture patient history as part of their maternal and child health (MCH) program. They had been in contact with the Millenium Villages Project (MVP) via the OpenMRS implementers mailing List. MVP staff shared their Antenatal Visit form. The implementation team decided to use the History section from the MVP form as a basis for their MCH History form.
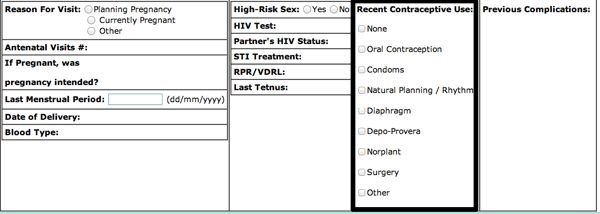
The MVP Antenatal History section looked like this:
Step 1: Identify and create concepts
Before you create a form, you must ensure that all reference Concepts are present in the Concept Dictionary. Because the MVP team already had a Concept Dictionary, the Amani Clinic were able to import the Concepts they needed. If you don't have access to an appropriate Concept Dictionary, you can also create new Concepts directly, following the steps outlined in the chapter "Managing Concepts and Metadata".
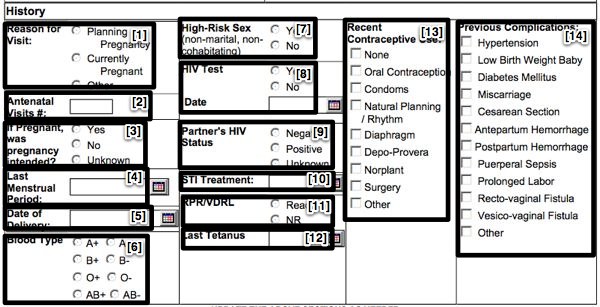
The MVP form included fourteen different Question Concepts, as well as Answer Concepts for [1], [3], [6], [9], [11], [13], and [14].
Step 2: Create the form
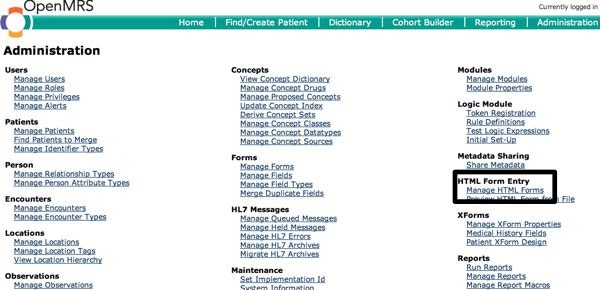
To create a form, click on the Manage HTML Forms link on the Administration page.
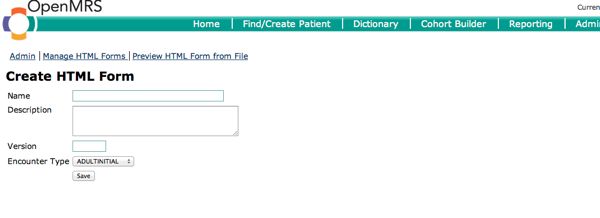
Click New Form.

Enter the basic form information and click Save.
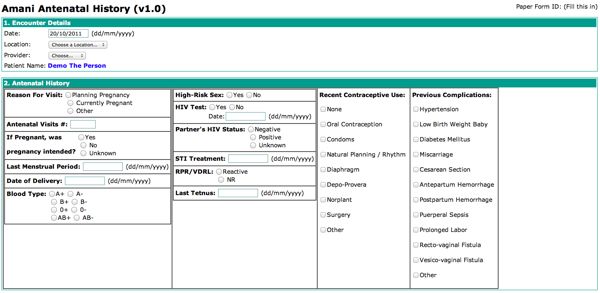
Step 3: Create visual form structure with HTML
HTML forms allow you to create a structure that closely resembles your paper forms, although it may not be precisely the same.
The degree to which your form resembles the paper form depends on your HTML layout skills--all HTML tags are supported. Table layout is beyond the scope of this book, but there are many resources available online.
This is the basic structure of the example HTML form, with a placeholder label inserted for each observation:

Step 4: Insert observation elements
Next, insert a form tag for each observation in your forms. These obs tags are not HTML tags, but are required by OpenMRS. The following sections provide examples of each Concept Datatype used on the example form. The HTML Form Entry module provides a wide variety of other tags. Please consult the HTML Form Reference on the wiki for full documentation along with other examples.
http://go.openmrs.org/book-htmlref
Note: The Concept Identifier numbers used in this example will not match the Concept Identifiers in your local OpenMRS instance.
Example 1: Date observation

To insert a Date Observation, include the Question Concept ID of any date-based Concept. The formatting label behind the Date Box cannot be removed.
<table>
    <tr>
        <td>
            <b>Last Menstrual Period:</b>
        </td>
        <td>
            <obs conceptId="1427"/>
        </td>
    </tr>
</table>
Example 2: Boolean observation

To insert a Boolean Observation, include the Question Concept ID of any boolean Concept. There are several different styles available for Boolean types.
...
<table>
    <tr>
        <td>
            <b>High-Risk Sex:</b>
        </td>
        <td>
            <obs conceptId="1355" style="yes_no"/>
        </td>
    </tr>
</table>
....
Example 3: Coded observation with radio buttons

This obs element is inserted with the radio button style. You must specify each Answer Concept ID even though they are already recorded in the system as Answers for the Question Concept. If you want to use a name other than the Concept Name for an Answer Concept, you must include the Answer Concept Label.
To render the radio buttons vertically, insert <br \/> at the end of each label for the previous button.
...
<table>
<tr>
<td>
<b>Reason For Visit:</b>
</td>
<td>
<obs conceptId="1433" style="radio" answerConceptIds="1435,1434,5622" answerLabels="Planning Pregnancy<br \/ >, Currently Pregnant<br \/ >, Other"/>
</td>
</tr>
</table>
...
Example 4: Coded observation with multi-select checkboxes
This obs element is inserted with the checkbox button style. You must specify each Answer Concept ID even though they are already recorded in the system as Answers for the Question Concept. If you want to use a name other than the Concept Name for an Answer Concept, you must include the Answer Concept Label.
Each checkbox selected actually represents an individual Observation; the Question Concept is common but each Answer Concept is unique.
...
<table>
    <tr>
        <td>
            <b>Recent Contraceptive Use:</b>
            <br/>
            <obs conceptId="1635" answerConceptId="1107" answerLabel="None" style="checkbox"/>
            <br/>
            <obs conceptId="1635" answerConceptId="780" answerLabel="Oral Contraception" style="checkbox"/>
            <br/>
            <obs conceptId="1635" answerConceptId="190" answerLabel="Condoms" style="checkbox"/>
            <br/>
            <obs conceptId="1635" answerConceptId="5277" answerLabel="Natural Planning / Rhythm" style="checkbox"/>
            <br/>
            <obs conceptId="1635" answerConceptId="5278" answerLabel="Diaphragm" style="checkbox"/>
            <br/>
            <obs conceptId="1635" answerConceptId="1378" answerLabel="Depo-Provera" style="checkbox"/>
            <br/>
            <obs conceptId="1635" answerConceptId="1359" answerLabel="Norplant" style="checkbox"/>
            <br/>
            <obs conceptId="1635" answerConceptId="1388" answerLabel="Surgery" style="checkbox"/>
            <br/>
            <obs conceptId="1635" answerConceptId="5622" answerLabel="Other" style="checkbox"/>
            <br/>
        </td>
    </tr>
</table>
...
Complete form
See Appendix B for Full HTML source.
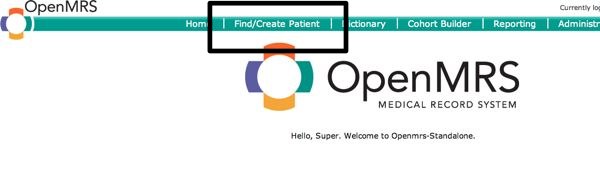
Enter patient data using an HTML form
Click on Find/Create Patient from anywhere within OpenMRS.
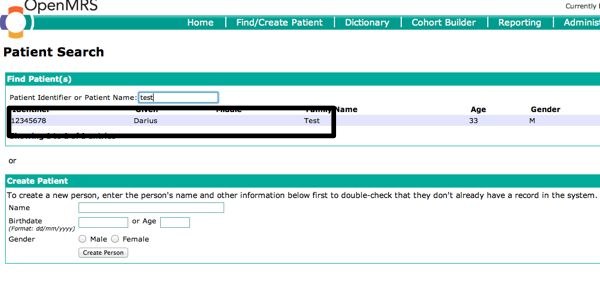
Begin typing the patient's ID number or name, then select the patient for whom you are entering data.
Click the Form Entry tab.

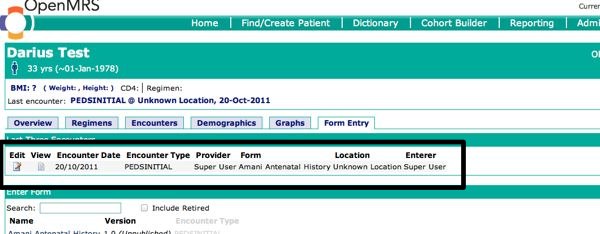
Select the appropriate form as shown below, then fill in the patient data and click the Enter Form button on the page that appears.

You can now see the completed form under the Form Entry tab of the patient's chart.
Example: Amani Clinic
We assume if you're reading this book that you're interested in deploying OpenMRS to support clinical care in the real world. To bridge the divide between theory and practice, and to illustrate the sometimes challenging process of deploying a large health-care information system, we have used the example of the fictional Amani Clinic as a case study throughout this book.
Every time you see this image in the book, you will learn how Amani Clinic used the information discussed to plan and implement OpenMRS.
While a single example could never possibly capture all the complexity of the many different contexts in which OpenMRS might be used, we hope it will serve as inspiration to think about how your environment may be similar or different. We also hope that as you read, you will start to consider the questions you need to ask to begin to design and implement your own installation of OpenMRS.
About the Amani Clinic

Our fictional case study, Amani Clinic in Kisiizi, Uganda.
Kisiizi is a small town in Southwest Uganda, over 40 kilometers from the nearest large city. Much of the fame of Kisiizi is based on its hydroelectric power generating station and its relatively large hospital, which handles most of the health care for the region.
Just over 2 years ago, a European-based NGO provided funding to help launch a new health care facility we'll call "Amani Clinic" in the town. This clinic was opened specifically to address the need for maternal and child health (MCH) care in Kisiizi and the surrounding areas.
Since its opening, the clinic has been very successful in establishing itself, and has attracted a full staff of doctors, nurses, and assistants. New patients, both pregnant women and new mothers, are continually being registered in the clinic, but there is very little information available about the efficacy of the work in the clinic, or the outcomes for its patients. Therefore, the funding agency has requested that the clinic work to implement an information system, to help better monitor and evaluate the health care outcomes of the patients over time, and to help the clinic scale up to see more patients more efficiently. The agency recommended that the clinic consider using OpenMRS, which had been successfully used by other projects funded by that agency in other countries.
The funding model provided for some information and communication technology (ICT) infrastructure to get the project started, as well as for some staffing support. However, deciding how to allocate this money was left up to the clinic's local management. After receiving the grant funding, the director of the site hired Claudine, a graduate of a medical informatics training program in neighboring Rwanda to help lead the effort. This newly-hired informatics manager, in turn, hired Daniel, recent university graduate from Kampala with expertise in ICT infrastructure and system administration.
Since the clinic was opened, doctors and nurses have used paper forms to collect data about their patients. These forms are stored in folders and kept in a locked file room until a patient's appointment. When the patients arrive, they are given their folder to carry with them as they talk with the various health care providers they will see during their visit. Each of these providers completes the relevant paper forms to add information about the visit. The forms are added to the patient's folder, which is returned at the end of their visit.
Clinical staff were concerned when they heard about the upcoming deployment of OpenMRC, because of the possibility of changes to the way they are used to working. However, the informatics manager has assured them that they can continue to use the familiar paper forms. When a patient arrives at the clinic, they will be registered by a patient registration clerk. After the patient's visit is complete, a data entry clerk will enter the information from that visit into OpenMRS.
Many people in Kisiizi have basic ICT skills, and there is a local Internet cafe, supported by an NGO that provides basic ICT training to local residents. Two recent students have been hired as the first patient registration and data entry clerks for the clinic.
Meanwhile, the system administrator has finished his preparation work and has deployed a basic local area network (LAN) to connect a server that will host the OpenMRS application to PCs in the file room, in the clinic manager's office, and in the ICT room. The LAN is connected to the Internet, although the connection isn't very fast and often goes offline. The server is powered by an uninterruptible power supply (UPS), that will ensure it stays running despite any fluctuations in the local power grid!
Through the rest of this book, you will follow the progress of the people at the Amani Clinic as they install OpenMRS, customize it to fit the needs of their clinic, and use OpenMRS from day to day, first to enter data and then to extract it for patient visits and for reporting to their funding agency on an ongoing basis.
Getting Around the User Interface

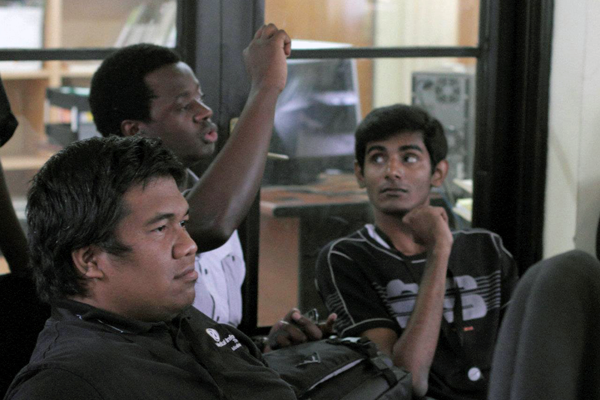
An OpenMRS implementer-programmer gives a demonstration of the system as his clinic.
This chapter gives a brief overview of key parts of the OpenMRS user interface, which will be helpful as you read the chapters to follow.
Logging in to the system
OpenMRS runs as a web application, meaning you use it via a web browser. Before you can access any pages in the system, you need to log in. To do this the first time, you will need to know the administrator password that you chose during first-time setup. Refer to the chapter "Installation and Initial Setup" for those details.
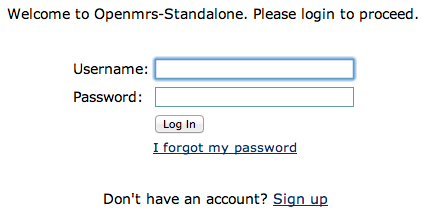
The OpenMRS login screen.
Users that forget their password may reset it if they have configured a secrete question, and know the answer. The Sign up link is provided by the Request Account module, if you have it installed.
Home
In the default installation of OpenMRS, all users see the same home page after logging in. To customize different home pages for different types of users, you can use the Role Based Homepage module.

The default OpenMRS home page.
As shown in the OpenMRS home page above, all pages allow you to:
- Log out and edit your profile, or
- Change your language for the current session.
You can configure the allowed languages via a global property in the Administration page.
Administration
As a system administrator or manager for an OpenMRS installation, you will frequently need to access the configuration and administration functions accessible through the Administration page.

The OpenMRS Administration page.
- You can access the Administration page from anywhere in the application by clicking its link in the top-right of the screen.
- Configuration pages for the OpenMRS core functionality are listed in the left and center columns.
- Configuration pages for functionality in add-on modules are listed in the right column.
- You add/remove/start/stop add-on modules from the Manage Modules page.
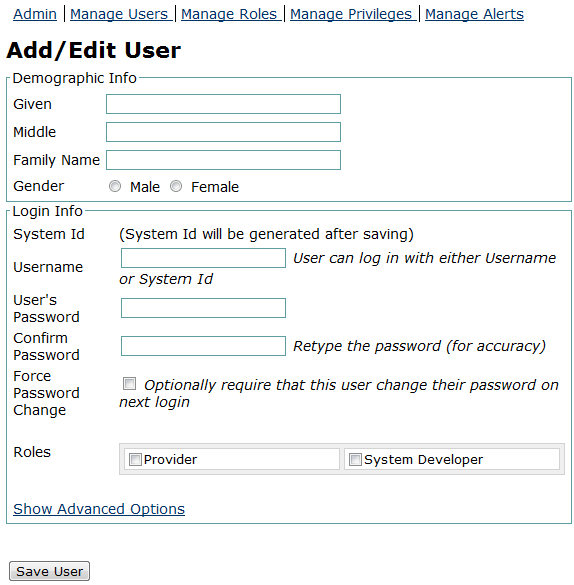
Viewing and creating patients
One of the most common actions for non-administrative users of the system is to find and open existing patient records. If the desired patient record is not found, users may be able to create new ones if they have sufficient privileges.
You can search for a patient by ID number. Clicking on the search result will open that patient's dashboard. If a user does not find a patient by ID number or name, you may create a new patient.
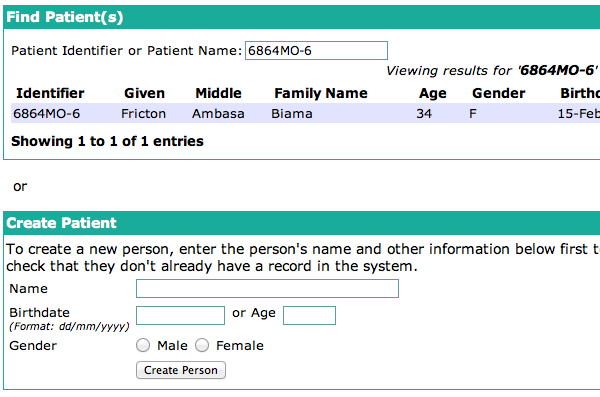
Finding and creating patients in OpenMRS.
Patient dashboard
Data entry staff will spend a lot of time on the patient dashboard page. This gives access to different parts of a patient's record and allows you to enter forms into the record.

A typical OpenMRS patient dashboard.
The workflow of the patient dashboard page is not efficient for a clinician who wants to access a patient's record at the point of care. To support those workflows you should consider downloading and installing the optional the Clinical Summary module or the HTML Form Flowsheet module.
Getting Help from the OpenMRS Community
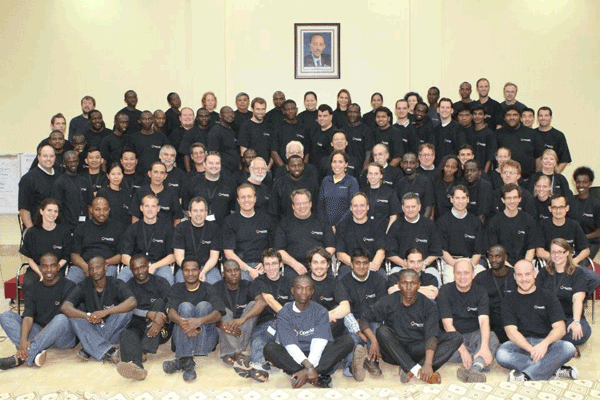
A 2011 meeting of the OpenMRS community in Kigali, Rwanda.
OpenMRS is supported by a vibrant community. Whether you need help installing, using, updating or extending OpenMRS, you can find help in a variety of places.
OpenMRS ID
OpenMRS ID is an account used to participate in most of the community resources to support implementers and developers, and is required to use most of the tools on this page. Learn more about OpenMRS ID and sign up online
http://go.openmrs.org/id
OpenMRS Wiki
Documentation for OpenMRS is available in the wiki.
http://wiki.openmrs.org
You can find information for users and developers, as well as details of shared modules and other resources.
You can search for information in the wiki using the search bar at the top of the page. Alternatively, use the links on the left of the page to navigate to the relevant section.
If you find an error in the information on the wiki, please correct it if you can! If you do not already have an OpenMRS ID, you can register for free using the Sign Up link at the top of the page. After logging in, you will see an Edit button at the top of most pages. Click this button, make your changes, and click Save. If you are not certain about making an edit, just leave a comment on the page with your questions or concerns. We appreciate your help!
Mailing lists
Information about the OpenMRS mailing lists, including details on how to subscribe, and archives of past messages, are available at the following URL.
http://go.openmrs.org/lists
The implementers mailing list is a community mailing list for people using, considering using, or otherwise interested in OpenMRS. You can ask questions, seek advice, and learn from others on the mailing list. Search the archives for similar problems before you post - someone else may have already answered your questions!
OpenMRS Answers
OpenMRS Answers is an exciting way to ask questions about installing and using OpenMRS, and to get answers from others in the community.
https://answers.openmrs.org/
It provides an alternative to mailing lists and IRC, and has a system of voting, badges, and points that allows you to compete with others. An OpenMRS ID is required to log in you can participate. OpenMRS Answers focuses on finding specific answers to specific questions. Brief discussions can be conducted in the comments, but most discussions should be held on the mailing lists (see above).
IRC
Internet Relay Chat (IRC) is a protocol for real-time Internet chat. The OpenMRS community use the #OpenMRS chat room on irc.freenode.net.
For more information on how to connect to IRC visit:
http://go.openmrs.org/irc
All IRC discussions are logged and available online.
Having trouble?
If you have problems with your OpenMRS ID, or with any of the tools listed above, please open a support desk ticket and someone will respond to your issue.
http://go.openmrs.org/helpdesk
If you are not able to log in when creating the ticket, please remember to include your name and contact information.
Identifying Your Needs
Discussing requirements and needs at TRAC Plus clinic in Kigali.
This chapter covers some basic strategies for identifying your organizational needs, and how OpenMRS might help. It does not go into detail about what OpenMRS does or how it stores data -- you will find that in other chapters. Instead, we encourage you to first take a step back and think about your organization.
Your organizational goals and practices
For now, forget about technology and instead think about your organizational goals and processes. Here's a list of questions to start:
- What are the high level goals of your organization?
- What are the teams and staff in the clinic? What roles exists? What functions does each role perform?
- What tasks are staff involved with on a day to day basis?
- What services does the clinic provide to your patients? What activities are involved?
- What other 3rd-party or government organizations do you report to? What information is included in each of these reports?
Answering these questions will probably help you think of more related questions. Make sure you consider them thoroughly.
Take advantage of institutional knowledge
As you think about your patients and how they interact with your organization, talk to your clinical and administrative staff--both those who have been around a long time, and those who have just joined. Talk to as many people as you possibly can to get a complete picture of every service provided to patients.
People generally want to be positive in describing their work places, so you may need to ask some people multiple times. Get physical or electronic copies, or pictures of all paper forms if possible. Figure out where (e.g., specific rooms and desks) data is recorded onto paper and by whom. Write an overview of current practices and define specific shortcomings that could be addressed by using an electronic medical records system.
Note that practices may vary seasonally, for example if the hospital is much busier due to increased malaria during rainy season or malnutrition before harvest.
Map your needs to OpenMRS
OpenMRS has been designed to be flexible and adaptable, based on input from many different partners, but it may not be an exact fit for the ways that your organization currently works. Doing things the "OpenMRS way" could mean adapting your workflow and adopting best practices in medical informatics. Be pragmatic and flexible, and think about whether your current working practices might need to change.
Remember that OpenMRS offers many opportunities to capture and analyze information in new ways not previously possible. Taking advantage of these new possibilities might possibly lead to positive changes and improvements for your organization.
Do not "reinvent the wheel"
The open source ethos of OpenMRS extends beyond just the application, to a much larger open community where ideas and experiences are shared. There are many existing resources available in the form of pre-built OpenMRS features (modules) and content that a new implementer should take advantage of. You should explore the following resources before building anything new.
Reuse an existing concept dictionary
A well-constructed, mature concept dictionary (see the "OpenMRS Information Model" chapter) is a strong foundation for any OpenMRS Implementation.
The Millenium Villages Project (MVP) maintains a well-curated concept dictionary. If this dictionary is applicable to your domain of care, you should strongly consider using it. The best way to learn about this dictionary is through a partner project, the Maternal Concept Lab.
http://go.openmrs.org/book-mcl
Other OpenMRS implementers can also help advise you about other concept references for your domain. Read the "Getting Help from the OpenMRS Community" chapter for more information.
Adapt existing forms
Implementers should evaluate data collection forms built by other OpenMRS users before creating new custom forms for their specific needs.
Implementers across the OpenMRS community have invested a lot of resources in ensuring that their forms reflect clinical best practices, international standards, and current research. These forms have already been optimized for electronic data entry. Many OpenMRS partners develop forms using medical informatics experts that may not be available to all projects. Finally, creating forms is time consuming--those resources could be redirected to other efforts.
The OpenMRS Form Bank is a new community-driven project which is beginning to collect existing forms from other users. Visit http://go.openmrs.org/book-formbank for details, or contact other implementers for help. Read the "Getting Help from the OpenMRS Community" chapter for more information.
Explore the module repository
Implementers should consult the OpenMRS Module Repository at http://modules.openmrs.org/ before considering customization through software development.
There is a good chance that someone has created a module to address needs you may have. Read the "Customizing OpenMRS with Plug-in Modules" chapter for a list of recommended modules.
Amani discovers their specific needs
Once the clinic determined they would indeed use OpenMRS, they began thinking specifically about how they would integrate their existing processes into the workflow supported by the software. As the newly-hired medical informatics manager, Claudine knew she should speak with everyone working in the clinic and watch them during a typical day to understand how they work. When she spoke to them, she assured them that OpenMRS would help to make their work easier, and they would still be using the same overall processes they were familiar with.
Claudine found many resources within the OpenMRS community, including pre-existing concept dictionaries and forms that had been used in other clinics. She was able to take these artifacts and adapt them to Amani's paper forms that were already in use. Starting out with the work of others saved quite a bit of time.
Installation and Initial Setup
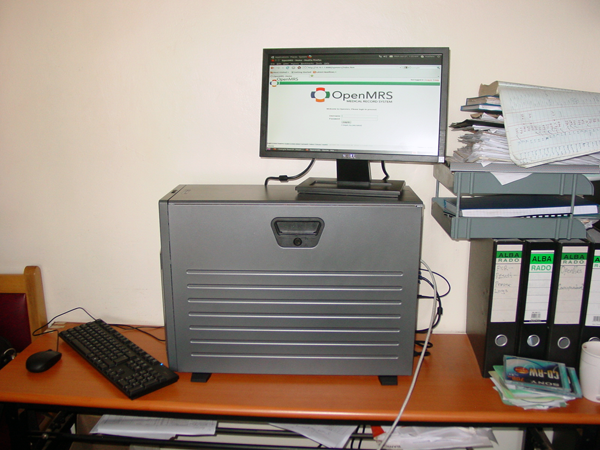
An OpenMRS server in Uganda.
You can download OpenMRS from the OpenMRS web site.
http://openmrs.org/download/
There are two ways to install OpenMRS: Standalone, and Enterprise. You must have Java 6 or higher installed on your system to run OpenMRS.
OpenMRS Standalone provides a simplified installation option with an embedded database and web server. It is a great way to evaluate and explore OpenMRS, letting you get a local version up and running within minutes, and includes download options with sample data. OpenMRS Standalone should run fine for smaller installations (fewer than 10,000 patient records), but if you are setting up a larger installation, we recommend using the Enterprise installation. If you are not sure which makes sense, you can start with a standalone installation and migrate your data to the enterprise version later.
OpenMRS Enterprise is appropriate for larger installations. If you already have a Java servlet container and a database installed, and you want to set up OpenMRS to use these resources, you should also use OpenMRS Enterprise.
OpenMRS Standalone
To install the standalone version, download the ZIP file and decompress it, then double-click the openmrs-standalone.jar file to run it. The first time you run this file, it will install OpenMRS and open your browser to the new OpenMRS instance.
Do not delete or rename any files or folders after decompressing the ZIP file. These files and folders are required by the standalone installer.
Alternatively, from the command line, you can navigate to the decompressed folder and run the following command:
java -jar standalone-1.1.jar
On Linux, you can also double-click on the file named run-on-linux.sh. If you are prompted for how to run it, just select run. Alternatively, you can use a command line shell to navigate to the decompressed folder and run the following command:
./run-on-linux.sh
Upgrading Standalone
To upgrade a copy of OpenMRS Standalone, do the following:
- Stop the previous version of OpenMRS Standalone and exit the application.
- Download and extract the most recent version of OpenMRS Standalone.
- Copy your database directory from the previous version to this new OpenMRS directory.
- Copy your openmrs-standalone-runtime.properties from the previous version to this new OpenMRS directory.
- Install OpenMRS Standalone as described above. The new version of OpenMRS will run with your old data.
Logging in
By default, the initial username and password are as follows:
- Username: admin
- Password: Admin123
You must immediately change the admin password after installation for security purposes. To change your password, click My Profile in the upper right of OpenMRS, and choose the Change Login Info tab. Update your password, then click Save Options. You can also change your username, and provide your real name, on this screen.
Stopping and Restarting
As long as OpenMRS is running, you can return to the application by opening the following URL in your browser.
http://localhost:8081/openmrs-standalone/
Before you change certain preferences, such as the port on which MySQL or Tomcat runs, you must stop the application.
To stop the application, use the Stop button in the user interface, or choose File > Quit. Alternatively, run the JAR file on the command line with a -stop parameter.
You can restart the GUI by clicking Start, or double-clicking on the JAR file again. Alternatively, you can run the JAR file with a -start parameter.
By default, OpenMRS runs the MySQL database on port 3316, and the Tomcat server on port 8081. To use a different port, stop the application, then change the port number in the openmrs-standalone-runtime.properties file or in the GUI, and restart. To override the port from the command line, run the JAR file with a -tomcatport or -mysqlport parameter.
Changing the port number will change the URL used to access the application. To access the application, you can choose File > Launch Browser, or run the JAR file with a -browser parameter.
OpenMRS Enterprise
You must have Apache Tomcat and MySQL installed on your system before installing the enterprise version of OpenMRS.
Download the Enterprise WAR package from
http://openmrs.org/download/
Navigate to the Tomcat Web Application Manager and enter your Tomcat administrator credentials.
http://localhost:8080/manager/html
Browse to the location of the openmrs.war package, and deploy it.
The initial setup which follows may take some time. At the end of the process, the Web Application Manager will refresh, and /openmrs should be displayed in the list of applications. Tomcat should also start the application (Running = True).
Open the OpenMRS web application to complete the initial setup process.
http://localhost:8080/openmrs
Getting Started with OpenMRS Enterprise
The first time you run OpenMRS, the setup wizard will help you configure your installation. Follow the instructions in this wizard to set up your database, and populate it with test data if necessary.
To change your configuration later, stop the application, edit the file openmrs-runtime.properties, and restart the application. On Windows, you can probably find this file in this location:
C:\Documents and Settings\YOURUSERNAME\Application Data\OpenMRS
or
C:\Windows\system32\config\systemprofile\Application Data\OpenMRS
On Mac OS X or Linux systems, it is probably located in this location:
~/.OpenMRS
or
/usr/share/tomcatX/.OpenMRS
After you have finished configuring OpenMRS, reload the application in the Web Application Manager. Open the login page, typically at this URL.
http://localhost:8080/openmrs
If Tomcat is installed on another server or another port, replace localhost or 8080 as applicable.
Use the administrator username and password you specified in the configuration wizard to log in. If you did not specify a username and password, try using the default username admin and password Admin123.
Upgrading OpenMRS Enterprise
To upgrade a copy of OpenMRS Enterprise, do the following:
- Use the Tomcat Web Application Manager to stop the previous version of OpenMRS.
- Download the most recent version of OpenMRS Enterprise.
- Install OpenMRS as described above. The new version of OpenMRS will run with your old data.
Amani chooses the Enterprise version
Although Amani Clinic is small, they decided to install the Enterprise version. Claudine is very familiar with Apache Tomcat and MySQL, and decided he would like more control over the system. She installed Ubuntu Linux on the physical server, then installed Java 6, MySQL, and Tomcat. After doing so, she downloaded the openmrs.war file and installed it in the Tomcat application server. Excluding download time for the software, she was able to complete the process in less than one hour.
Is OpenMRS for You?
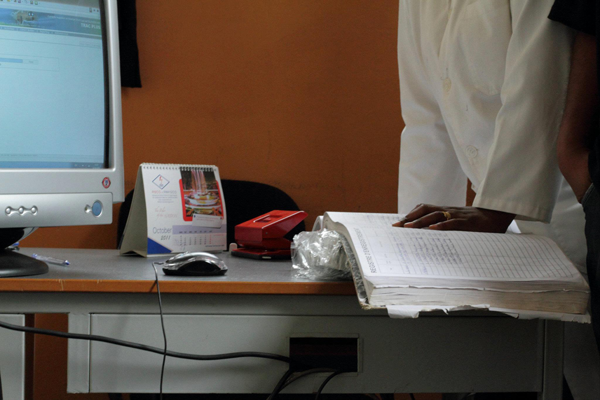
A clinician compares her paper records with OpenMRS in Rwanda.
This chapter will help you to decide whether OpenMRS is the right clinical application for your organisation.
Why have an electronic medical record (EMR) system? First, you need to clearly identify your reasons for adopting a computerized medical record system. Without a clear need or anticipated benefit, sustained use will be difficult. Many adopters use OpenMRS to gather information about direct patient care for analysis and outcome improvement. It can also reduce the effort of reporting to 3rd parties. Supporting clinicians during the process of direct patient care is also possible--but this requires further customization.
Where OpenMRS fits best
OpenMRS is a patient-centric application, meaning data is captured about interactions between a health care provider and a patient. Your main information needs should also focus on direct patient care provided. If you primarily intend to capture data about something other than the patient (for example, about lab specimens), you should consider other alternatives.
OpenMRS is designed to manage patient data longitudinally, linking multiple interactions over time into a single patient chart. Having this complete patient history available empowers clinicians to make more informed decisions about care, while also enabling a deeper analysis of patient health in order to draw more meaningful conclusions on improving outcomes. If you only care about individual patient visits, and not about linking those together into a longitudinal chart, then OpenMRS may not be the right tool for you.
Technical capacity required to manage OpenMRS
OpenMRS requires a fairly sophisticated team of implementers to install and run. (See the chapter "Transitioning to OpenMRS".) At minimum, you will need ongoing resources with knowledge and skills in three areas:
- Medical information management, to ensure data is captured properly and in a way that will support meaningful use in the future.
- System administration, for installation and maintenance of the OpenMRS server, local area network, backups, and local ICT infrastructure.
- In addition, for further customization to meet specific clinic needs, some software development skills may occasionally be required.
Of these three areas of capacity, it is most important that the system administrator be at the clinic or a contractor in close proximity to the clinic. The other areas can more easily be made up of external team members that support the clinic during strategic cycles of system improvement.
Other ways to find out if OpenMRS is for you
OpenMRS is powerful software and has the potential to help your organisation reach its goals, but it may not be the right choice for every organisation. Here are some ways that you can find out whether OpenMRS is right for your organisation:
- Read this book!
- Play with a demonstration site.
- Download and explore the OpenMRS Standalone.
- Talk to others who use OpenMRS.
- Talk to an OpenMRS consultant.
Demonstration sites
OpenMRS hosts a demo site at http://openmrs.org/demo/ which runs a very basic version of the latest released version. However, it has not been configured in a way to support a typical deployment. Specifically, it lacks medical information management content--it lacks good forms for data entry and does not have any reports configured for interpreting and extracting information.
OpenMRS Standalone
If you have technical skills or are feeling adventurous, you can download and set up a local version of OpenMRS, that is a version that is stored on your local computer rather than on a server on the internet. You'll still access it through a browser, but it will only be visible on your computer. The advantage of a test installation is that you can configure OpenMRS in the way that you want to use it, and experiment with your data. See the chapter "Installation and Initial Setup".
Talking to others who use OpenMRS
If you know of another organisation that uses OpenMRS, talk to them about their experience. The more similar they are to your organisation, the more useful their experiences will be. In any case, you will gain valuable insight from their knowledge.
If you don't know anyone that is using OpenMRS, consider joining the weekly OpenMRS Implementers Forum. The session regularly includes presentations and demonstrations from a range of international users. For more information about the meeting, see the OpenMRS Wiki: http://go.openmrs.org/book-impforum
Talking to OpenMRS consultants
There is no official list of OpenMRS-endorsed companies that provide professional services for the platform. However, a quick email to the OpenMRS Implementers or Developers mailing lists requesting professional support should result in a prompt reply and recommendation. See: http://go.openmrs.org/book-mailinglists
Amani Clinic evaluates OpenMRS
At the Amani Clinic, the newly-hired medical informatics manager was already familiar with OpenMRS. However, because he was new to the clinic and to the field of maternal health, he started research other organizations that were using OpenMRS for maternal and child health care clinics. After joining one of the weekly Implementers Forum meetings, he learned of a group in Nigeria doing exactly that, and had several follow-up conversations with them. They agreed to collaborate on projects as much as possible once Amani had OpenMRS up and running.
Leaving Amani Clinic

We now end our visit to Amani Clinic. We saw how the clinic management started with the idea of using a medical information system to support the workflow of their clinic. They implemented OpenMRS to manage their data, evaluate and report on their project's effectiveness, and ultimately improve care for their patients.
Claudine, Daniel, James, and Kissa all had challenges in planning and getting used to new ways of working, but we can believe that their increased ability to better manage health care delivery will result in healthier, happier people in the village of Kisiizi.
We hope you have found their story, along with the information presented in this book, useful in thinking about your own situation.
As a reminder, this book serves only as an introduction to the OpenMRS medical record system and our larger open source community. You are now a member of a new extended family of people working together to make and improve technology for health care on every continent. We hope you will be as excited as we are to make a difference in our communities, and we hope to see you in our mailing lists and wikis, and hear you in our meetings very soon.
Welcome and good luck!
Maintenance

OpenMRS server room in Webuye, Kenya.
Once you have installed and configured OpenMRS and it is being used to support day-to-day clinical operations, there is still work to be done. To ensure the system runs smoothly and error-free, use the following tips as a starting point to create a maintenance plan for your OpenMRS installation. We recommend documenting this plan and reviewing it regularly.
Server management
Although outside the scope of this book, it is important to keep both your OpenMRS server(s) and client systems updated with the latest security patches. In Windows, you should use the Windows Update tool to review and install critical system updates. If you use Linux, use either apt-get upgrade or yum update, depending on what distribution of Linux you use.
Before upgrading MySQL, Java, or Apache Tomcat (and of course, OpenMRS) you should check with the OpenMRS community to see how those upgrades might effect how OpenMRS runs on your server. See the "Getting Help" section for more information.
You should also periodically check to ensure your server has plenty of free disk space. Additionally, if you are running a Windows server, ensure your system has anti-virus software installed and it is up-to-date.
Backups
You should ensure your system has a backup strategy. Much has been written on this subject and general knowledge about backups is beyond the scope of this book. However, there are some specific items to consider when backing up your OpenMRS server.
Most importantly, you need to create a backup strategy for your MySQL database. Perhaps the simplest way to do this is by using the mysqldump utility that ships with the database. Ideally, you will want to shut down OpenMRS before backing up, and restart it once the backup has completed. If you are not able to do so, or wish to have the system remain in a "read-only" mode, you may want to use the options of mysqldump to lock tables. Consult the MySQL documentation for details.
You should also ensure you are backing up the .OpenMRS directory. This directory, which stores modules and configuration files, is stored in the home directory of the user which runs the Tomcat server on Windows or Linux.
Performance tuning
Over the past several years, implementers of OpenMRS around the world have compiled information about improving the performance of their systems. There are several components of the system that may need to be tuned to ensure optimal performance. Please use the information in the following sections as a guide and a starting point -- you will likely need to explore what settings work best for your system.
OpenMRS settings
You may need to adjust some global properties in OpenMRS. To do this, use the Manage Global Properties page under the OpenMRS Administration section, find the desired global property and clear or change its value as described in the following tips, then click the Save button at the bottom of the page.

- Clear out the patient.identifierRegex global property to disable regular expression identifier searches.
- Clear out the patient.identifierPrefix and patient.identifierSuffix global properties to disable "like" identifier searches.
- Make sure that the dashboard.regimen.displayDrugSetIds global property has concept ID numbers and not names. In other words, use "1085,1159" instead of "ANTIRETROVIRAL DRUGS,TUBERCULOSIS TREATMENT DRUGS".
- Set the searchWidget.batchSize, searchWidget.runInSerialMode and searchWidget.searchDelayInterval global properties to tune your searches for better performance and suit your implementation's environment. You may wish to consider the speed of your network connection, typing skills and average number of simultaneous users on a typical work day. You might also consider reducing the value of the global properties person.searchMaxResults and searchWidget.batchSize to reduce the load on the search widgets and server for better performance.
Apache Tomcat
Tomcat has several settings which may be adjusted to optimize its use of memory
- Experience has shown it is best to install Tomcat from the download section at http://tomcat.apache.org/ rather than any other source. If using Ubuntu Linux, we do not recommend using the apt-get installer.
- Increase the amount of memory allocated for Tomcat. Depending on how you start or run Tomcat, use one of the following methods:
-
- If running Tomcat from the command line, add the following parameters:
-Xmx512m -Xms512m -XX:PermSize=256m -XX:MaxPermSize=256m -XX:NewSize=128m
- If running Tomcat as a Windows service, launch the Tomcat Monitor application. Go to Configure > Java > Java Options and add the following to the listed settings:
-Xmx512m -Xms512m -XX:PermSize=256m -XX:MaxPermSize=256m -XX:NewSize=128m
- If running Tomcat as a Linux service, edit the /etc/init.d/tomcat (or equivalent) script and modify the line for CATALINA_OPTS to read as follows:
CATALINA_OPTS="-Djava.library.path=/opt/tomcat/lib/.libs -Xmx512m -Xms512m -XX:PermSize=256m -XX:MaxPermSize=256m -XX:NewSize=128m"
- Adjust Tomcat to prevent potential memory leaks. Tomcat has a default setting that often causes memory leaks. To turn it off, open the configuration file.
<TOMCAT_HOME>/conf/web.xml
In JSP servlet definition add the following element:
<init-param>
 <param-name>enablePooling</param-name>
 <param-value>false</param-value>
</init-param>
- Experiment with better garbage collection in Tomcat to prevent PermGen out of memory errors. To use a newer version of Tomcat garbage collection, you need to add the following to CATALINA_OPTS, as was shown above in the previous step.
-XX:+UnlockExperimentalVMOptions -XX:+UseG1GC
MySQL
Optimizing MySQL database settings will help OpenMRS to run more efficiently, especially when as your installation grows in the size of data you are storing.
Increase the innodb_buffer_pool_size. It is the size in bytes of the memory buffer InnoDB uses to cache data and indexes of its tables. The larger you set this value, the less disk I/O is needed to access data in tables. On a dedicated database server, you may set this to up to 80% of the machine physical memory size. However, do not set it too large because competition for physical memory might cause paging in the operating system. Modify the following in MySQL's my.ini file, or add it if it is not present.
max_allowed_packet=64M
Increase the max_allowed_packet size. When MySQL attempts to work with a packet of data larger than specified, it causes a packet too large error and closes the connection, causing OpenMRS to stop working. Increasing this value allows MySQL to handle larger sets of data. Modify the following in MySQL's my.ini file, or add it if it is not present.
innodb_buffer_pool_size=3G
You may also consider running a MySQL performance tuning script and making adjustments to your MySQL configuration file based on its suggestions. One such script is available here:
http://go.openmrs.org/book-tuningscript
Replication options
Replication of your OpenMRS installation across multiple servers or multiple sites is an advanced topic that is outside the scope of this book. However, you should be aware that several options exist if you require access to your OpenMRS data from alternate locations.
MySQL replication
The MySQL database offers methods for replicating your database across multiple servers, meaning it is possible to have multiple synchronized copies of your OpenMRS data. Please consult the MySQL documentation for details. If you point an identically-configured OpenMRS server at this replicated database, you will have a mirrored instance of OpenMRS. It is important to ensure that if you make changes to the primary system, those same changes take place on all servers.
Sync module
Another option is available for OpenMRS installations with multiple sites. The community-developed Sync module is available from the OpenMRS module repository, and allows data to be synchronized across a network (or external data storage) using tools within OpenMRS itself. Please search the OpenMRS Wiki for more information about the Sync module.
Upgrading OpenMRS
The OpenMRS implementer and developer communities provide application and customization support via mailing lists, IRC, and other means. See "Getting Help from the OpenMRS Community" for more information.
When the development team release a new upgrade for OpenMRS, they will provide either a new version of the OpenMRS Standalone installer or the OpenMRS Enterprise installer file to run on your server. If using the Standalone version, follow the upgrade instructions included with the application. If using the Enterprise version, you should be able to undeploy the OpenMRS webapp in Apache Tomcat, and deploy the new version.
Be sure to test any upgrades on a server other than the primary server you use for normal clinical support. Always be sure to back up your system before upgrading.
Updating modules
Supported community-developed OpenMRS modules are regularly updated, and those new versions are published in the OpenMRS module repository. You should check for upgraded modules regularly. Go to http://modules.openmrs.org/ or view the "Manage Modules" page from the OpenMRS Administration page. From there, you can upgrade a module with updates automatically by clicking Install Update, or you may manually upload the new version by following the instructions on the page.
Amani's maintenance plan
As part of his responsibilities as ICT infrastructure manager for the clinic, Daniel created a written maintenance plan. In this document, he has included daily, weekly, and monthly tasks. The only daily task is an automated one -- Daniel created a script on his Ubuntu server to stop OpenMRS, backup MySQL and other OpenMRS files, and restart the application. This script runs overnight while the clinic is closed. Weekly, Claudine manually checks the disk space and runs apt-get upgrade to update system components. Every month, Claudine checks the OpenMRS web site for OpenMRS upgrades and upgrades to the modules the clinic uses.
Managing Concepts and Metadata
Having well defined Concepts is crucial for every OpenMRS installation. OpenMRS is delivered with just a few basic concepts and it is up to you to gather the rest.
Creating Concepts is a complex task which requires expertise and experience so we do not recommend doing it on your own. It is best to contact our community and use some of existing Concept dictionaries like MVP or MCL. For more information on how to get in touch with the right people, see the "Getting Help from the OpenMRS Community" chapter.
You can either enter Concepts on your own manually or use a tool like the Metadata Sharing Module to import them. In this chapter, we will present how to enter Concepts manually via the web interface.
Concept Class
To start with you will need to setup Concept Classes. The standard installation includes around 15 predefined concept classes. To view them enter the Administration page > Manage Concept Classes.
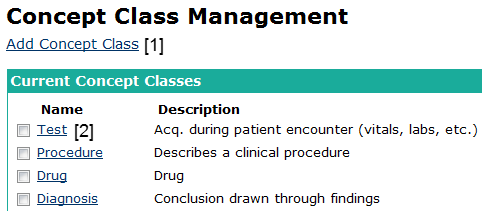
- Add a new Concept Class
- Click to edit an existing Concept Class
You will see a list with names and descriptions. You can edit them by clicking on a name and also delete by selecting check-boxes next to their names. Note that you cannot delete Concept Classes that are used in Concepts already. There is also a link Add Concept Class to enter new ones.
Concept Datatype
Concept Datatypes are purposed to indicate different formats of data stored in Concepts. They are predefined and read-only. You can view them under Administration > Manage Concept Datatypes.
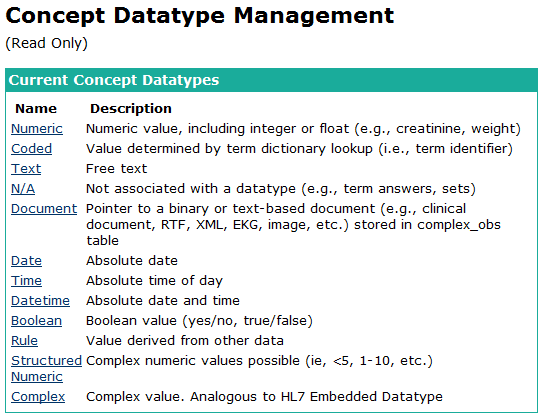
Concept
To view Concepts available in your system click Dictionary in the top menu. You will be able to search for particular Concepts by name or id. There is also a check-box that allows to search for retired Concepts which are not supposed to be used anymore or are replaced with new ones. You can also enter a new Concept from here clicking Add new Concept.
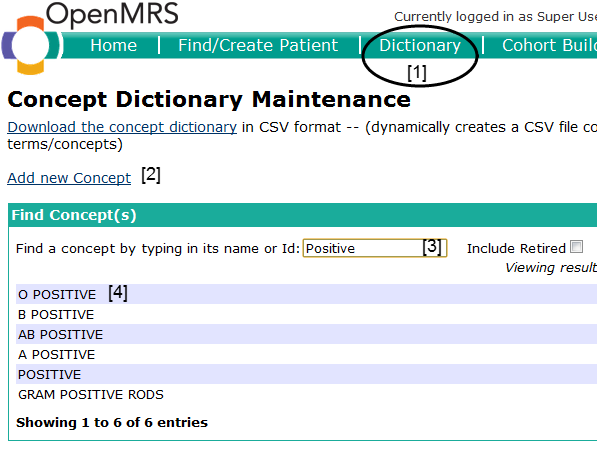
- Open Concept Dictionary
- Adding a new Concept
- Searching for Concepts
- Search results
Let's create a Concept to represent ANTENATAL VISIT REASON. We will use it later in the book in a data entry form. The form for creating a Concept allows you to enter Fully Specified Name as well as synonyms. You can add synonyms with Add Synonym button [2]. At least one of the names needs to be marked as Preferred with the radio button next to it.
While creating a new Concept you need to decide on Datatype. In this case it will be a coded Concept that is you will provide a list of answers. Answers need to be defined as Concepts. You need to create them beforehand or else add them later.
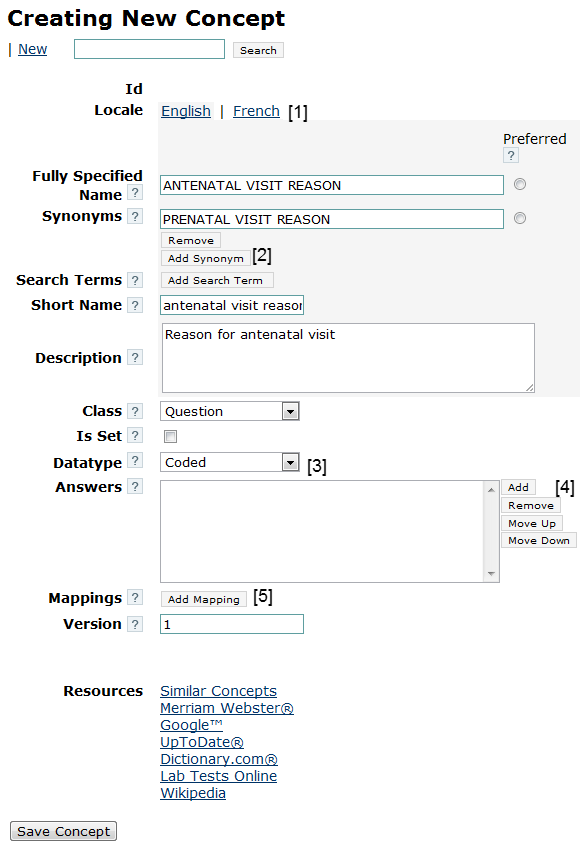
- Switch between languages
- Add a synonym
- Select Datatype
- This section changes depending on the chosen Datatype, in this case we can edit a list of answers
- Allows to add mappings
Concept Mappings
Concept Mappings are added to facilitate managing Concept Dictionaries and point to other Concepts which have the same meaning. For instance we could add here a mapping to a Concept in the MCL dictionary. You can save the Concept now and create some answers.
Repeat the steps and create Concepts PLANNING PREGNANCY and CURRENTLY PREGNANT of Class Finding and Datatype Boolean. The last possible answer will be OTHER of Class Misc and Datatype N/A. After creating three new Concepts, you can edit ANTENATAL VISIT REASON and add them as answers.
Concept Drug
To view Concept Drugs, go to Administration > Manage Concept Drugs. You can either enter a Concept Drug by clicking its name to edit it, or you can create a new one through the Add Concept Drug link. You must enter a name and choose one of Concepts of datatype Drug.
Metadata
There are different types of Metadata which need to be managed. The list includes Locations, Encounter Types, Order Types, etc. You can view and edit them easily via the Administration page.
Patient Identifier
A patient identifier is any unique number that can identify a patient. Examples are a Medical Record Number, a National ID, a Social Security Number, a driver's license number, etc. A patient can have any number of identifiers. The Patient Identifier Type table defines what type of identifiers are collected in your system.
A patient can have multiple identifiers of each type defined in your system. For example, a patient could have five identifiers of type of "Medical Record Number" because they were seen at five different hospitals that collected five different types of ids.
The patient search screen searches across all identifier that are still active for a patient.
New identifier types are generally created if they have different characteristics. For example, one identifier can be only a string of numbers, another is a number with a hyphen plus a check digit, etc.
Identifiers uniquely identify patients within the system. Different types of identifiers are distributed by various health care systems. Some of these systems will be within your control, so you will be able to control how identifiers are created and distributed; however, there will likely be identifiers that are not within your control but are useful to record within your system to aid in patient identification.
In order to see predefined identifiers types, or to add a new one, go to Administration - Manage Identifier Types. Let's examine OpenMRS Identification Number.
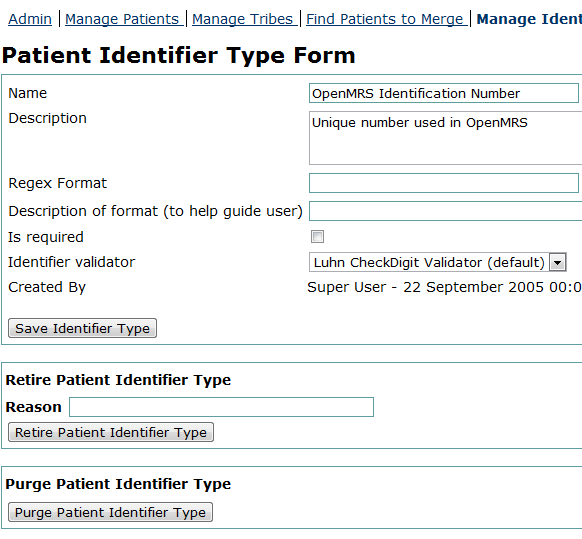
The Regex Format and Description of format fields are empty, but you could add here a regular expression to validate each entered identifier. For example:
\d{1,8}-\d
would allow 1 to 8 digits followed by a dash and a single digit.
It is also possible to choose one of several pre-defined Identifier validators. Here Luhn CheckDigit Validator is used. The purpose of check digits is simple. Any time identifiers (typically number +/- letters) are being manually entered via keyboard, there will be errors. Inadvertent keystrokes or fatigue can cause digits to be rearranged, dropped, or inserted. Have you ever mis-dialed a phone number? It happens.
Check digits helps to reduce the likelihood of errors by introducing a final digit that is calculated from the prior digits. Using the proper algorithm, the final digit can always be calculated. Therefore, when a number is entered into the system (manually or otherwise), the computer can instantly verify that the final digit matches the digit predicted by the check digit algorithm. If the two do not match, the number is refused. The end result is fewer data entry errors.
Internationalization
Concepts can be easily internationalized that is you can enter different Concept names for every allowed locale. The list of allowed locales is stored in a global property locale.allowed.list as comma separated language codes (for instance en, fr, or de). You can edit the global property from Administration > Manage Global Properties. See this link for the full list of ISO 639.2 language codes:
http://go.openmrs.org/book-isolang
Currently, Metadata cannot be internationalized.
OpenMRS Information Model

Reference books line a shelf in a rural African clinic.
This chapter explains terms and concepts which are useful to understand as you install and use OpenMRS.
Data
The actual information you want to record in OpenMRS is called Data. Examples of Data in OpenMRS are Patients, Encounters, and Observations. To support this data, and describe its meaning, you need additional Metadata.
When a user deletes a piece of data in OpenMRS, the information actually remains in the database. It is marked as voided, so that it will not show up in the interface, but it is not immediately deleted from the database. If a user deletes a piece of data by accident, an administrator can unvoid it to return it to the system. To permanently delete data from the database, an administrator must purge that data. Typically, this should never be done in a production system.
Metadata
The fundamental expectation of OpenMRS's design is that you will customize it for your clinical program's use case. The system has no built-in idea of the patient's weight or seeing the patient in an outpatient visit. Instead, you can configure these things yourself, to match your project's workflow. Generally speaking, the things that you need to configure in order to describe the real patient information you will be capturing are referred to as Metadata. An example of a piece of metadata is a Location that represents a hospital.
An administrator may also retire metadata in OpenMRS. This does not mean that the metadata is deleted, but rather that it is not intended to be used going forwards. Old information that refers to the retired metadata remains valid. An administrator may unretire metadata if it becomes relevant to active use again. If no actual data refers to a piece of metadata, an administrator may purge the metadata to permanently remove it from the database.
For example, the hospital you refer patients to closes. Therefore, you can no longer refer patients there. This Location can now be retired in OpenMRS. This would not invalidate the fact that many patients were referred there in the past.
Concepts and Concept Dictionary
The most important part of the system's metadata is the Concept Dictionary, which is a list of all the medical and program-related terms that you will use as questions and answers in Observations. This dictionary does not need to be complete when you begin using OpenMRS. You should expect new terms to be added and old terms to be retired as your use of the system evolves. It is better to start with a pre-populated Concept Dictionary, rather than starting from scratch yourself. See the chapter "Sharing Concepts and Metadata" for more details.
Every question you ask about a patient needs to be defined by a Concept. (For example, to record a patient's weight you need a Concept like Weight in kilograms.)
If you want to ask a question that has a fixed set of coded answers, those answers are also Concepts. (For example, the question concept Blood Type may have 4 different answer concepts: A, B, AB, and O)
Persons
Every individual who is referred to in any patient's record in OpenMRS must be stored in the system as a Person. Most persons will also be Patients or Users.
Names
A person can have one or more names, one of which must be marked as the preferred name. The preferred name will be displayed in search results and patient screens.
Addresses
A person may have zero or more contact addresses. You may configure the format of these addresses for your particular locale.
Person Attributes
To support your local needs, you can define additional pieces of information about the people in your system, on top of those that are natively supported by OpenMRS. You can define the datatype of a Person Attribute, as well as any constraints on the possible values, using metadata. This metadata is called a Person Attribute Type.
Person Attributes are suitable for storing other information. But historical values of person attributes are not retained. For example, you should use a person attribute to record a patient's contact telephone number. This information may change, but if it does so, the system need only store the most recent value, and need not retain previous values. It is not appropriate to use a person attribute to store something like the patient's height, which is recorded at a given point in time, but can be expected to change and should be tracked as it does so.
Patients
Anyone who receives care in OpenMRS must be a Patient (for example, anyone who has an Encounter or who is enrolled in a Program). Every Patient must have at least one Identifier, which is explained below.
A Patient is also a Person, meaning they must have at least one name and they may have addresses.
Patient Identifier
The Patient Identifier is a medical record number assigned by your facility, used to identify and re-identify the patient on subsequent visits.
A Patient Identifier Type defines the format of a particular kind of patient identifier. For example, you might define that Amani ID is an identifier type that is required for every patient; the format is 2 letters followed by 6 digits and uses a particular check digit1 algorithm.
Relationships
A Relationship is a bidirectional link between two Persons in OpenMRS.
The metadata describing a particular kind of relationship is a Relationship Type which defines the names of each direction of the relationship.
At the Amani Clinic, it is necessary to use relationships to link a mother's patient record to the patient record of her children. One might also use relationships to record the link between a patient and their primary care provider.
Encounters
A moment in time where a patient is seen by a provider at a location, and data is captured. Generally speaking, every time you enter a form in OpenMRS this creates an Encounter.
If a patient visits a clinic, checks in at registration, is seen by a doctor, and has meds dispensed in the pharmacy, this would be recorded as 3 Encounters.
The metadata that describes a kind of encounter is an Encounter Type. These are displayed in the user interface, and you may also search against them.
Locations
A Location is a physical place where a patient may be seen.
Locations may have a hierarchy, for example Children's Ward might be a location within the location Amani Clinic.
You might also store physical areas (for example Eastern Province, or California) as Locations. You should not use Locations to represent logical ideas like All District Hospitals.
Observations
An Observation is one single piece of information that is recorded about a person at a moment in time.
Every observation has a Concept as its question, and depending on the datatype of the concept, it has a value that is a number, date, text, Concept, etc.
Most of the information you store in OpenMRS is in the form of Observations, and most Observations happen in an Encounter. When you enter a form in OpenMRS, typically one Encounter is created with anywhere between tens or hundreds of Observations.
Note that an individual Observation is valid only at one moment in time, and it does not carry forward. You may query the system for the last observation for pregnancy status but this does not tell you whether or not the patient is pregnant at any point after the moment of that observation.
Examples of observations include Serum Creatinine of 0.9mg/dL or Review of cardiopulmonary system is normal.
Observation Groups
Sometimes a single Observation is not sufficient to capture an entire piece of patient information, and you need to use multiple Observations that are grouped together.
For example recording that a patient had a rash as an allergic reaction to penicillin would need to be stored as two observations plus a third one that groups the previous two together:
- Concept = "Allergen", coded value = "Penicillin", group = (3)
- Concept = "Reaction", coded value = "Rash", group = (3)
- Concept = "Allergic Reaction Construct", group members = (1), (2)
Orders
An Order is an action that a provider requests be taken regarding a patient.
For example a provider could order a Complete Blood Count laboratory panel for a patient.
An Order only records an intention, not whether or not the action is carried out. The results of an Order are typically recorded later as Observations.
Prescribing a medication is a Drug Order. A drug order can be placed for a generic drug, represented by a Concept (for example, 500mg of Ciprofloxacin, twice a day). If you are using OpenMRS to manage a formulary of specific medications (i.e., Drugs in OpenMRS), you may also record Drug Orders against those. For example, a drug order might be one 500mg tablet of Ciprofloxacin, twice a day.
Allergy Lists
OpenMRS lets you manually maintain an Allergy List for a patient, including the allergen, reaction, severity, etc.
This list is managed separately from Observations: observing an allergic reaction to a drug does not automatically add an Allergy to the list.
Unlike an Observation (which happens at one moment in time), an Allergy is longitudinal data, with start and end dates.
Problem Lists
OpenMRS lets you manually maintain a Problem List for a patient. This list is managed separated from Observations: observing that the patient has "Diagnosis Present = Diabetes" does not automatically add a Problem to the list. Unlike an Observation (which happens at one moment in time), a Problem is longitudinal data, with start and end dates.
Program Enrollments, Workflows, and States
A Program represents an administrative program or study that a patient may be enrolled in (for example, Child Nutrition Study or DOTS Tuberculosis Treatment Program).
A Program Enrollment represents the fact that a patient is enrolled in one of these Programs over a time period at a Location. This is longitudinal data with a start date and end date.
A Program can also define administrative Workflows, and possible States the Patient may have within those workflows. An initial state is one that a Patient is allowed to start in when they are first enrolled in a Program. A terminal state is one that closes the Program enrollment if the Patient is placed in it.
For example a research study on infant nutrition might have a workflow called Study Enrollment Status with the states:
- Patient Identified (initial)
- Mother Consented to Study
- Study Complete (terminal)
- Lost to Followup (terminal)
These states are meant to represent administrative statuses, not clinical ones. For example putting a patient in a Loss to Followup state represents an official declaration and will not happen automatically even if no encounters are entered for the patient for several months.
Forms
A Form represents an electronic form that may be used for entering or viewing data. The basic OpenMRS system does not define a specific technology for entering forms. You will need to use one of the community-developed form entry modules. See the chapter "Data Entry" for more details.
The Form Entry (Infopath) and XForms modules rely on a Form Schema, where you define which Concepts are used on the Form. The HTML Form Entry module does not require you to manage the schema.
Users, Roles, and Privileges
A User in OpenMRS is an account that a person may use to log into the system.
The real-life person must be represented by a Person record in OpenMRS, and a person may have more than one user account. If you want a patient to be able to view her own record in OpenMRS, then you need to attach User account to the Patient record.
A Role represents a group of privileges in the system. Roles may inherit privileges from other roles, and Users may have one or more Roles.
A Privilege is an authorization to perform a particular action in the system. The list of available privileges are defined by the core system and by add-on modules (for example, Delete Patients and Manage Encounter Types), but you need to configure which Roles have which Privileges while you are configuring your system.
The Information Model in use at Amani Clinic
A patient named Asaba arrives at Amani Clinic, where the registration clerk James creates her electronic record and stores her contact phone number as 312-555-7890. On paper the Nurse, Kissa, records Asaba's weight as 61.5kg and orders a pregnancy test. James enters these onto an electronic screen.
From the perspective of the OpenMRS model, we have the following metadata:
- The nurse, Kissa (a Person)
- The registration clerk, James (a User)
- Contact Phone Number (a Person Attribute Type)
- Weight, in kilograms (a Concept, with class Finding and datatype Numeric)
- Urine Pregnancy Test (a Concept, with class Test)
- Amani Clinic (a Location)
- Outpatient Visit (an Encounter Type)
- Outpatient Triage Form (a Form)
When Asaba is first seen at the registration desk, James creates the following data:
- A Patient (Asaba)
- A Person Attribute (type = Contact Phone Number, value = 312-456-7890).
After Asaba sees the nurse, who gives a paper form to James, he creates more data:
- An Encounter with:
-
- patient = Asaba
- type = Outpatient Visit
- form = Outpatient Triage Form
- location = Amani Clinic
- provider = Nurse Kissa
- creator = Registration Clerk James
- An Observation (in that encounter), of Weight in kilograms = 61.5.
- An Order (in that encounter), for Urine Pregnancy Test
Check digits
A check digit is an extra digit that is added to the end of an identifier, and depends on the rest of identifier. It allows OpenMRS to determine whether an identifier has been mistyped. For example using a Luhn check digit, "1234-1" is valid, but "1234-5" is incorrect. It is a strongly-recommended best practice to use check digits in all patient identifiers that you assign.
http://en.wikipedia.org/wiki/Check_digit
Patient Alerts and Flags
It's important to actively use your data to provide feedback to users of the system, both for clinical purposes and data quality purposes. One way to do this is with the Patient Flags module, which can display Flags on a patient dashboard when certain criteria are met, and to find all patients that match a set of criteria. We will briefly describe this module here, but you can find further documentation at the following location:;
http://go.openmrs.org/book-ptflags
Using this module requires significant technical knowledge. This chapter assumes that you are familiar with CSS, SQL, Groovy/Java, and the OpenMRS API.
First, you need to install Patient Flags module from the OpenMRS module repository, and then go to its section on the Administration page. First, define categories of alerts [1]. Then, you can define logic and messages for these alerts [2].
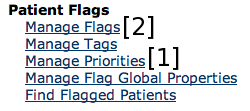
Categorizing flags by priorities
From the Manage Priorities link, you can define different categories of alerts, each of which can be decorated with custom CSS.
In this example we define two different categories of alerts, the more critical of which will be highlighted in orange, and the other in gray. Note that you need to include the style="..." in your style property.
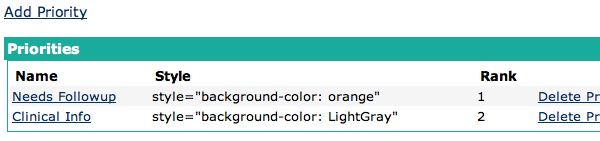
Defining flags
To set up a flag, you need to define a calculation that returns the Cohort of patients for whom the flag should be shown. There are multiple ways to do this, each requiring a different type of technical knowlege.
All flags, regardless of how they are calculated, let you specify text and a Priority. The text is displayed on a patient dashboard for patients to whom the flag applies, and the Priority controls the formatting of the flag if displayed.
Finally, you can decide whether flags are Real-Time, which means that the flags to be displayed are calculated whenever you view a patient dashboard. If you don't make a flag real-time, you can still execute the flag calculations on-demand as a batch.
SQL flags
The calculation behind this type of flag is a SQL statement that will be executed against the database, and must include a select (something).patient_id ... statement. The results of this query will be intersected with all non-voided patients to produce the Cohort for the flag.
Many system administrators know how to write SQL queries, and over time they become familiar with the OpenMRS data model, making this type of flag very accessible. At the same time, writing this type of flag can be error-prone. There is nothing to prevent you from omitting a clause, such as to ensure you are only looking at non-voided data.
In this example we are searching for all patients who have carried at least 4 pregnancies.
Since SQL flags must include .patient_id in their select clause, we have to join the obs table against the patient table, even though we aren't using that table.
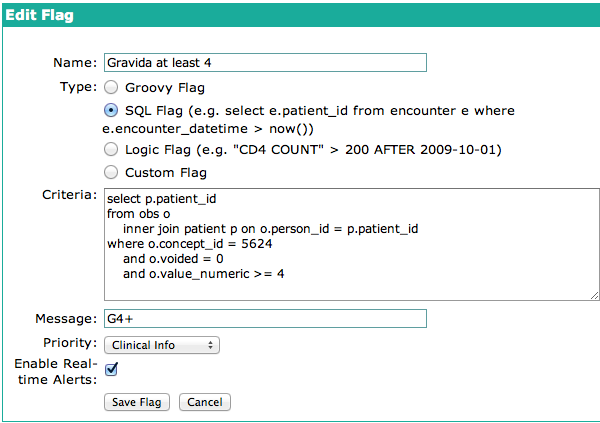
Groovy flags
The most powerful type of flag allows you to write Groovy or Java code, which can call OpenMRS's Java API and perform complex calculations on patient data. The advantage of writing flags in Groovy is that the OpenMRS API takes care of details like ensuring you're only getting non-voided date. The limitation is that most managers of OpenMRS systems don't know how to write Groovy/Java code.
A Groovy flag returns a Cohort of all patients that match the calculation. In this example we find all patients who are expected to give birth in the next 3 months, but who have not had an encounter in the last 3 months.
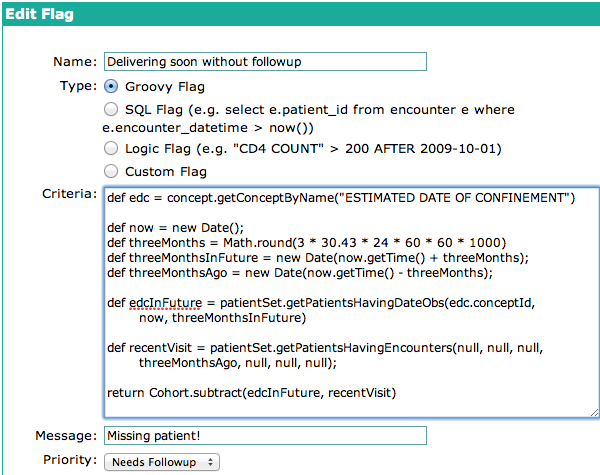
Registering Patients
In order to be able to fill out forms for a patient, you must first create a Patient. Often, a registration clerk or data entry clerk will create patients in the system. You should decide which model works best for your clinic, to prevent duplication of records.
You can create patients by clicking Find/Create Patient in the top menu.
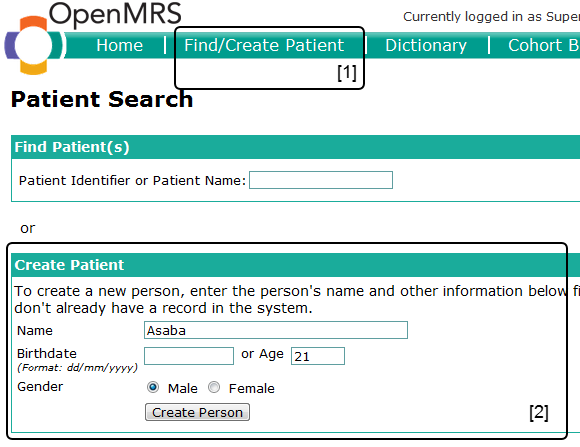
The first step in creating a Patient is to fill out the short Create Patient form. After entering the necessary information, click on Create Person. You can enter more details on the next screen.
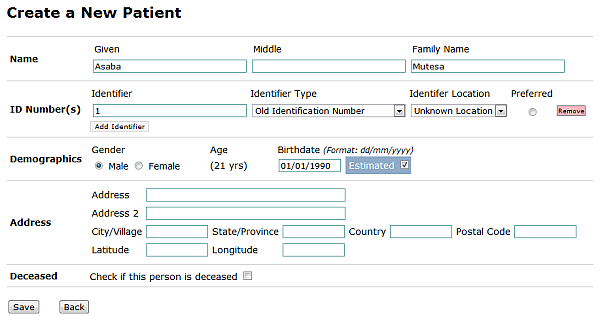
Family Name, ID Number and Identifier Type are required. Identifier type is discussed in detail in the "Managing Concepts and Metadata" chapter.
Click Save to go to the Patient Dashboard screen, where you can see all the details, enter forms, etc. for the newly created patient.
Reporting
This chapter describes how to use the Reporting module to produce a simple report on several indicators--the type you might use for monitoring and evaluating a program.
Although this chapter will cover the basics, as your OpenMRS implementation grows, you'll want to take advantage of the Reporting module's additional features like:
- Multiple types of indicator-based reports,
- Quick ways to break down indicators based on gender, age groups, etc.,
- Several kinds of patient reports,
- The ability to schedule regular reporting,
- Easy formatting options for printed output using Excel templates, and
- An API that Java developers can extend to add custom reports, indicators, and displays.
The module's full functionality is beyond the scope of this book. You can find further documentation on the OpenMRS Wiki:
http://go.openmrs.org/book-reporting
This chapter follows after the ones on Data Entry, because you cannot actually build reports without some data to run them on. But while planning the project you should follow the best practice of determining what outputs you want, and working backwards from there to determine the minimal set of data that you need to collect to produce those outputs.
Background and terminology
The reporting module is built around the idea of Definitions that are evaluated to produce output.
Reports and data sets
In general a Report Definition can have multiple Data Set Definitions. When run, this will produce a report with multiple data sets, which is rendered to a format chosen by the user.
Cohorts
Almost all reports produced with OpenMRS refer to groups of patients. A report may be run on different patient groups, or require identifying or counting sub-groups of patients. The module lets you define cohort queries (as discussed in the chapter "Cohort Builder"). When the report is run, these queries will be evaluated to produce actual cohorts of patients.
Indicators
In this chapter, we look at a report that is based on Indicators, and specifically indicators that look at the count of patients in a cohort in a period of time.
Parameters and mapping
Unlike in the OpenMRS Cohort Builder, reports and their underlying queries are intended to be created once, and reused. To support this idea, reports and queries usually take parameters. For example, a report intended to be run monthly would have Start Date and End Date parameters, and the user would be asked for these when they generate the report.
The underlying queries in the report also typically take parameters. If the report is going to display the number of patients enrolled in the Child Nutrition Study at the end of a given month, it would need to have an underlying Cohort Query for "patients enrolled in Child Nutrition Study on a date". That date would be an Effective Date parameter.
When the user runs the report, they are asked for a Start Date and an End Date, but they are not asked to specify an Effective Date. When designing the report, you will need to define how parameters in the underlying queries obtain their values, based on the values provided by the user when running the report. This process is called mapping.
The idea of mapping parameters is complicated. The following resources include more information about why it is necessary, and how to do it:
Amani Clinic's weekly report
Before adopting OpenMRS, Amani Clinic used to spend significant time at the end of every month tabulating paper registers and patient charts to produce a monthly report for the Ministry of Health. When planning their OpenMRS implementation, they decided that to improve their program, they needed more immediate feedback. The clinic and Ministry of Health met and decided on five indicators on which they wanted a report every week. They modified their paper data collection forms to make sure that they were capturing the right data to produce those indicators, as well as the periodic Ministry of Health reports.
We'll focus on two of the indicators they calculated:
- Number of female patients seen during the week, and
- The percentage of those who were >16 years old, not pregnant, and using appropriate family planning
Defining the underlying cohort queries
Calculating the first of those indicators was very straightforward: they defined this to be any female patient having an encounter between the start and end of the week.
The second indicator was more complicated: they had to break down both the numerator and the denominator into multiple Cohort Queries. For the denominator they needed:
- Not pregnant ("no obs for Estimated Date of Confinement with a value in the future")
- Female
- Age > 16 at the end of the week
- Had an encounter during the week (same as the query for the first indicator)
The numerator required just one more Cohort Query, for patients who self-reported use of contraceptive methods other than "Natural Planning / Rhythm" during the week.
Building the report in the user interface
Having determined how to calculate their indicators, they proceeded to build them in the Reporting module's user interface. First, they build the low-level queries [1]. They then composed the two indicator definitions [2] from those cohort queries. Finally, they created a report definition [3] that included the two indicators.
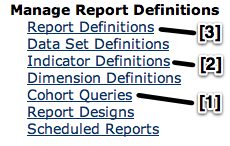
Building cohort queries
The Cohort Query management page shows you the different types of queries available. Clicking on any of the [+] links lets you create a new query of that type.
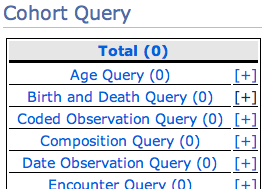
The simplest query built by Amani Clinic included only female patients:
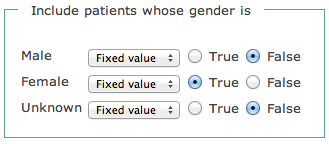
The rest of the queries needed to include parameters. For example, the query to find patients with any encounter between two given dates, the "on or after" and "on or before" fields were set as a Parameter [1] and a user-friendly names "Start Date" and "End Date" were provided.
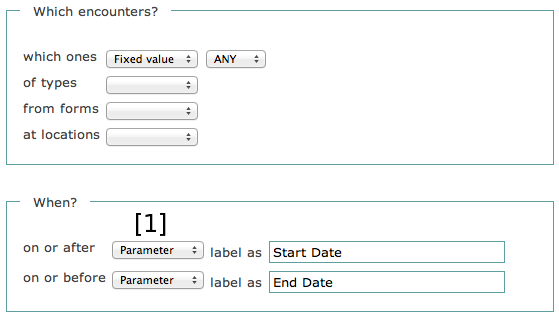
Some of the queries built in this example included parameters that weren't directly equivalent to the Start Date and End Date of the report. The "not pregnant" query was a Date Observation Query that included a single parameter, which they later mapped to the End Date of the report.
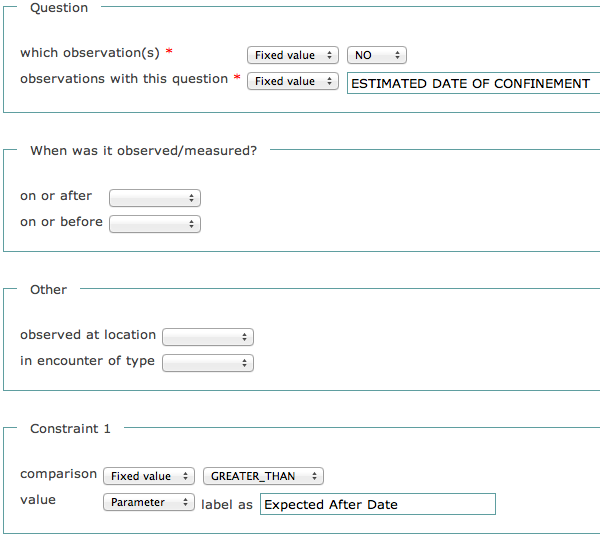
Combining cohort queries
After Amani Clinic created the underlying queries that their report required, they built several Composition Cohort Queries to tie them together. The most complicated query calculated the denominator of the second indicator, "non-pregnant women, age > 16, seen during the week".
This is their composition query, which includes the two parameters Start Date and End Date. It includes four underlying queries, with values in those queries mapped to these two parameters. Finally, the queries are combined by AND-ing them all together.
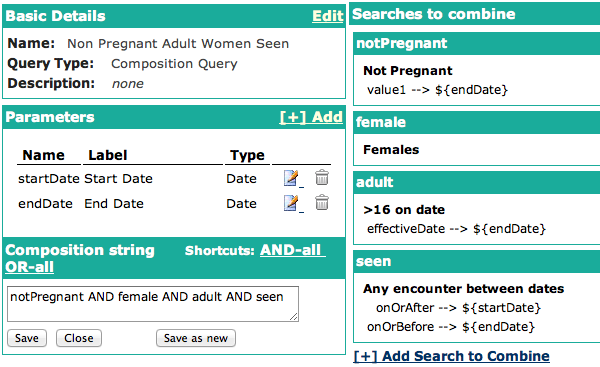
Here, we see the seven cohort queries they built:

Indicators
Having built cohort queries to do the underlying calculations, they used these to build the two indicators. The Indicators page is accessed from the Manage Report Definitions section of the Administration page.
Since indicators are generally calculated over a time period, at a particular location, the indicators they created contain the default Start Date, End Date, and Location parameters. (Since the Amani Clinic was only managing a single site in OpenMRS, they ignored the Location parameter.)
Count indicators
The simplest type of indicator is a Count indicator, which counts the number of patients who match a Cohort Query.
They used a Count indicator to build their first indicator, shown below. The underlying cohort query is a composition query including "Females" and "Any Encounter Between Dates".
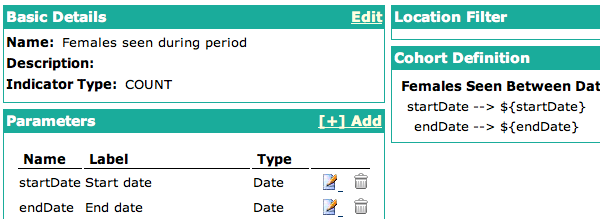
Fraction indicators
The most useful type of indicator for monitoring program progress is the Fraction indicator, which takes two cohort definitions representing a numerator and a denominator, and displays this as a fraction. (It ensures that the numerator patients are a subset of the denominator.)
Amani Clinic built their second indicator as a fraction indicator. The underlying cohort query for the numerator was a simple Coded Observation Query, while the denominator was the Composition Query described above.
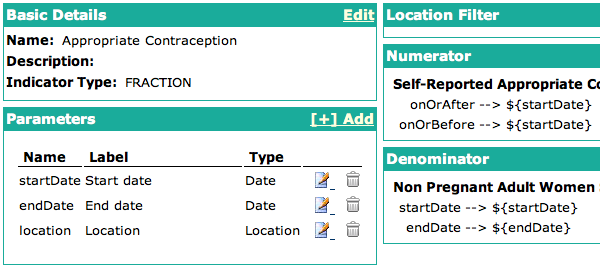
Period indicator report
Having created their indicators, they built a report that combined them. They used a Period Indicator Report, which a simple way to show the indicators you have already defined.
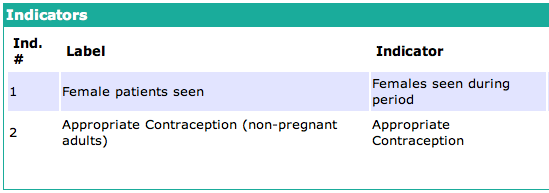
Running the report
To run this report, the Amani Clinic data manager clicks the Reporting link on the top of the screen and selects the Program Monitoring Report. They must enter the start and end date of the week for which to generate the report.

The output of the report includes clickable links to the lists of patients matching each indicator.
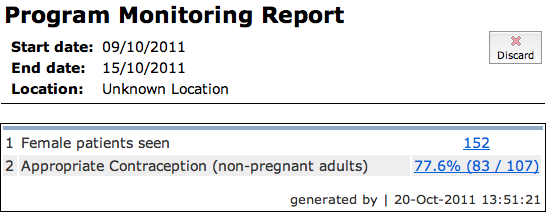
Sharing Concepts and Metadata
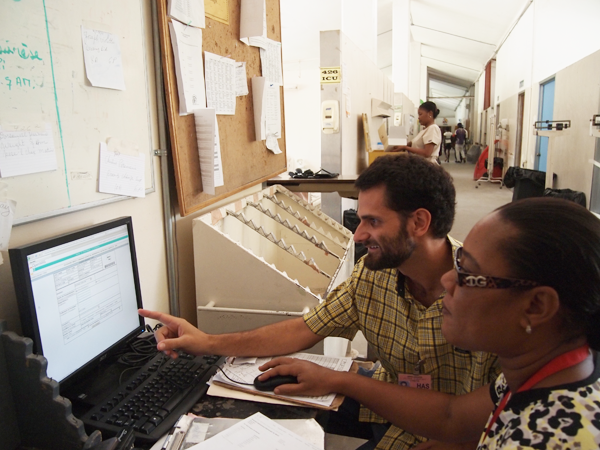
Working with OpenMRS forms at Hôpital Albert Schweitzer, Deschapelles, Haiti.
Instead of creating concepts, forms and other metadata yourself, you are highly encouraged to use some which are publicly available. You can use complete concept dictionaries like MCL or MVP as well as metadata packages which include just a fraction of dictionaries, forms, locations, etc.
Sharing forms entails sharing associated concepts and other metadata. To facilitate this task, the Metadata Sharing module was created. It allows all kinds of metadata (concepts, forms, locations, roles, programs, etc.) to be exchanged between different OpenMRS installations.
Any dependent metadata will be packaged along with the exported item. For example, if you export a concept which has coded answers, the module will package the initial concept along with all the coded answer concepts, class and datatype. If you export a form, it will package the form along with the encounter type, all concepts used on that form, etc.
The import process is designed in a way to help identify items in your system that are semantically the same as the ones included in a package so that you can skip importing them and use yours.
You can find some published forms at:
http://go.openmrs.org/book-formbank
Let's see an example of importing a form with the Metadata Sharing module. The Amani Antenatal History form will be presented in detail in the "Data Entry" chapter.
After installing the Metadata Sharing module, go to Administration > Import Metadata.

- Import a new package
- List of previously imported packages you are subscribing
To start, click the Import package button and on the next screen, point to a file you want to import.

- Choose a local file you want to import
- Enter a subscription URL
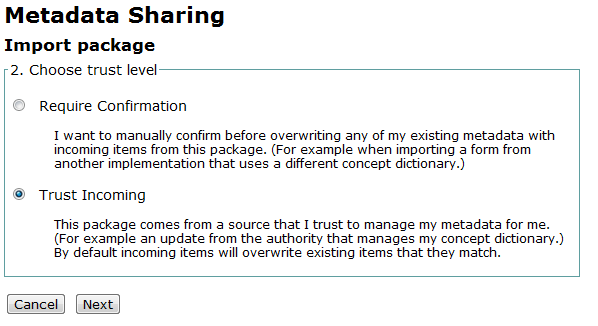
The next step is to choose a trust level. As stated before, while importing a package you will have a chance to use concepts, locations, etc. which exist in your system rather than creating new ones from the package. If you choose to do so, you can either overwrite your existing items or keep the ones you already have. If you choose Require Confirmation, you will be asked to review most of the metadata before importing and decide what you want to do. The Trust Incoming option in most cases will default to overwrite your existing metadata and will not require confirmation. Click Next to proceed.
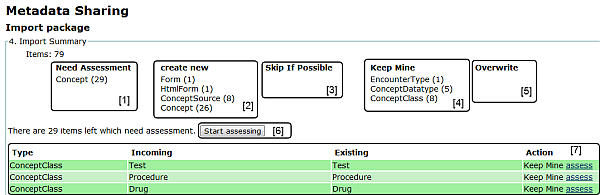
- Items needing assessment
- Items which will be created
- Items to skip
- Items in your system which will be used instead
- Items which will be overwritten
- Opens the assessment screen
- All items in the package
On the next screen, you will see some details about the package and clicking Next again will bring you to the Import Summary page where you can assess items. As in our example, you will have to review twenty-nine concepts.
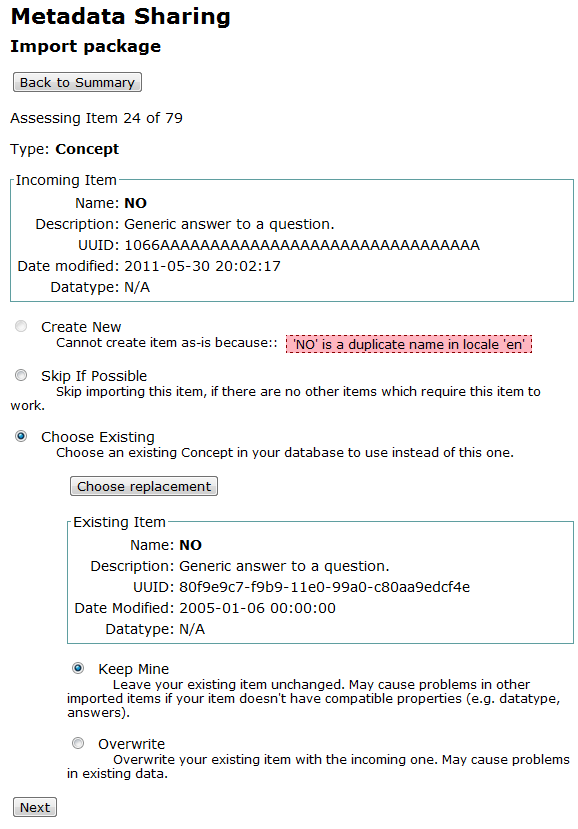
The assessment screen depending on the case allows you to choose Create New, Skip if Possible, Choose Existing - Keep Mine, and Choose Existing - Overwrite. If you select Choose Existing you will be able to search for an existing item on your system by clicking Choose replacement. In this example, you cannot select Create New as it would violate a restriction that there cannot be two Concepts in the system with the same name.
Once reviewing all the items which need to be assessed, you can import the package.
A good source of concepts is the Maternal Concept Lab:
http://go.openmrs.org/book-mcl
It allows you to find concepts you need and download them as metadata packages which you can import directly to your OpenMRS installation as needed with the help of the Metadata Sharing module.
The Metadata Sharing module promotes decentralized management of metadata where everyone can both create and import metadata packages.
Transitioning to OpenMRS
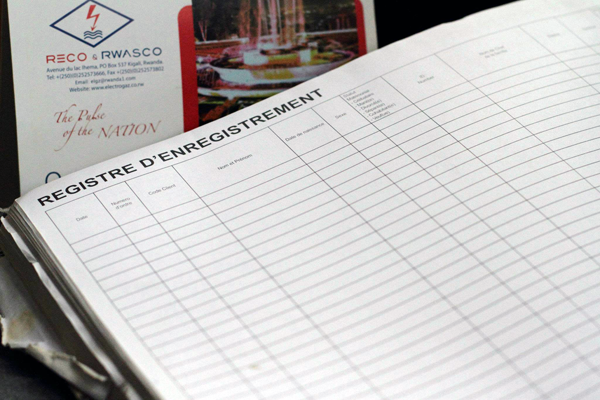
A paper-based patient register book at an African OpenMRS clinic.
This chapter outlines steps that typically make up a OpenMRS project, and should be read by people about to embark on a OpenMRS project. Some of this information may be obvious to experienced project managers. A comprehensive guide to project management is beyond the scope of this book, but we have included some high-level process considerations to get you started thinking about what needs to happen.
We recommend you try to build a structured implementation process. It's important to plan carefully--the decisions you make during this process require substantial investments of resources, and you will be living with your choice for the foreseeable future.
When you start out on a new OpenMRS project, you should spend time thinking about (at minimum):
- Which people will be involved in the project
- Business goals of using OpenMRS
- How you will approach the initial configuration
- What ongoing support you will need
- Costs associated with ICT infrastructure
- Training and documentation
- Change management
People and the project team
Your project implementation team should include clinic staff:
- Management are aware of funding obligations and 3rd party reporting requirements.
- Health care providers are focused on improving patient care.
- Administrative staff are specialists of workflow issues and clinic processes.
The team could also include the following people that may or may not be from the clinic:
- A system administrator is in charge of installing and maintaining OpenMRS inside of the clinic's ICT infrastructure.
- Medical informatics expert(s) create clinical documentation and ensure that data is managed properly in the system. Develop reports.
- (Optional) A project manager or coordinator. For larger implementations, this person works to hold people accountable to finishing their work in a timely manner, and ensures the project is on track.
- (Optional) Software developers may be needed for locations that decide to customize the system.
It's very important to include clinical staff (for example nurses, data entry clerks, and others) in your implementation team from the earliest phases of the project so that the resulting deployment is ultimately useful for them and easy for them to use.
Managing an OpenMRS project will require a major time investment from people within your organization, even if you employ an external consultant. Organizations often under-estimate the amount of time that will be required from their staff in implementing an enterprise ICT project. This time investment includes items such as training, modifying existing processes, and providing new or updated information to relevant people. Deploying OpenMRS is no different. It's not something that can be added to the end of an already busy schedule--we urge you to keep this in mind and take it into consideration when planning.
Goals
By this point in the project, you should have a good idea of what indicates a successful OpenMRS implementation for your clinic. This could be something like reduction of time to prepare month-end reports by 50%, or increase antiretroviral treatment (ART) in HIV-infected pregnant women by 25%. Your goals should be specific, measurable, attainable, relevant, timely--or SMART.
These goals will help you in directing and managing your project. For example, if the project group wants some customization that requires budget and effort, your overall goals will help you decide whether or not to consider that customization. Your goals will help you to focus on why you are implementing OpenMRS and what you want to achieve in the long run.
Incremental adoption
It often makes sense to divide the implementation process into smaller, more manageable sections, which can be implemented in discrete stages or iterations. Implementing in stages allows people to get used to changes gradually without feeling overwhelmed, and allows your implementation team to be responsive to feedback from users during the process.
Another reason people choose to develop iteratively is that it is very hard for users to correctly or fully explain their requirements at the beginning of the project. Giving people hands-on experience of an early version of the system helps them understand how it works and what might be possible. They can then provide you with valuable feedback, and they might articulate requirements that they not previously identified.
The Amani Clinic chose to introduce change iteratively. First they started using the system for patient registration. This affected only the administrative staff without impacting the clinical staff. Later they started doing retrospective data entry, which included paper forms for clinicians that had minor changes, as well as training a new data entry clerk.
Pilot projects
Larger multi-site implementations may wish to develop a pilot approach to help reduce risk. In this scenario, you would only deploy OpenMRS at one site and learn about the process in a more controlled way. You can then incorporate what you've learned into a coordinated implementation process for other sites.
Ongoing support and development
It is a mistake to think about an OpenMRS project as a one-off installation that will meet the needs of your organization for the foreseeable future. Organizations are always changing and evolving. Your medical record system should evolve with you, otherwise it will eventually become out-of-sync with the organization.
Once you have been using OpenMRS for a while and staff are comfortable with it, you will likely want to take advantage of additional functionality. Each improvement or new piece of functionality that you decide to implement in OpenMRS will take resources, so you'll want to plan ahead for these.
Even if your organizational needs don't change, you need to plan for ongoing support of OpenMRS, including:
- Keeping your system up-to-date with security patches
- Upgrading to the latest version of OpenMRS (not always necessary, but OpenMRS is improving all the time and your users will thank you for the improved usability and functionality each time you upgrade)
- Upgrading the modules you use to fix bugs and improve features
- Maintenance of your server and network infrastructure
For more information, see the "Maintenance" chapter.
Training
Training is also an important part of any OpenMRS implementation project. Your training could take many forms depending on the needs of your users, but it often makes sense to spend resources (e.g., time and money) on formal and reusable training resources such as user guides, lesson plans, and other materials.
Trying to cover everything in one training session probably won't be effective. People will want and need time to digest the new ideas they learn and use them in their daily work, and you must anticipate staff turnover. Instead, consider holding smaller training sessions that introduce concepts and specific functionality, followed by periods of testing, piloting and feedback. Customize your training for your audience--not everyone needs to sit through a two-hour training session on data entry if only a single person is responsible for this role. When possible, train people to become trainers. This increases peoples' sense of ownership in your OpenMRS implementation, and helps people to better remember what they learn.
Training is an ongoing process. New employees will need to be trained when they start, and people familiar with the system can benefit from learning about more advanced topics. Sometimes, people will need further training when there are significant upgrades or new functionality is added to OpenMRS or a module you use.
Change management
Introducing an electronic medical record system will cause changes in workflow and processes at your organization. These changes may be "political" and cause challenges in your organization, or they may be more practical and technical changes. Either way, too much change at the same time is often difficult and stressful.
To help, give people time to accept and support each change so that they share in ownership of the new system, rather than feeling as if something has been forced on them. Focus on simple tasks at the beginning of deployment and introduce more difficult tasks as people start to better understanding OpenMRS. Show staff how the new system will make their work easier and where their feedback has been incorporated.
Good planning can minimize the risks around change, but it is important to be flexible within your plan. Unforeseen things often occur, and a plan that is too rigid could prevent you from reaching the best solution.
Troubleshooting Your Installation
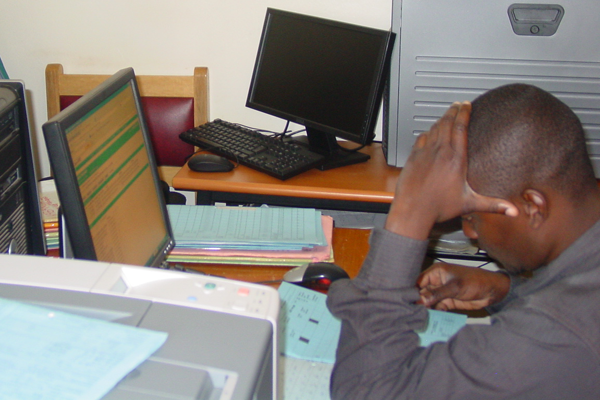
Unfortunately, sometimes things do not go exactly the way you would like them to. This chapter can help you deal with the most common problems.
We recommend using Apache Tomcat 6.0.29 to run OpenMRS. Any J2EE-compliant Java servlet container should be able to run it, but most people who use OpenMRS are running it with Tomcat, which makes it may be easier to get support if you encounter problems.
If you are not yet using Tomcat 6.0.29, consider upgrading Tomcat before you continue. We recommend getting Tomcat from this link.
http://tomcat.apache.org/
When troubleshooting Tomcat, your first step should always be to review the Tomcat logs. In Windows, these are stored at the following location.
C:\Program Files\Apache Software Foundation\Tomcat 6.0\logs
Historically, MySQL has been recommended as the database of choice to use with OpenMRS. The newer database from the open source project MariaDB should also be compatible with OpenMRS. Work is underway in the OpenMRS community to provide support for other databases such as Oracle, Microsoft SQL Server, and others, but these databases are not yet supported.
You may not be able to resolve your problem with OpenMRS using the troubleshooting material in this chapter. That is OK -- the OpenMRS community is available to help! Check out the "Getting Help from the OpenMRS Community" chapter for more information about how to communicate with others, ask questions, and get answers.
Some possible problems and solutions
OpenMRS fails to install with message "Error creating bean with name 'messageSourceServiceTarget'"
MySQL must be running before starting and installing OpenMRS. If it is not, you may see the following error message in your web browser and log files when you attempt to install OpenMRS:
org.springframework.beans.factory.BeanCreationException:Error creating bean with name 'messageSourceServiceTarget' defined in class path resource applicationContext-service.xml
Ensure MySQL is installed and running before attempting to start and install OpenMRS.
MySQL Configure Instance hangs on starting the service, or reports Error 1045
On Windows, the computer may stop responding while running the MySQL Configure Instance tool. Most commonly, this occurs before the tool marks Starting the service as complete, because there is already a MySQL service running.
To fix this, you should delete the pre-existing MySQL service in Windows, and try the installation again. You can find instructions on how to do delete a MySQL service at this link.
http://www.howtogeek.com/howto/windows-vista/how-to-delete-a-windows-service-in-vista-or-xp/
Alternatively, you may see a MySQL Error 1045, if your computer has previously had a MySQL instance installed. This means that the root password is incorrect, and is most commonly caused by residual data from the previous installation.
To fix this, you should delete the MySQL data directory. On Windows 7, you may need to reboot and delete the directory, or to use an unlocking program in order to delete this directory.
You can also change the password that OpenMRS uses to access your MySQL database, by editing the openmrs-runtime.properties file, as described later in this chapter.
Starting Tomcat service on Windows fails
If you cannot start the Tomcat service on Windows, try checking the Tomcat logs. You can find the logs in the following directory.
<TOMCAT HOME>\logs
Errors like "Failed creating java C:\Program Files\Java\jre1.6.0\bin\client\jvm.dll"
To fix this problem, search for msvcr71.dll on your hard drive, and copy that file to this location.
C:\Windows\System32
Installing OpenMRS or running database updates fails with message “Could not acquire change log lock”
To prevent conflicting updates, liquibase begins each update by creating a row in the liquibasechangeloglock table. This row acts as a lock. If OpenMRS or Apache Tomcat crashes while an update is in progress, the update may fail to complete, and this row will not be removed from the table.
You may see the following error message in your web browser or in the Tomcat logs, the next time you start up or attempt to install or update OpenMRS:
"Error Could not acquire change log lock"
Deleting this row from the liquibasechangeloglock table will solve the problem, and allow installation or updates to proceed normally. To delete rows from the liquibasechangeloglock table using a command line SQL client, run either of the following SQL commands:
truncate table liquibasechangeloglock;
delete from liquibasechangeloglock;
If you prefer to use a GUI client for MySQL, you should navigate to the liquibasechangeloglock table and delete all rows from that table. When you have cleared the table, restart Tomcat if necessary, and restart OpenMRS.
Problems connecting to Tomcat on port 8080
Other programs you have already installed may already be using port 8080. This will prevent Tomcat using this port. Some software may also use port 8005, which should not interfere with running Tomcat, but may prevent it from starting up correctly.
If you know what program is using these ports, you may choose to stop or remove that program. Alternatively, you can configure Tomcat to run on a different port, by editing Tomcat’s server.xml file to change 8080 to a different value (eg 8090).
If you need further help, see the "Getting Help from the OpenMRS Community" chapter for more information.
Permission problems when running Tomcat as a service on Ubuntu
If you are trying to run Tomcat as a server on Ubuntu, you may run into permission issues. The following error is typical of these problems:
java.security.AccessControlException: access denied (java.io.FilePermission /usr/share/tomcat6/webapps/openmrs/WEB-INF/dwr-modules.xml delete)
The easiest way to solve this issue is to disable the Java security manager or similar startup script, which you can find at this location.
/etc/init.d/tomcat6
Edit the file and set TOMCAT6_SECURITY to no.
# Use the Java security manager? (yes/no)
TOMCAT6_SECURITY=no
Tomcat stops responding after updating or reloading OpenMRS in the Web Application Manager
Tomcat and the JVM allocate memory to a webapp each time you use the Update or Reload functions in the Web Application Manager. When the app is destroyed or recreated, some of this memory may not be released. If you update or reload the webapp too many times, Tomcat may run out of allocated memory, and will stop responding. You will also see the following error in the Tomcat logs:
java.lang.OutOfMemoryError: PermGen space
It is not possible to completely avoid this problem. However you can mitigate it by allowing Tomcat to use more memory, or by restarting Tomcat if you have to repeatedly update or reload a webapp.
Deploying OpenMRS using the Tomcat Manager web application fails
For various reasons, trying to deploy OpenMRS using the Tomcat Manager web application may fail. If this occurs, you should undeploy OpenMRS using the Tomcat Manager, then stop Tomcat.
You can do this on the command line under Linux or OS X. First, find the process ID (PID) by running the following command:
ps ax | grep tomcat
This may return several lines, each starting with a number. Look for a long line that contains something like /usr/local/tomcat or /opt/tomcat. The PID is the first number on that line. Stop Tomcat with the following command:
kill -9 PID
Finally, you can restart Tomcat as follows:
service tomcat6 start
Log back into the Tomcat Manager web application and deploy OpenMRS normally.
OpenMRS (openmrs.war) deploys successfully but fails to start
If there are issues with the OpenMRS settings for application_data_directory, openmrs.war may successfully deploy, but thereafter fail to start. The following messages are seen in Tomcat's logs:
SEVERE: Error listenerStart
SEVERE: Context [/openmrs] startup failed due to previous errors
Ensure that the runtime properties file exists, and that the application_data_directory is specified in this file. Further, ensure that the directory exists, and that Tomcat has read and write permissions to the directory.
If the directory exists as specified in the runtime properties file, and Tomcat has the appropriate permissions, you may have security violation problems in your Tomcat configuration. If you need further advice, consider seeking help from the community, as described in the chapter "Getting Help from the OpenMRS Community".
Unable to log in to Tomcat Manager due to lost password
The Tomcat admin password is required to log in to the Tomcat Manager web application, to deploy and undeploy applications, including OpenMRS.
If you have forgotten, lost, or misplaced this password, you can retrieve it from the file tomcat-users.xml. On Windows, this is probably located at this location.
C:\Program Files\Apache Software Foundation\Tomcat 6.0\conf\
The database password or other properties are set incorrectly
If you have installed the OpenMRS Standalone application, you can modify settings by editing the openmrs-standalone-runtime.properties file in the directory where you extracted the ZIP package.
To modify settings for the OpenMRS Enterprise version, you should edit the file openmrs-runtime.properties. You should find this file in one of the following locations:
On Windows systems:
- C:\Documents and Settings\YOURUSERNAME\Application Data\OpenMRS
- C:\Windows\system32\config\systemprofile\Application Data\OpenMRS
On Mac OS X or Linux systems:
- ~/YOURUSERNAME/.OpenMRS
- /usr/share/tomcatX/.OpenMRS
The OpenMRS administrator account password has been forgotten
In general, when a user is locked out, the password should be reset by the administrator using the "Edit User" page from the OpenMRS Administration page. However, in rare situations that administrator's account may have been forgotten. The only way to reset the password for this account is to directly modify the OpenMRS database. This should only be attempted by advanced users, and you should always back up your database before making changes.
You will need to modify the users table in the OpenMRS database schema. Find the row for the user in question and change the password and salt values to the following:
- password: 4a1750c8607d0fa237de36c6305715c223415189
- salt: c788c6ad82a157b712392ca695dfcf2eed193d7f
Some module pages throw java.lang.ClassNotFoundException
There are currently some issues with compatibility between OpenMRS and versions of Apache Tomcat later than 6.0.29. OpenMRS modules that rely on certain custom expression language functions will throw a java.lang.ClassNotFoundException exception.
If you encounter this issue using a version of Tomcat greater than v6.0.29, you may need to disable any modules that rely on custom expression language functions, or install Tomcat 6.0.29 for use with OpenMRS.
Starting OpenMRS fails with message “Module file does not have the correct .omod file extension”
OpenMRS will not start if there are non-modules in the modules directory. You may find a message in the logs similar to these:
org.openmrs.module.ModuleException: Module file does not have the correct .omod file extension Module: derby.log
org.openmrs.module.ModuleException: Module file does not have the correct .omod file extension Module: velocity.log
To solve this problem, delete or move any files in the modules directory that are not modules with an .omod extension.
In particular, the BIRT Runtime creates various log files in the modules directory when the BIRT module is stopped. If you are using the BIRT Report module, there may be non-module files in the OpenMRS modules directory--typically, derby.log or velocity.log. These files can safely be moved to another location, or may be deleted.
To prevent the derby.log from being created in future, delete the directory org.apache.derby.core_10.1.2.1 which is located under the following directory.
birt-runtime-2_2_0/ReportEngine/plugins/
MySQL packet length errors, or MySQL Error 2006
These errors occur when the client or server tries to handle data larger than the maximum packet length. The default maximum packet length is 1MB. Some items (such as form data) can easily exceed this maximum, causing errors when importing data into or exporting data from the OpenMRS database.
To increase the maximum packet length allowed by your MySQL server, you should stop the server, edit the configuration file, then restart the server. The configuration file is typically located at one of these locations.
- Windows: C:\Program Files\MySQL\MySQL Server x.x\my.ini
- Linux or Mac OS X: /etc/my.cnf
Some MySQL packages come with alternative configurations (INI configurations)--make sure you edit the one that you will be using!
This file should already contain a section with the header [archive:mysqld]. You can add the following line below that header:
max_allowed_packet=64M
You can also increase the maximum packet length using the MySQL Administrator application, by opening the Health section and changing the max_allowed_packet setting on the System Variables tab. This setting can be increased up to a maximum of 1024M as necessary.
Depending on your MySQL client, you may also need to adjust the maximum packet length of the client. If you are using the MySQL command line client, you can start it with an increased max_allowed_packet by adding the following after the mysql command:
--max_allowed_packet=64M
Problems connecting to MySQL on a system with multiple MySQL installations
If MySQL is already installed and running on your system, OpenMRS Standalone's initial setup may be unable to create the OpenMRS user and database. You may also encounter this problem after installation, if you have installed a "traditional" MySQL server and try to run OpenMRS Standalone.
This problem happens because MySQL clients on UNIX-based systems always use UNIX sockets to connect to MySQL when localhost is specified in the connection URL. This is a known issue/limitation/bug in MySQL and is documented in more detail by the MySQL project.
http://bugs.mysql.com/bug.php?id=31577
It is possible to run OpenMRS in a separate database instance than the one already existing on your system (for example, to run OpenMRS Standalone on a system where MySQL is already installed). To do so, you must first ensure that the new database instance is running on a different port.
Then, ensure that you are connecting to MySQL via TCP/IP instead of using the same UNIX socket as the existing instance. The easiest way to do this is to use 127.0.0.1 instead of localhost in the connection string. An alternative is to add &server.port=XXXX to the value of connection.url in the openmrs-runtime.properties file, where XXXX is the port used by the OpenMRS MySQL instance.
For example, if the MySQL instance used by OpenMRS is running on port 4242, the openmrs-runtime.properties file should include one of the following lines:
connection.url=jdbc:mysql://127.0.0.1:4242/openmrs?autoReconnect=true&sessionVariables=storage_engine=InnoDB&useUnicode=true&characterEncoding=UTF-8
connection.url=jdbc:mysql://localhost:4242/openmrs?autoReconnect=true&sessionVariables=storage_engine=InnoDB&useUnicode=true&characterEncoding=UTF-8&server.port=4242
Tomcat error log contains IOException while loading persisted sessions
Apache Tomcat tries to restore the exact memory state after each restart. OpenMRS does not depend on this feature, so you can ignore any warnings printed to the Tomcat logs that look similar to the following:
SEVERE: IOException while loading persisted sessions: java.io.WriteAbortedException: writing aborted; java.io.NotSerializableException:
If you find these messages annoying, you can turn off session persistence. Edit the <TOMCAT_HOME>/conf/server.xml file and uncomment the line that includes:
<Manager pathname="" />
Java Heap Size errors
OpenMRS uses a lot of memory for caching. Certain tasks, such as exporting data, may cause a Java Heap Size error. You can mitigate this by increasing the default memory allocation in Tomcat.
If you are starting Tomcat on the command line, you should pass the following parameters to increase the default memory allocation:
-Xmx512m -Xms512m -XX:PermSize=256m -XX:MaxPermSize=256m -XX:NewSize=128m
If you are running Tomcat as a Windows Service, you can increase the memory allocation by adding this same line to the list of start parameters. Make sure that you add this to the end of the existing parameters exactly. An extra space at the end of the line can prevent Tomcat from starting properly. You can find the list of start parameters in the Tomcat Monitor application, by going to Configure Tomcat > Java > Java Options, or via the Control Panel > Services > Apache Tomcat > Properties > Start Parameters.
If you are running a 64-bit version of Tomcat as a Windows Service, you must edit the Windows Registry to add that line to the HKEY_LOCAL_MACHINE\SOFTWARE\Apache Software Foundation\Procrun 2.0\Tomcat5\Parameters\JavaJVM settings in the Registry.
If you are running Tomcat on Ubuntu, edit its startup script such as /etc/init.d/tomcat6 and make the following changes:
if [ -z "$JAVA_OPTS" ]; then
        JAVA_OPTS="-Djava.awt.headless=true -Xmx128M"
fi
Should become:
if [ -z "$JAVA_OPTS" ]; then
        JAVA_OPTS="-Djava.awt.headless=true -Xmx1024M -Xms1024M -XX:PermSize=256m -XX:MaxPermSize=256m -XX:NewSize=128m"
fi
If you are running Tomcat as a Linux service, open the /etc/init.d/tomcat script and append change the CATALINA_OPTS variable:
CATALINA_OPTS="-Djava.library.path=/opt/tomcat/lib/.libs -Xmx512m -Xms512m -XX:PermSize=256m -XX:MaxPermSize=256m -XX:NewSize=128m"
Memory leaks
After troubleshooting, you may determine that Tomcat or OpenMRS are having problems with memory leaks.
To mitigate memory leak problems in Tomcat, consider enabling pooling by adding the following element to the JSP servlet definition in the file <TOMCAT_HOME>/conf/web.xml:
<init-param>
<param-name>enablePooling</param-name>
<param-value>false</param-value>
</init-param>
If you believe you have discovered a memory leak in OpenMRS, and are comfortable looking at the OpenMRS application code to identify where the leak is located, you may like to troubleshoot further to find out the cause. OpenMRS developers use YourKit Profiler to discover and debug memory and CPU consumption issues.
YourKit is kindly supporting members of the OpenMRS community with its full-featured Java Profiler product. If you have development skills you may want to use this tool to understand why the application is leaking memory or consuming too many processor resources. As an active participant in the OpenMRS community, you can request a license by opening a support desk ticket
http://go.openmrs.org/helpdesk
Bugs in OpenMRS
If you believe you have discovered a problem that may be a bug in OpenMRS, we encourage you to report that bug. The OpenMRS development team takes bug reports seriously and continually fixes as many bug reports as possible for future releases. Please see our bug report page on the OpenMRS wiki for further details and instructions:
http://go.openmrs.org/bug
User Management and Access Control
Roles and Privileges are controlled through the Administration page, under the Manage Users section.
OpenMRS uses privileges and roles to control access to data within the system. Privileges define what can or cannot be done in the system (e.g., Edit Patients or Add Users) while roles are used to group privileges into more manageable groupings. To make the system easier to manage, roles can contain other roles as well as privileges. Roles inherit all the privileges of their parent roles.
We will use this example: you are working with several privileges related to patient data—e.g., View Patients, Edit Patients, and Add Patients. The View Patients privilege lets users look at patients in the system, the Edit Patients privilege lets users edit information about existing patients, and the Add Patients privilege allows users to create a completely new patient record within the system.
Now imagine that you need to assign the proper rules to three people: Mary the Medical Student, Bob the Data Assistant, and Erica the Data Manager. You want medical students to be able to view patients, but not edit or add them. Data assistants should be able to not only view, but also edit patient data. And you want your data managers to be able to create new patients within your system.
Designing role and privilege schemes
In order to give these privileges to the relevant users, you must define a role for each of these types of user.
| Role |
Privilege(s) |
| Medical Student |
View Patients |
| Data Assistant |
View Patients
Edit Patients |
| Data Manager |
View Patients
Edit Patients
Add Patients
|
Now, by defining the main roles for users of your system and assigning users to those roles, you have a much easier system to manage and users will automatically inherit all privileges given to their role(s). Of course, some users will have multiple roles. Now, let's take this process one step further. While it may not seem necessary in this simple example, as your system grows, you will likely end up with a large number of different roles. Very often, certain roles can be defined as a combination of other roles. In our example, a Data Manager oversees the Data Assistants and therefore should have all of their privileges plus some additional privileges. So, let's redesign our roles slightly to show how this might work.
| Role |
Inherit Privileges from Role(s) |
Additional Privilege(s) |
| Medical Student |
|
View Patient |
| Data Assistant |
|
View Patient
Edit Patient |
| Data Manager |
Data Assistant |
Add Patient |
You can see that the Data Manager role can be more clearly defined as a Data Assistant with the extra ability to add patients to the system. In addition, if you should change or enhance the privileges of the Data Assistant role at any time in the future, the Data Manager will automatically adapt to those changes — for example, if you decided a month later to allow any Data Assistant to Edit Encounters (by adding the Edit Encounters privilege to the Data Assistant role), the Data Manager role would automatically gain the ability to edit encounters as well.
In a common deployment scenario, you would define a role like Provider that is inherited by Physician, Nurse, Clinical Officer, etc. You can then control most of the privileges within the Provider role and those changes will effect all types of providers in the system. If you find that you have to go through multiple roles and edit them to make a change, then you could likely benefit from defining a new role that the others can all inherit from. For example, if you found that you were constantly editing roles like Provider, Data Assistant, and Caregiver whenever you adjusted how patient data are allowed to be viewed in your system (i.e., affecting all users/roles that are allowed to view patient data), you might benefit from creating a new Patient Data Viewer role, assigning it to each of those other roles, and then managing the privileges in one place (under that new role).
Built-in roles
There are some special roles that are predefined within OpenMRS and cannot be deleted: Anonymous, Authenticated, and System Developer. Any privileges granted to the Anonymous role will be available to people without logging into the system. Generally, Anonymous privileges should be kept very restricted, since patient information might otherwise be compromised. Privileges granted to the Authenticated role are granted to anyone that logs into your system, no matter what other role(s) they might be assigned. Granting privileges to the Authenticated role is an easy way to grant privileges to all users of the system. The System Developer role is automatically granted full access to the system and should only be granted to system administrators.
Super users (system administrators) are automatically granted all privileges in the system; therefore, you must be very careful to protect your system administrator password.
Some privileges are built into the system and cannot be deleted. Other privileges may be added by modules. It is unlikely that you will be adding new privileges yourself, since privileges are only useful when they are understood and used by the system. On the other hand, you will definitely be creating new roles to fit your needs and will be managing privileges within those roles.
Creating roles
You create roles through Administration > Manage Roles.
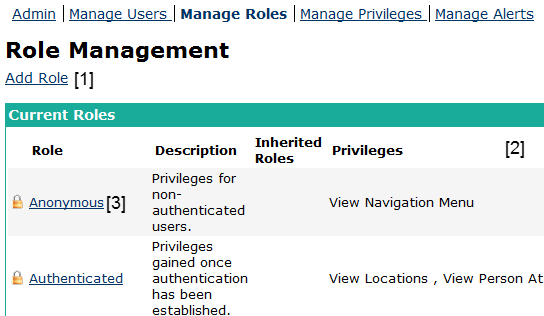
- Allows to add a new role
- Lists all roles present in the system
- Click a role to edit it.
If you then follow the Add Role link, you will see a form for adding a new role.
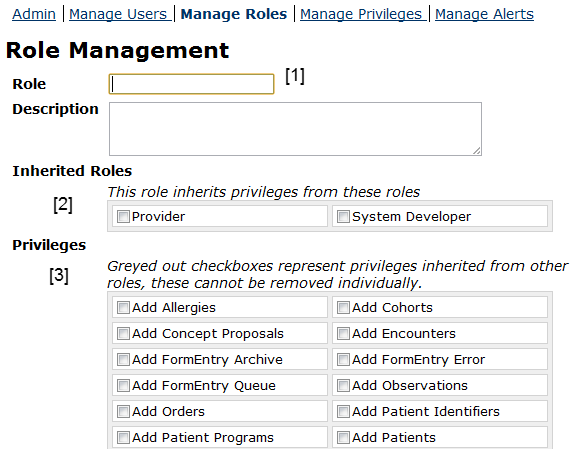
- Enter Role Name
- Choose Roles Privileges of which you want to inherit
- Choose Privileges which you want this Role to have
Creating users
To create these users, we'll go through Administration > Manage Users. This page also lets you find and edit existing users.
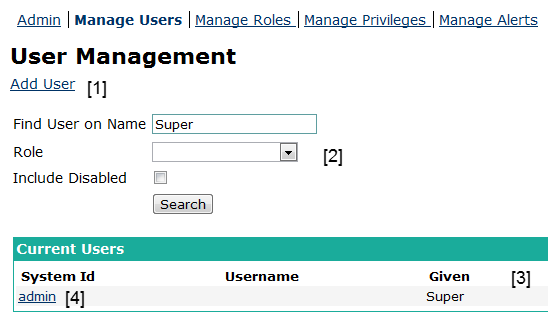
- Create a new User
- Search Users by Name or Roles
- Search results
- Edit a single User
Users in OpenMRS need to be associated with Persons. You either need to create a new Person, or attach the user account to an existing one.
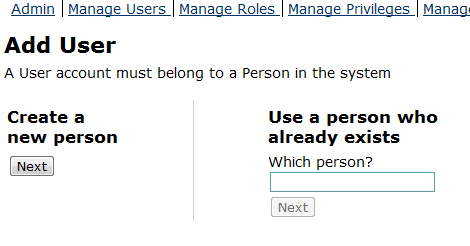
In both cases you will be taken to the same Add/Edit User screen. (If you selected an existing person, the fields in the Demographic Info section will be filled out for you.)