


Organizing your files
As you continue working on your layout, you will accumulate an increasing number of files. It begins with your source files for text and images. Next comes your document file itself, various PDF proofs, production notes and communications, messages and corrections from your proofreaders, and perhaps some additional requests for enhancements.
On a practical level, it will make sense to collect similar files together, and have some organization for successive issues of a periodical for example, when you want to easily refer back to prior issues. All of this begins on a small scale, yet soon you have so many that, without some organization you risk suddenly frantically trying to find something that you seem to have lost.
Organization begins from the top down, so start with a main folder for the project, with a sensible name so you can locate it quickly. Think about whether you are creating something as part of a series, so that you can name your directories accordingly, perhaps with an issue number included in its name. You might, for example, concatenate date-projectname-issue-dimensions-colorspace-resolution.extension. More specifically one could have something like 20110712_leaflet-A4-flossmanuals_150x125mm_CMYK_300dpi.tif. This might seem ridiculously long, but such a title can make subsequent searching much easier, and avoid the time it takes to actually look at the files inside.
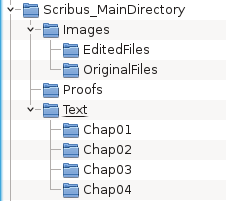
Inside this directory will first of all be the Scribus .sla file, then subdirectories for each type of content. Text and images would of course be appropriate, and you may have separate folders for processed images to keep the originals safe and unaltered. After this, folders for PDF proofs, and a separate one for the final PDF. You can certainly add further folders for your specific needs as you continue working on your project, with a hierarchy that meets your needs.
Images in Scribus files
Scribus does not have the actual image data in its .sla files, only a link (pathname) to the file for each image. The only exception would be an imported vector image, in which case the vector data is included in the document file. Thus one can see how imperative it is to have an organized system for keeping your image files together.
Proofs
A separate folder for these is advisable, and once again, naming the files in some numerical fashion will be useful for future reference.
Create a directory template
One way to easily reproduce such a structure is to have a template of sorts, a main directory with its various subdirectories, which has all the basic structural elements. Thus when you begin a new project, you simply copy this folder and subfolders, renaming the main folder, and voilà! You are ready to begin your project.