


Styles
Depending on the type of document you are working on, the process of design can be optimized by automating common tasks.
When the amount of text is great, and it has a consistent structure, as far as header, titles, blockquotes, captions, and so on, then styles are by far the best tool for easily applying these features. With a single click, you can apply the various font parameters you have been using throughout your document.
There are several advantages to using styles:
- They improve productivity
- They greatly simplify making last minute changes to a text appearance document-wide
- They allow for a consistent appearance from one part of a document to another and from one issue or edition to the next
- They allow for coordinating captions with the graphics to which they refer
- They allow for a more pleasing experience on the reader's part
- They easily allow for coordination of work by a team working on the same document
About the only disadvantage is the time it takes to plan and create these various styles, but even here there is an easy allowance to adjust your style later, so less pressure to get the style "exactly right" the first time.
Creating styles
Making a simple style is actually a very quick process. It takes no more time than setting various font and typography characteristics with the Properties palette, and you end up with something you can immediately reuse somewhere else.

Tip: It's good practice to begin making styles as you begin a document. Think about some basic elements such as the text body, headings, captions, and make some reasonable attempt at these. Remember, you can easily alter these later once your document begins to take shape.
The Style Manager consists of two main parts. When you initially open it with Edit > Styles from the menu, you see this smaller part shown above, where you may select a style and act upon it (Edit), or create a new one (New).
To create a style of whatever type requires a few steps:
- Bring up the Style Manager with Edit Styles.
- Click the New button, then from the drop-down list choose the type of style you wish to create.
- The dialog now expands as shown below for creating a Character Style.
- Change the name to something meaningful for its use. It's probably best not to incorporate the font name in the style name, since at some later point you might switch to another font for your headings, for example.
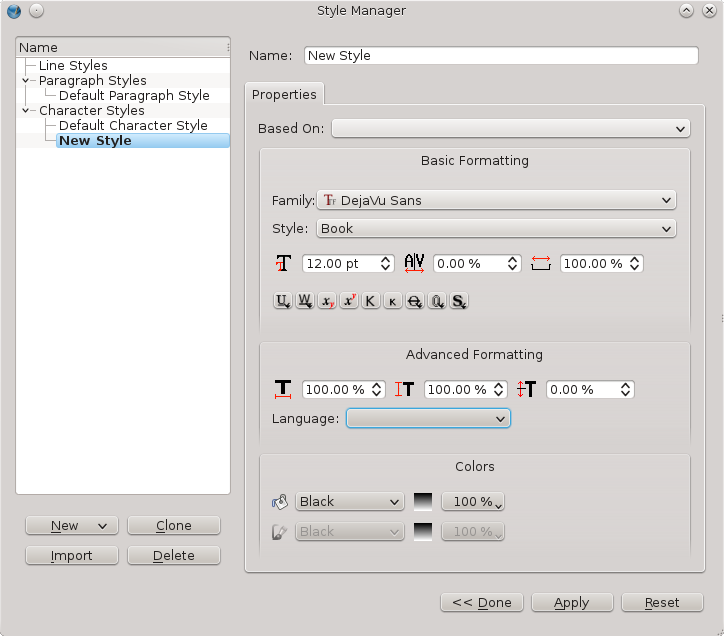
Character Styles
Character Styles and Paragraph Styles are related, but not exactly the same. A Character Style has to do with the particular attributes we have set for the font, such as the typeface, its weight, size, kerning, whether it might be underlined, struck through, and the other features you see above.
One feature of a Paragraph Style is that it also implies an associated Character Style, but the reverse is not true. Thus we can use a Character Style to modify the appearance of a font in mid-sentence without affecting the structure of its paragraph or the font elsewhere in that sentence.
Consider, for example, a situation where you may have some text which contains numbers referring to some statistics. Since you want these to stand out from the surrounding text, you change the typeface, or weight. Using the Properties palette, you could highlight these one-by-one, then modify settings as needed. If you use styles, however, you make the settings once, then simply apply the Character Style, and if later you modify the style, it is immediately applied everywhere it was used.
So to be more specific:
- Bring up the Style Manager with Edit > Styles.
- Click New, then choose from the drop-down list Character Style.
- Replace the default name New Style with StatisticalNumerals.
- Select your font, its weight, then farther down its color. Your list of colors here is the same color palette you use elsewhere.
- Change any other properties as you see fit, then click Done. If later you edit your style, you can click Apply to apply the changes wherever it is used.
Paragraph Styles
As was stated above, the settings for a Paragraph Style include those for its associated Character Style.
As its name suggests, Paragraph Style is applied to an entire paragraph of text. What may be less obvious is that, in addition to the features of a character style, you also may set linespacing, indentation, presence of drop caps, optical margins, space above or below a paragraph, justification, and tabs.
- Open the Style Manager with Edit > Styles.
- Click New, then choose from the drop-down list Paragraph Style.
- Replace the default name New Style with, for example, Title.
- In the Properties tab, choose the various parameters to your liking.
- You may also select the Character Style tab for all the various adjustments in the font, etc.
Line Styles
Although less commonly used, Line Styles can also be useful for maintaining a consistent appearance to frame borders, or any lines which you may use in your document.
- Open the Style Manager with Edit > Styles.
- Click New, then choose from the drop-down list Line Style.
- Replace the default name New Style with, for example, Framed Quote.
- In the Properties tab, choose the various parameters to your liking.
Applying Styles
Once you have created your styles, they are available in selected locations for their application.
Paragraph and Character Styles
These are both available in the Properties palette, under Text > Style Settings. Use some caution, so that you understand how to apply each style from its drop down list. There is also some importance of the order in which to apply styles.
- First, apply your Paragraph Style.
- Next, select the appropriate text and apply a Character Style.
- At this point, you might still wish to make some minor adjustments by adjusting various parameters in the Text tab elsewhere.
If you notice trouble reverting in case you have made a mistake, you should try the Remove Direct Paragraph/Character Formatting buttons (with the broom icon), to attempt to undo some application of a style. Going back to default styles may also help.
The other place to apply Paragraph Styles (but not Character Styles) is in the Story Editor, where you can, paragraph by paragraph, apply styles.
Line Styles
There is only one place to apply a Line Style, in the Line tab of Properties palette. Simply select your object, and choose the style from the list. If it's a frame, the style is applied to the border.
Editing Styles
Chances are, you have already seen the Edit button in the Style Manager dialog.
- Open the Style Manager with Edit > Styles.
- Click on the style you wish to edit, then click the Edit button.
- Make your changes, then click the Apply button, and your edits are applied wherever that style is used. This shows the dramatic benefit from making use of styles in your workflow.
In case you might import text from ODT or HTML formats, you will likely see that some new styles appear in your list. You may want to check these styles and adjust as needed, or you may find you can substitute some style you have created, then delete them.
Deleting Styles
- Open the Style Manager.
- Select a style, then click the Delete button. Alternatively, right-click the style you wish to delete and choose Delete from the list that appears.
- You will have a choice here to substitute some other style for the one you are deleting.
Importing Styles from other documents
In case you haven't already seen the benefits gained from using styles, you can also reuse styles you have created in some other document.
- Open the Style Manager.
- Select Import.
- A file dialog appears, and you next choose the document file from which you wish to import one or more styles.
- Scribus presumes you will import all of them (not likely), but simply uncheck the ones you wish to import to the current document.
- In case you are importing a style with a name matching one already in use, the default behavior will be to rename the imported font, but you may choose to replace the existing font of that name.
Note that if the imported style uses a color not in your palette, that color will be imported as well.