A Hybrid Approach to Online Video
A Hybrid approach to online video embraces both external video services and self-hosting on our own websites.
Embedding Video Players
Embedding means you can profit from all the categorisation, navigation, social media sharing and other techniques you use to amplify your message and stay in touch with your viewers.
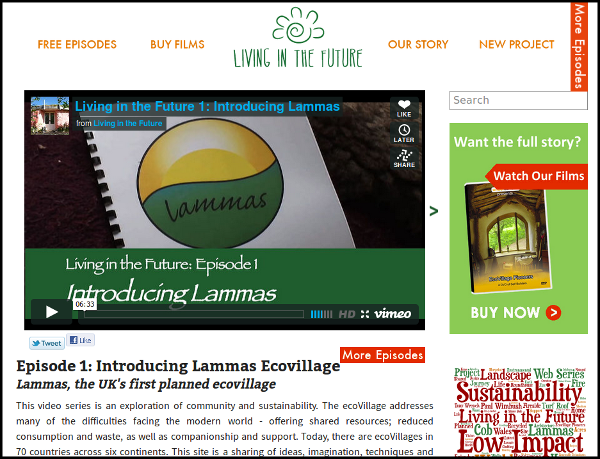
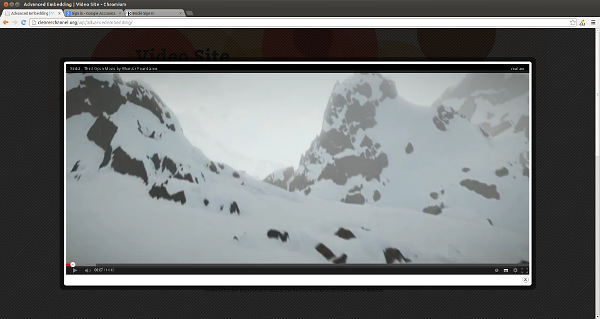
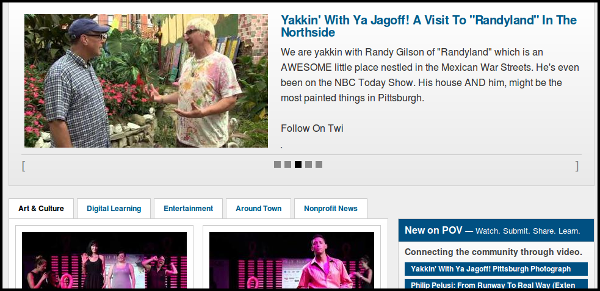
An embedded video from Vimeo inside a webpage with menu, category tags,
search bar and links to buy the filmmaker's films.
Upload Video to Both Your Website and a Sharing Service
When uploading your videos to your own site, you may want to upload to YouTube as a back up. This could allow you to 'swap out' popular videos to prevent your bandwidth costs from being too high.
Upload Video to Multiple Services
If you are unable to host video on your own webspace, then you can decrease your dependence on any one video service by uploading video to many services or repositories. If you have time and a good internet connection, then you may choose to upload your videos to two or even more video-sharing sites.
This approach provides the advantage of reaching the audience of the different sites and allows you to have a more resilient presence for your videos. If your account is suspended on one service, you can direct your viewers to another.
Use Archive Services
There exist some archive services that allow you to upload video files. While these services may be limited in what they provide, they have proven to be a stable home for video content.
Internet Archive: Their website at archive.org is a repository for openly licensed material. They provide a basic embeddable player. You can also link to video files so they can appear on your site in your own HTML5 players.
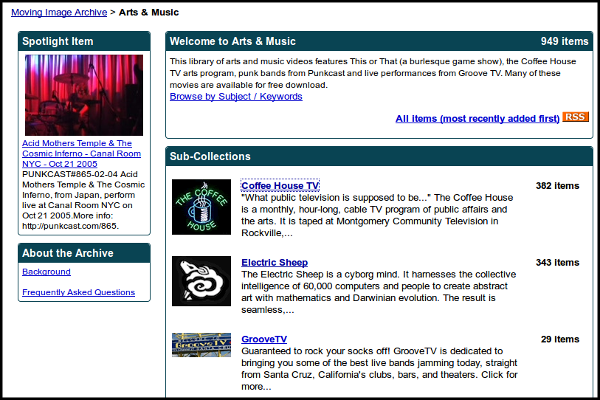
Archive.org - Art and Music section
WikiCommons: Wikicommons allows you to upload videos in the open WebM or Ogg Theora formats up to 500mb in size. WikiCommons is linked to the Wikipedia foundation, which would seem to ensure that it is a solid archive in which to deposit your video work.
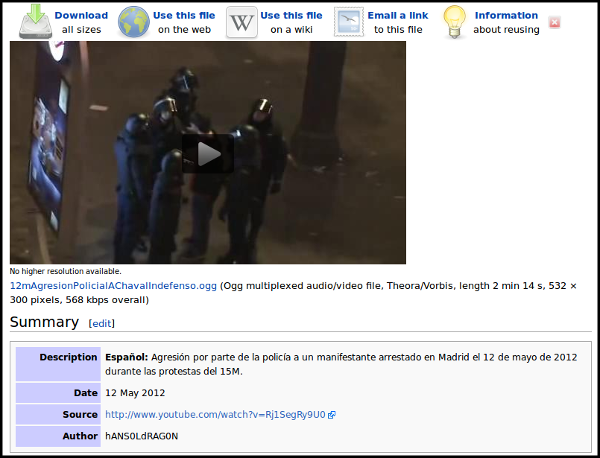 Wiki Commons video pages
Display YouTube Videos in Your Own Player
The interface of the player of your uploaded videos and embedded players from external sites may look very different. It is possible to pipe in video from video services to be displayed in your own HTML5 players.
MediaElement.js player playing a YouTube video inside an unbranded HTML5 player on
a self-hosted website
The details of this process are explained in other chapters of this guide and examples can be seen in these pages of the JW Player and MediaElement.js players.
Aggregating Video from Multiple sources
You may be partnering with many other organisations who may also be creating videos that you wish to display.

The Visionon.tv project aggregates many videos on activism into one player with a playlist
and encourages others to embed this player into their own websites
The subject of aggregating videos is covered in another section of this guide.
Possible Pitfalls of a Hybrid Approach
Changing Interfaces: YouTube often changes their interface (called an API). This kind of hybrid approach might rely on this API.
Unreliable for Archives: If your organisation is seeking to use your online video-sharing space as an archive then using a free external service may not be appropriate.
Advanced Responsive Video Embedder
You may want a more flexible way to embed videos than the default. There are literally hundreds of plugins that offer this, so it is hard to offer an overview. Instead, we outline the possibilities of just one called Advanced Responsive Video Embedder.
Hands On: Using Advanced Responsive Video Embedder
If you need help on how to search for and install WordPress plugins you can read help here.
To start, install Advanced Responsive Video Embedder. plugin AND an additional plugin called Jquery Colorbox.
You will then see a new icon of a clapper board on your WordPress editor bar.
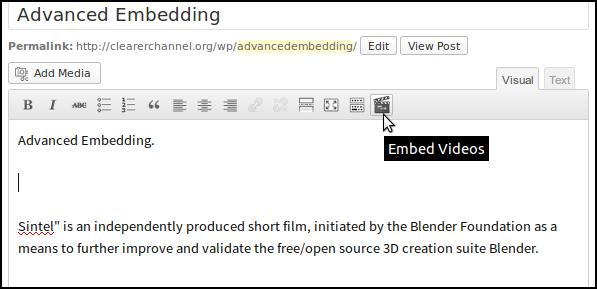
Click on the icon, and paste in the URL of the video you want to embed in the top box.
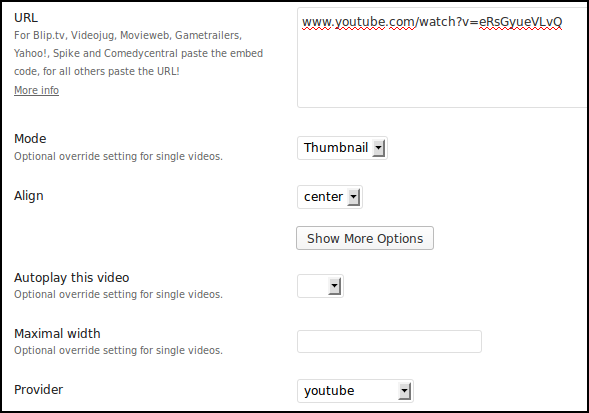
Fill out any other options. Here, choose Thumbnail as your mode.
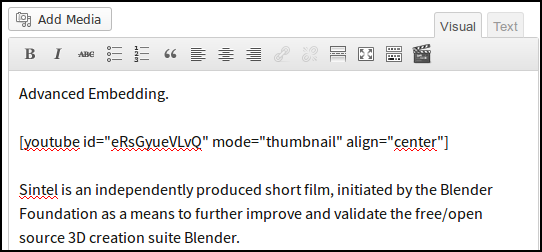
Click on the Insert Short Code option.
Your post should now look like the following.
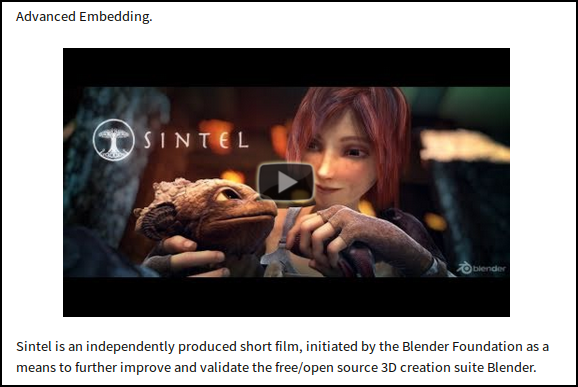
Click on Publish to save your post.
When you review it, you should see a thumbnail image of the video.
When we click on this thumbnail, the background of our page will go grey, and our video will play inside a nice looking 'colorbox'. This relies on the jQuery colorbox plugin we installed.
It also intelligently works out how large your browser is on your screen and adapts. This is the Responsive part.
On a large screen it looks like the above.

If your browser window is small, it responds and adapts.
There are different settings that you can choose for this colorbox, which change the look.
Advances in Online Video Players
This section of the guide gives a simple introduction to the subject of video players and which video formats to use when self-hosting. Ideally, web technology should be based on open standards and use free, open source software solutions. Open formats and standards are future-proof and widely compatible. As long as media is stored in an open format, there will be a way to access it. Open solutions are also often a cheaper solution.
The rapid development of HTML5 web browser has made it much easier to host your own video in a low-cost, compatible way. When we compare our current situation with many fantastic choices of HTML5 players to the proprietary Flash player and swf video format that was dominant only a few years ago, it is clear that we are in a much better position.
Some Examples of Modern Video Players
In this guide, we mostly take a minimalistic approach to documenting the functionality of the players. However, this section shows the visual appeal of some of the new generation of players and the ways they can be integrated into your site.
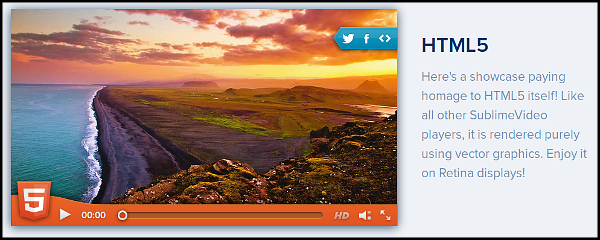
Sublime HTML5 video player demonstration with an option to share
via Twitter, Facebook and Embed codes
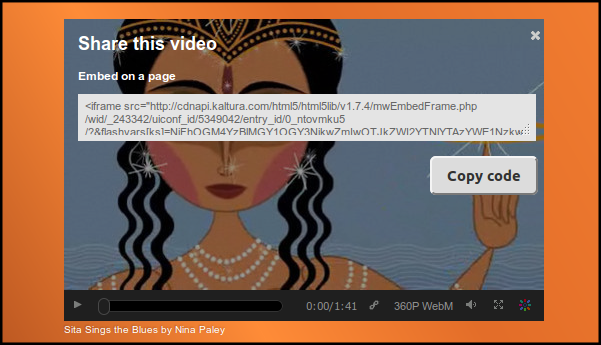
Kaltura Video player with a nice option to embed video on a page
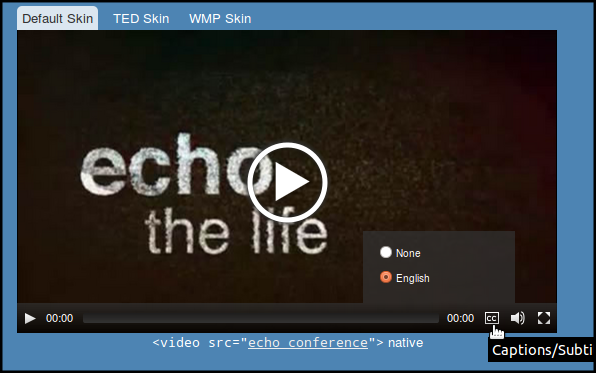
MediaElement.js player with an option to display captions and use different looks or skins
Simple Summary of Video in HTML5
HTML5 is a series of accepted techniques for a variety of interacting web technologies. Now browsers widely accept the <VIDEO> tag, so delivering video in open formats can be as simple as adding the following line of code to your page.
<video src="myvideo.mp4" width="320" height="240"></video>
Here is a quick table to give you a quick summary of which browsers will display different video formats using the VIDEO tag
| Web Browser |
Ogg |
WebM |
Mp4 |
| Chrome |
Yes |
Yes |
Yes |
| Firefox |
Yes |
Yes |
No |
| Safari |
No |
No |
Yes |
| Opera |
Yes |
Yes |
No |
Because not all browsers will display all video formats using the VIDEO tag by default, we would suggest using a custom video player that deals with the situation more flexibly.
Which Video Player?: When choosing a video player, there are several factors that may influence our decision on which one to choose. One important factor is how wide a variety of devices we want our video to be viewed on.
We will get into the technical details of which formats work with which players and browsers in the 'Hand On' sections.
Which Format? H264(mp4) vs WebM: Even if we want to support free and open formats like WebM, we may choose to use more restrictive formats like h264 to reach users on a wide variety of operating systems and browsers.
Aggregation of Video
The process of 'aggregation' in this context refers to different ways of bringing together disparate sources of videos and presenting them in one place. Aggregation also often indicates a degree of automation to this process.
Examples of Video Aggregation Websites
Commercial Video Aggregation Services: These sites can be a useful way of finding video on subjects you are interested in.
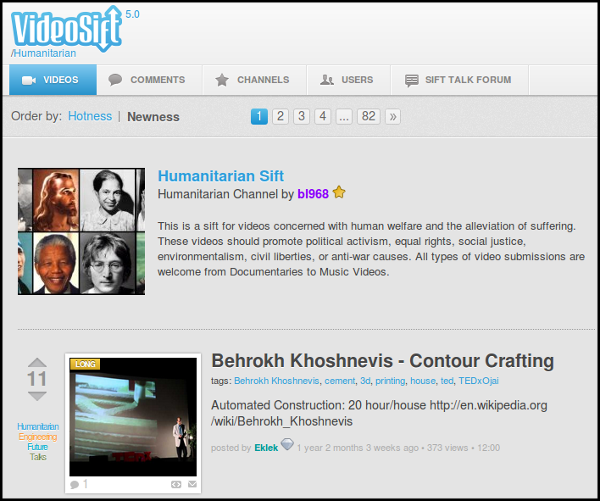
Videosift is one of the few remaining commercial video aggregating services driven by users: http://videosift.com/humanitarian
Community Video Aggregation Services: Some services (including Miro Community) provide a simple way to pull together and present the videos of you and your partners.
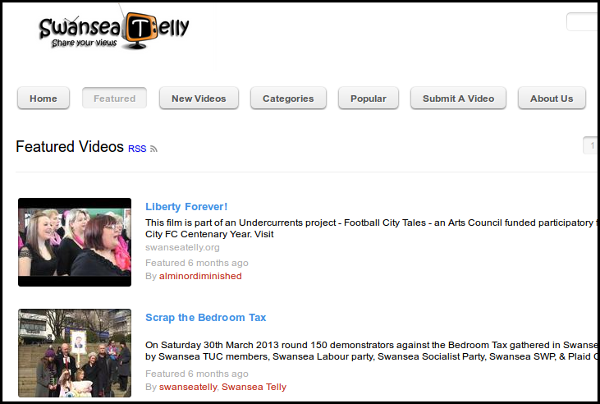
An example of an aggregator site using Miro community: http://www.swanseatelly.org/
Set Up Your Own Video Aggregator: Frameworks like Drupal and Wordpress allow a more flexible approach to what data is aggregated and displayed. This is perfect for a network of video collectives to represent the work of their disparate members.

An example of a video aggregation site for social justice at http://transmission.cc
The Mechanics of Aggregation
Aggregation can work in a number of different ways.
RSS Feeds & Video Podcasts: An RSS feed is a simple and standard way of getting content from A to B on the internet. Originally very popular for news, it has been adopted for multimedia in the form of podcasts.
APIs: Many modern website have an API as a way of allowing outside sites to interact with the core site. While there are advantages to APIs, they are not official web standards and, as such, they may change in the future.
OEmbed: OEmbed is a useful way to aggregate video by making it easy to use 'embed codes' remotely. OEmbed does this in a standard way so it is unlikely that unexpected changes made by video-sharing sites would cause problems for your aggregator site.
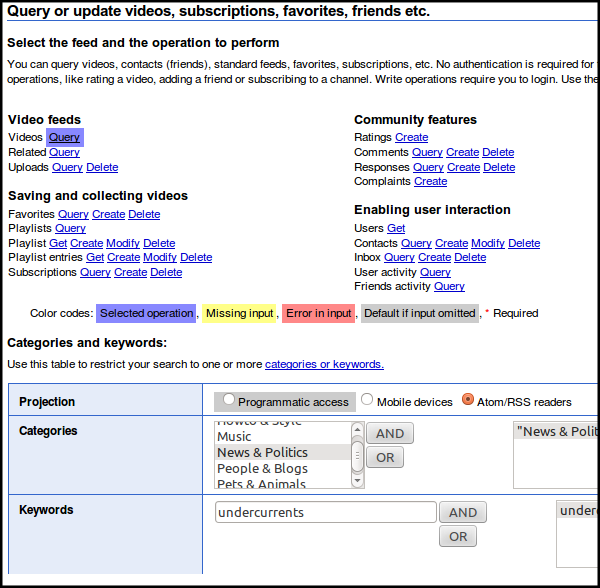
This page details how to use the YouTube APIi / RSS feed system to output
a custom feed to import into your website - http://gdata.youtube.com/demo/index.html
An Intro to Choosing WordPress Plugins
If we want to do more with our website than the default way WordPress handles video, we can install extra plugins for WordPress.
While the core functionality of WordPress is maintained by a healthy but relatively restricted group of developers, the wider eco-system of themes and plugins, which add extra functionality and design to the platform, is maintained by thousands of coders.
Because there are so many plugins, it can be a daunting task to know which ones to use. Developers often gather in user groups to pass on tips about plugins that they know work well.
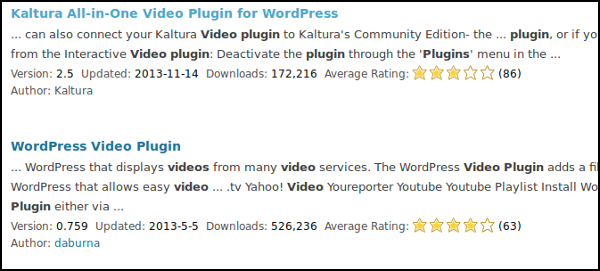
The results page of http://wordpress.org/pluginssearch for video plugins. You can see when it was update, average rating and the number of downloads.
There are also general tips to help you choose the tools to get the job done.
Are plugins from WordPress.org plugin directory reliable? The plugins directory at http://wordpress.org/pluginsis a reputable source. Plugins here are openly licenced and available for peer review, rating etc. As you will see, there is other information listed there that helps us make a decision about whether to use it or not. Our advice, if the plugin is not listed here, you should probably avoid it and find an alternative.
Is it simple? The best plugins do one thing and they do it well. If the options for the plugin are too numerous or confusing, try to see if you can achieve the same thing with a simpler plugin.
How many people have downloaded the plugin? You can check this by looking at plugins' home pages in the plugin directory at http://wordpress.org/plugins/
Is it up to date? WordPress gets updated quite regularly. The longer it has been since the plugins was updated, the less likely it is to work well.

How is it rated? There is a rating system allowing users to give feedback. This is a good way of quickly assessing plugins.
Is there an active support forum? Some plug in writers are great at supporting the users of their plugins. They fix any bugs, keep the code up to date and respond to questions about how to use it.
Is there more than one coder involved? Ideally you don't want your plugins to become outdated if one coder loses interest. Many great plugins have just one author, but it's safer if there is more than one.
Basic Video Embedding in Drupal
Drupal is a content management system like WordPress. A lot of developers like Drupal as you can quickly and flexibly create websites with quite complex functionality. As we progress through the sections on Drupal, we will start with a very basic set up and gradually add more features.
Embedding Video in Drupal
To embed video inside Drupal, we can use the OEmbed technique.
First, install and enable the OEmbed module in the normal way. Make sure to also enable the oEmbed Filter sub module.
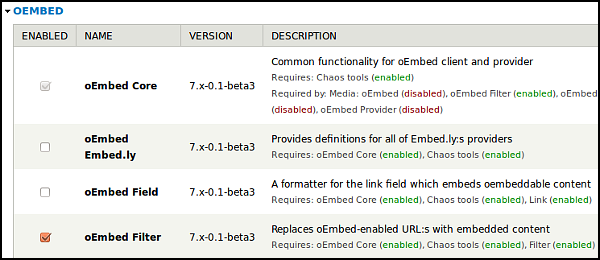
You can test if oEmbed is working on the test tab of the module's configuration.
In the admin section, navigate to configuration, media, oEmbed and then Test [admin/config/media/oembed/test].
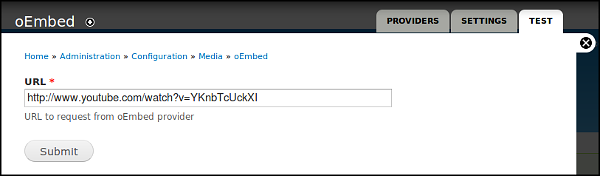
Enter the URL of a video. Click Submit. If the test works, you will see an embedded player.
This means you can paste in an URL of a supported video provider into any content post, which will convert to a player when you view the content.
Let's try this with the default Article content type.
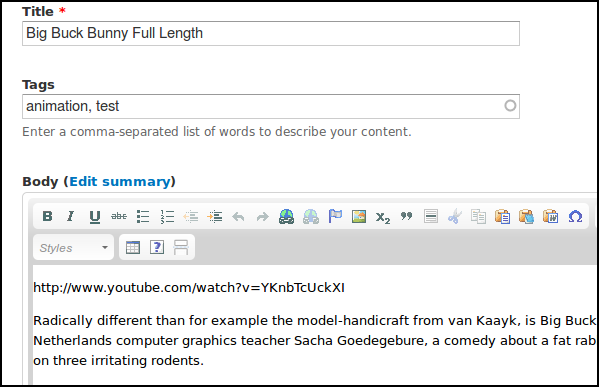
Post the video URL into an article. Make sure not to make the URL a link or the embed won't work.
Save the post and your video should appear.
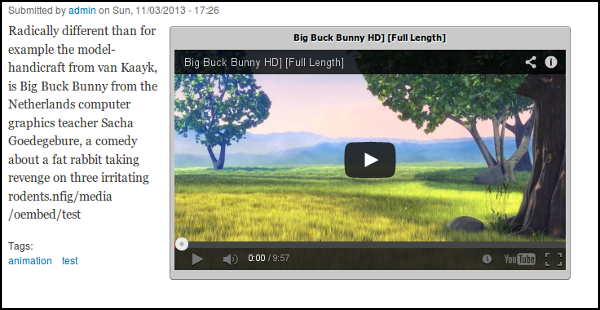
This process works well. However, it is quite limited in how the video is displayed. Read on for more options.
Choosing an HTML5 Video Player
This section focuses on choosing an HTML video player and Drupal CMS. However, the same approach could be used for many other systems.
HTML5 is a specification and set of technologies that allow us to take advantage of the latest things you can do inside of web pages. The HTML5 specification added a <VIDEO> tag that was a step forward in delivering video.
Choosing Player Functionality
While some of will celebrate the diversity of HTML5 Video players available to us, others may find the range of choice confusing. Here is a list of just some of the most popular players.
Luckily, there are a few websites that can help us to make this choice. The following process is based on the approach of these websites.
First, we need to decide on what functions we want our player to be able to do. The sites list some of the following features that you may or may not need for your website.
-
Flash fallback: Can you use a flash video player or plugin if the user's browser doesn't support your video?
-
Unified Look/API: Is the look and functionality the same for HTML5 and the flash fallback option?
-
iOS Support: Will the videos play on iOS devices like iPads and iPhones?
-
True Fullscreen: Is there an option to scale the player up to full screen?
-
Subtitles: Can you display subtitles over videos?
-
Playlists: Can you input a list of videos and display the queued videos?
-
CMS Plugin: Are there plugins to make it easily usable for CMSs like WordPress and Drupal?
-
Skinnable: Is it possible to add 'skins' to change the look of the player?
There are some handy tables on the websites mentioned.
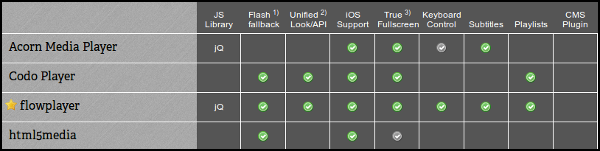
This chart is from HTML5Video.org.

The following chart is from praegnanz.de/html5video/.
Our top 5 Video Player Modules for Drupal
Here are our top five modules to help integrate Video Players into Drupal:
Creating Subtitles Online Using Amara
Subtitles can open up your video to new audiences. Subtitles can be a written translation of the video dialogue in a foreign language or a rendering of the dialogue in the original language, often targeting viewers who are deaf, hard-of-hearing or have accent recognition problems.
Video Captions Online
Below we can see a video with English subtitles selected on the subtitler platform Amara.

Starting a New Transcript with Amara
To start subtitling a video with Amara, simply go to http://www.amara.org/ and copy and paste the link to your video into the field titled 'Add a video'.
The video below from the Papuan Voices website has already been translated into many languages. These can be selected in the online video player.

The process of creating subtitles is quite easy and intuitive.
The work area is shown below.
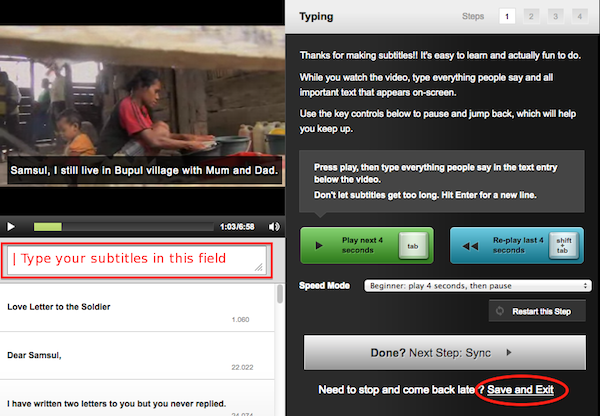
To add a subtitle, simply start typing in the field below the video player. To start a new title, hit enter. (This is also button you use for line breaks in text documents.)
If you want to save your transcript, but haven't finished it, select Save and Exit.
More Resources
More Help Using Amara: One of the reasons for using the open approach of Amara, is that it allows your community to get involved in subtitling the videos. There is more help available on using Amara here - http://support.amara.org/support/solutions
Hybrid Approaches for Video in Drupal
This chapter looks at just two techniques for a Hybrid approach to video in Drupal, using well-supported modules. Specifically, incorporating external video files into a player using the Linkmodule, and merging uploaded video files and video from external services using the Media module.
Hands On: Incorporating External Video Files
To start, install the Link module.
Add a link field to a content type and give it a name like Video Link.
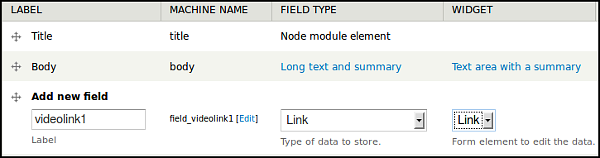
Then set up a Link field to use Media Element Video in the Manage Display section of the Content Type.
Click Save.
Test this set up by first pasting in a URL from an external file hosting service like Archive.org.

If we preview this, we see it works well to create a player that is streaming the external video file.
Hands On: Displaying Video from Services and Uploaded Video
To use it, install and enable the Media module in the normal way then some helper modules extending media. To test it, try media_youtube and media_vimeo to get you started, but there are many more available.
Add a File field to content type, and select Media File Selector as widget type.

Configure file types allowed for uploaded video, select Video for Allowed remote media type, select Youtube and Vimeo, and enter other details like max file size.

When we add our video content, now we can see a Select Media button.
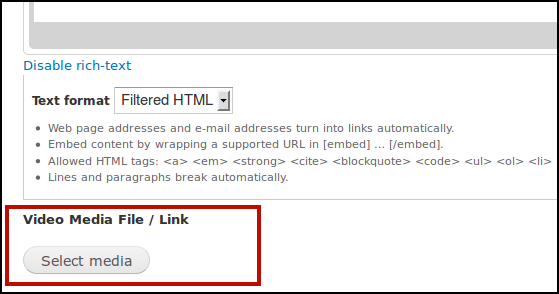
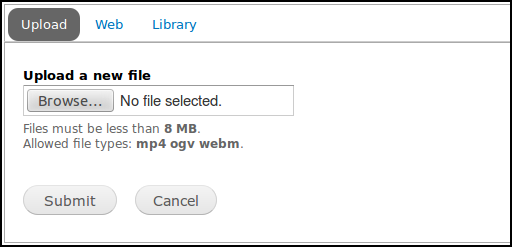
This gives us a flexible dialogue box where we can Upload a new video, enter a URL or Embed code from one of the video service, or choose a video already in our Media Library.
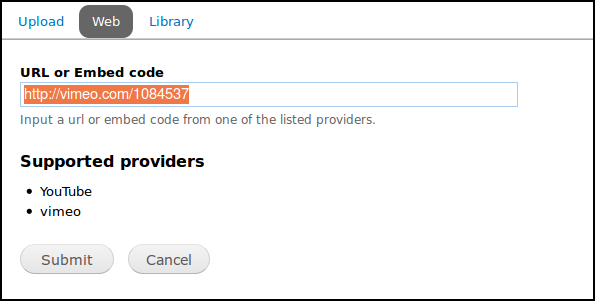
Try either an upload or a web link.
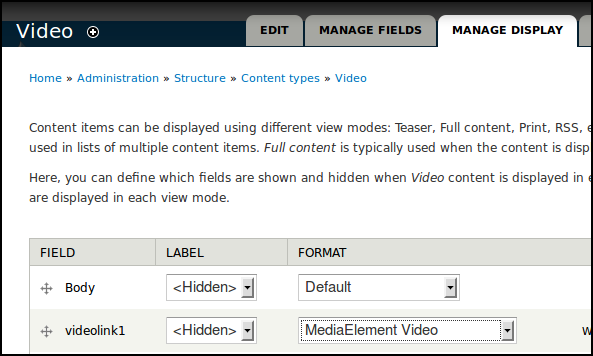
To display the video, we need to choose different options in the Manage Display tab of our File field.
For video coming in from services like YouTube and Vimeo, choose Rendered File.
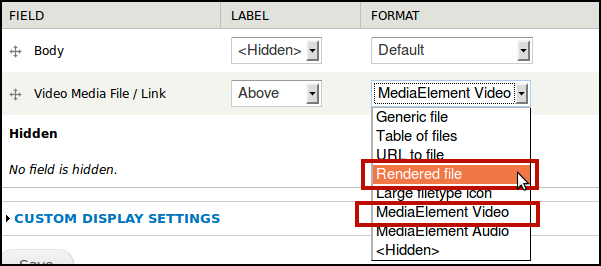
However, for uploaded video, we need to select MediaElement Video.
Inbuilt Video Features in WordPress
Uploading and Display Video Files
You may need to check that your hosting plan gives you enough space to upload video files.
To start, add a new post or page in your WordPress website.
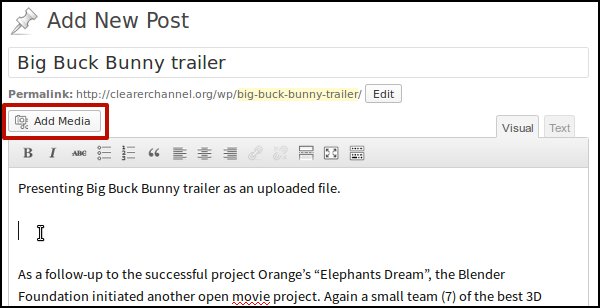
In your editor, type the title and text you want to go with your video.
Click where you want to insert your video and then click on the Media button.
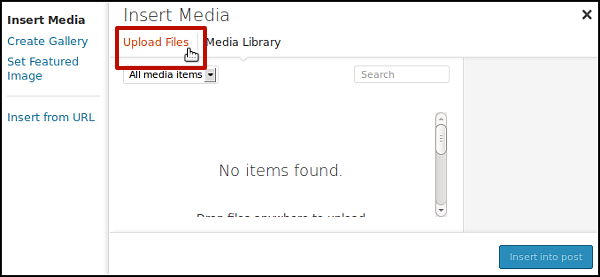
Click on Upload Files tab.
Now click on Select Files.
Browse for your video file and select it to upload.
When your video is uploaded, it will be selected in the Media Library tab.
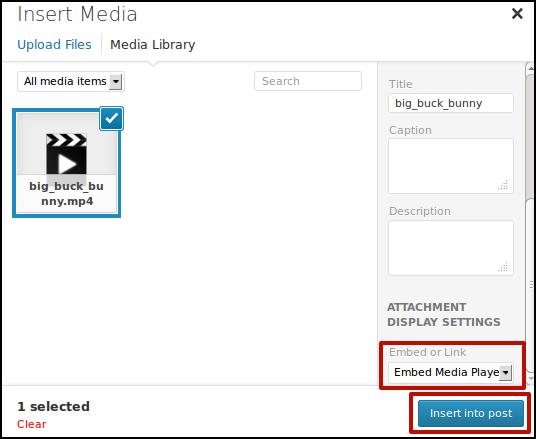
Choose Embed Media Player from drop-down menu, then click on Insert into Post.
This inserts a 'short code' into the post that will look something like this.
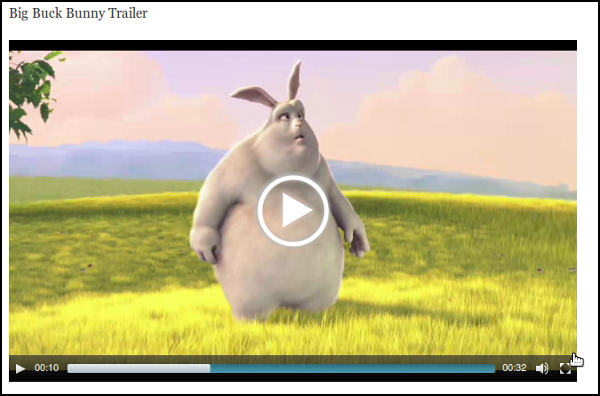
[video width="640" height="360" mp4="http://clearerchannel.org/wp/wp-content/uploads/2013/11/big_buck_bunny.mp4"][/video]
You can change the size by altering the width and height in the short code.
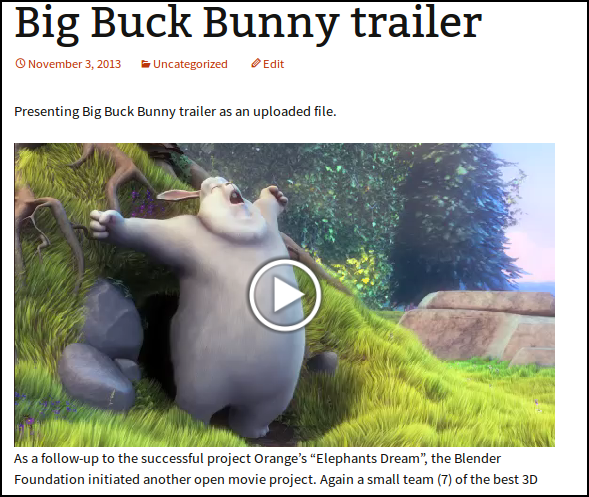
Publish your page and your video upload should work with nearly all kinds of video files, including mp4, WebM, Ogg.
Working with Video Embeds
Copy the URL to your computer's memory.
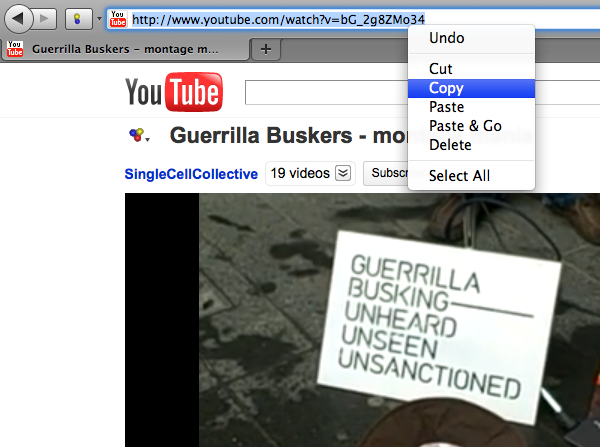
Then in your WordPress blog you can add a new post, give it a title, write a short description and then paste (right-click > Paste) the URL of the video where you want it to appear.
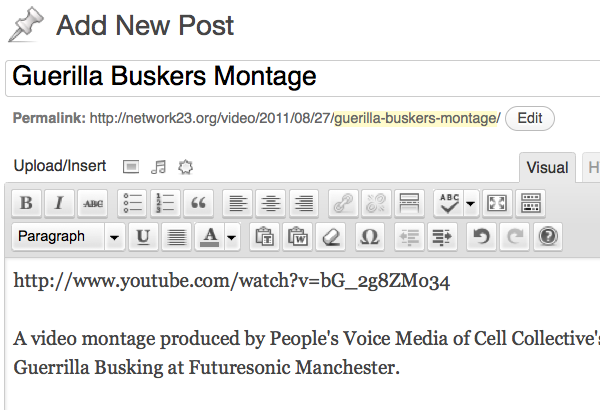
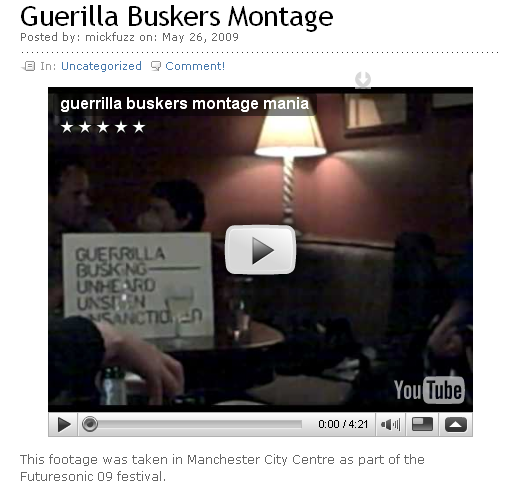
Click on Publish on the right of the edit screen.
You can then click on View Post to check if the embedding of the video has worked.
Controlling the Size of Videos and Using Embed Codes
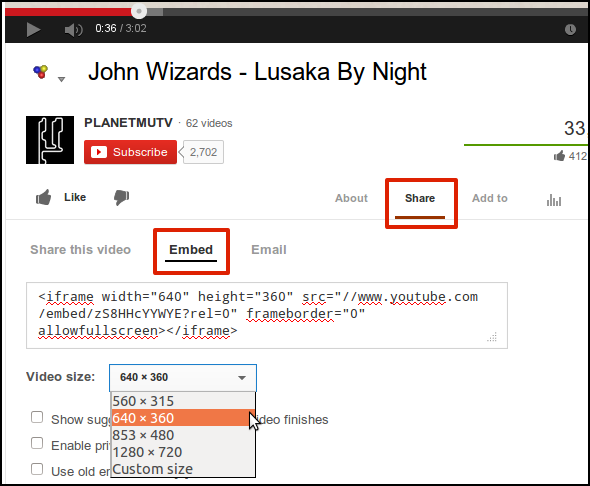
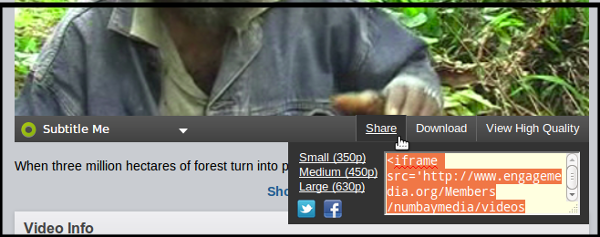
To control the size of your video, and other options, most video-sharing sites will give you access to an embed code.
On YouTube, click the Share button underneath the video you want. Then click Embed to see the embed code you need and select a size of display.
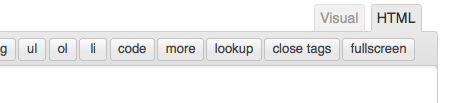
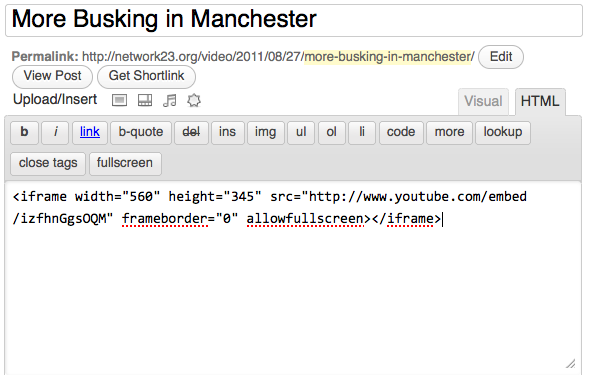
Copy the embed code and then click in the body of your post at the place where you want your video to be appear. If you are in the Visual editor, change the view from Visual to Text / HTML.
Paste in the Embed Code that you copied earlier. It should look something like the screen shot below.
If you now switch back to the Visual tab, you'll see a square where the video will appear:
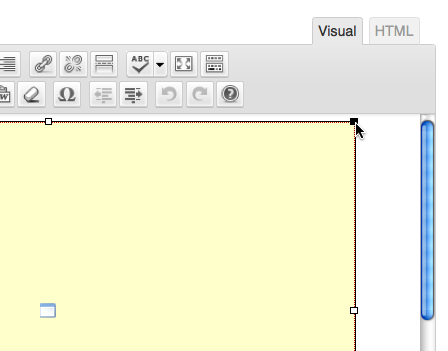
To resize, click on a corner and drag the square.
Click Publish and View Post to review your resizing.
Installing and Configuring Plumi
Installation
The most up to date Plumi installation guide can be found at https://github.com/plumi/plumi.app/blob/master/docs/INSTALL.rst
This page takes you through how to install Plumi on Debian/Ubuntu. Plumi is a package that includes an application server, web server, FTP server, cache server and media transcoding system. The guide runs you through required packages, how to run the buildout, and how to check all services are running.
Configuration
Plumi and Plone itself (upon which Plumi is built) are highly configurable. This chapter covers some of the aspects of Plumi which you can configure easily, with links to further documentation about customisation.
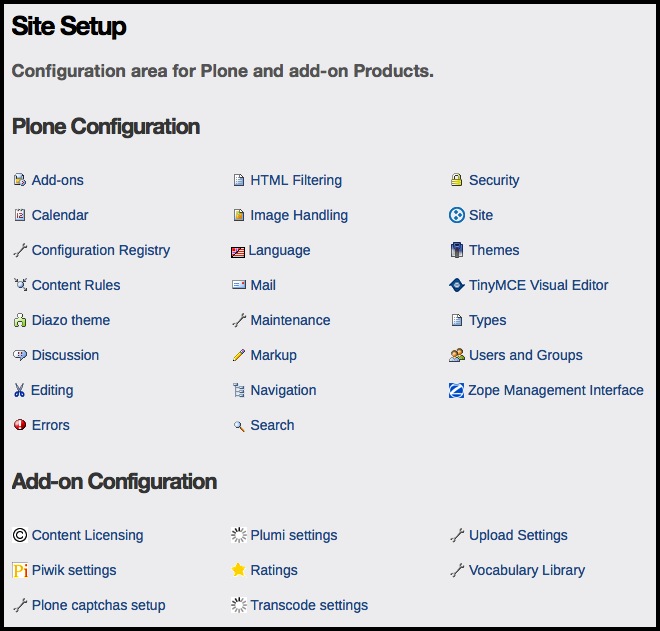
Site Setup
You can configure Plumi's built in settings by accessing Site Setup by clicking the site setup link in the top right. Please note that you must be logged in as a user with the Manager role to do this.
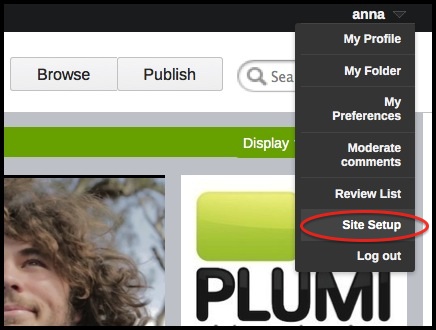
Basic Plone Configuration is available, as well as configuration of Add-On Products (including Plumi packages).
 ⁞
⁞
Plone Configuration
-
Add-ons. Which add-on modules you have available to implement on your Plumi site.
-
Calendar. Settings such as the first day of the calendar week.
-
Configuration Registry. Settings for some add-on modules.
-
Content Rules. Rules that automatically perform actions on content when certain triggers take place.
-
Diazo theme. The visual theme for Plumi uses Diazo, read more here.
-
Discussion. Configure commenting.
-
Editing. Configure the WYSIWYG editor.
-
Errors. A log of the most recent errors that have occurred on the site.
-
HTML Filter. Plone filters HTML tags that are considered security risks. Here you can change the settings for which tags are stripped and which are allowed.
-
Image Handling. Configure sizes for images generated by Plumi.
-
Language Settings. Here you can define which languages are available on your site. Plumi currently offers both English and Indonesian with more languages to follow.
-
Mail. Mail settings, including SMTP server and the 'From': address for emails sent by your website.
-
Maintenance. Restart the Zope application server (which runs Plone and your Plumi site) and change other maintenance options.
-
Markup. Change from default HTML to other kinds of markup such as plain or structured text.
-
Navigation. Navigation settings, including what kinds of content appear in the tree.
-
Search. Which content types can be searched.
-
Security. Settings including passwords.
-
Site. Change site title and description plus various site-wide settings.
-
Theme. The older pre-Diazo theme configuration.
-
Types. Workflow, visibility and versioning settings for your content types.
-
Users and Groups. Add or remove users, define groups, assign roles (permissions) to users and to groups.
-
Zope Management Interface. Further configuration settings in the older ZMI interface.
Add-On Configuration - Plumi Specific Settings
- Content Licensing Settings. Open content licencing options including Creative Commons.
- Piwik settings. Configure server name etc. for your Piwik instance.
- Plumi settings. Configure notifications on publishing content.
- Ratings. Set which content has ratings applied.
- Plone Captchas Setup. Change colours etc. of captchas.
- Transcode Settings. Enter transcode server address, set mime types etc. Also here you can configure subtitles. By default, subtitle support through Universal Subtitles is enabled. You can disable it through Site Setup->Transcode Settings. You can also disable downloads through embedded videos there.
- Upload Settings. Allowable image sizes and types for upload.
- Vocabulary Library. Here you can upload vocabularies to create taxonomies within Plumi e.g video Genres, Topics, Languages and Countries (by default).
Further Customisation
For more information on customising your Plumi site please consult the documentation on Plone.org.
Intro to Plumi
So far we’ve looked at two open-source options for creating your own video site - Wordpress and Drupal - which are well suited to small and medium-sized communities of users, and are both written in the widely used PHP scripting language.
Plumi is another free software alternative, which has many advanced features to create a fully-fledged video-sharing community out-of-the-box, that will also run on tablets and mobiles. However, it is written in Python and based on the Zope application server, which fewer developers are versed in. If you have access to these skills, you can take advantage of this powerful video-sharing web application.
Plumi is a package of customisations built upon the enterprise-level FOSS Content Management System Plone, enabling you to create your own sophisticated video-sharing site. It includes an adaptive visual theme, server-side transcoding of most video formats, upload progress bar, thumbnail extraction, HTML5 video playback and embedding, subtitles using Amara, large file uploading via FTP, social media integration and more.
Plumi was specifically designed by EngageMedia to be a platform for non-profits and independent journalists to create their own video communities.However, it was also designed to be modular and customisable, and contains smaller Python packages that can be run independently (such as Transcode Star, a suite of modules that provides media transcoding services to Plone sites).
Plumi was first released in 2007 and has been updated to work with each latest version of Plone along with continually expanding its feature set.
This chapter assumes higher-level familiarity with software development, including a working knowledge of Linux web-servers and Python. We will cover the basics of Plumi’s features and a basic installation and configuration guide here.
More information about Plumi can be found on the Plumi blog, including links to a working demo of Plumi to try out for yourself, a full copy of the Plumi manual on Flossmanuals, the development tracker and code.
If Plumi seems right for your project, we recommend you grab a copy of the code to install and assess it for your own needs. There is an email discussion list where you can find help to get it running.
Hands on: Using Miro Community
Miro Community is a great tool that aggregates (brings together) different videos from different sources. It doesn't take long to set up and produces a great looking site quickly. Have a look at these examples of Miro Community websites.

As a Service or Self-hosted Miro Community
Miro community is available as a service with various pricing plans or as a code that you can download and install on your server. There are various advantages to either option.
As a Service: The main advantage to run Miro Community as a service is that it takes care of all the technical needs. You simply need to sign up for an account and start using it. Unfortunately, the free service was discontinued during the writing of this guide.
Self-hosted: When self-hosting, you don't run into video number limits, which are part of the service pricing structure. You may also extend the features and change the layout.
Features Miro Community
Here are some of the features that make Miro Community such an appealing option for a video aggregator site.
Display Video Information Attractively
Miro Community takes advantage of feeds and APIs to including thumbnail images of the videos as well as details about them, to create an attractive layout of imported videos. You can set featured videos to show in a slide show.
Add Individual Videos
Add individual videos to the site in the following ways
-
Add the URL of a supported video sharing site
-
Add the direct link to a supported video file - mp4, webm etc
-
Add the details any video that has an embed code
Add RSS Feeds and YouTube Channels
If the source of videos that you are trying to add has a RSS feed or if they have a YouTube channel, then these sources can be added. To do this, add the URL of the feed or channel into the Manage Sources tab for your Miro Community dashboard. Click on Add Feed and follow the instructions.
Approve or Reject Pending Video Quickly and Simply
You can set some sources to appear on your site automatically, or you can add them to a queue of videos that you moderate manually. The process is quick and simple to understand.

Overview of Concepts and Terms
This chapter gives a quick summary of terminology you may come across.

Platform: In the context of this chapter, 'platform' refers to any of the websites available for you to publish your video online.
Content Management System (CMS): A system with an interface that allows you to manage content easily on the internet.
Self-hosting: Self-hosting in the context of video distribution refers to the process of using your own storage space for the video content that you upload.
HTML5 & Flash Video Players: In this context, a video player is both the code needed to play a video.
Embedding videos: Services like YouTube allow you to place a player inside page of your own website. This is called embedding and sometimes involves an 'embed code' to make it work.
Clicking Share next to a video player will normally give you an Embed Code
Streaming video: The process of streaming video, which delivers video from a server to the viewer in real time.
Metadata: Metadata in our context of video hosting is information about videos, including title, description and other technical information.
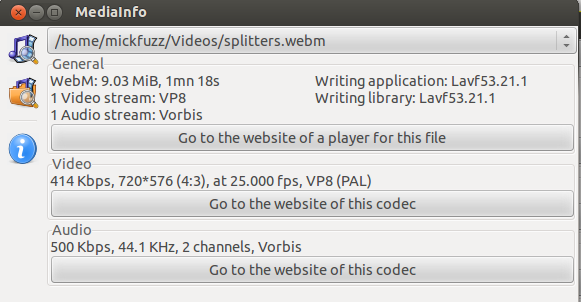
The application MediaInfo can display technical metadata of a video file.
RSS Feeds: RSS feeds are like channels of information that we can subscribe to or use to move information from one place on the web to another.

Aggregation & Syndication: These terms became increasingly popular with the advent of RSS technology specifically for news feed
Bandwidth: This is the amount of data you transfer to and from your internet server.
Closed Captions: Closed captions subtitles are separate from the video image. Closed captions make it easier to deliver multiple versions of subtitles without changing the core video file.

Closed Captions are used by the Amara system to allow viewers to choose a language
Summary of other resources
Here are some other resources you may find useful:
Plumi Features
We will look at three main aspects of the Plumi user interface, as well as list Plumi's video, community and development features.
Front Page
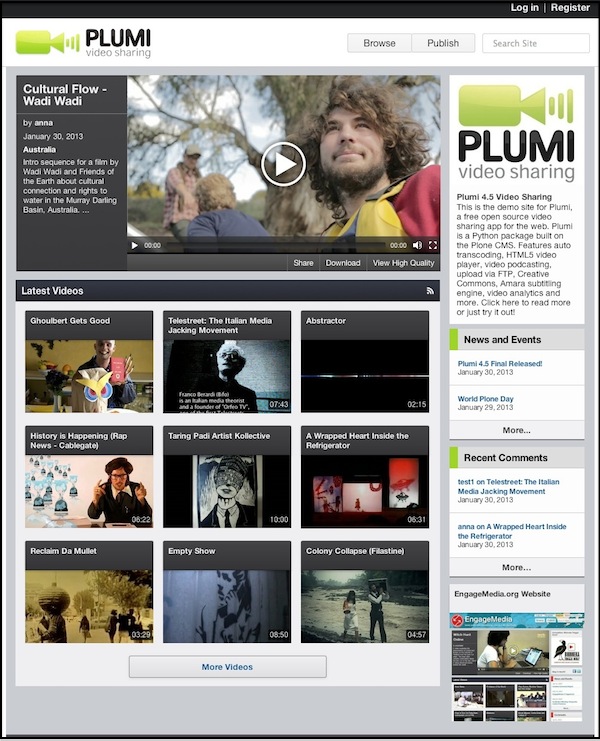
Plumi's front page. You can see that users can browse the latest videos (with durations captured on upload), watch a featured video on the front page, publish videos as well as news and events, comment on videos, download videos, and share them via social networking sites.
Publish Form
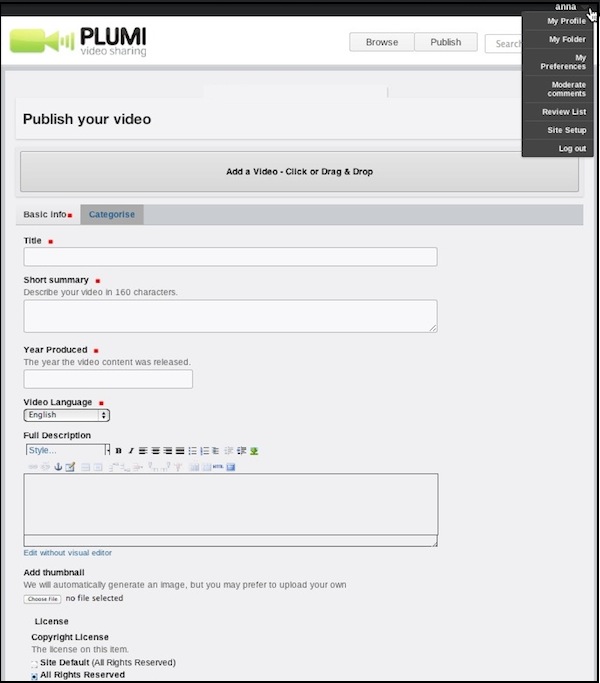
On the publish page you can drag and drop a video file to upload, add metadata, attach a custom thumbnail (thumbnails are also automatically generated), attach a copyright or Creative Commons license, and categorise the video, all while uploading using the Ajax form. In the user options tab, you can see links to profile, preferences, a folder storing all the user's content - and for Reviewers and Managers the ability to review moderated content and configure options in the site setup panel.
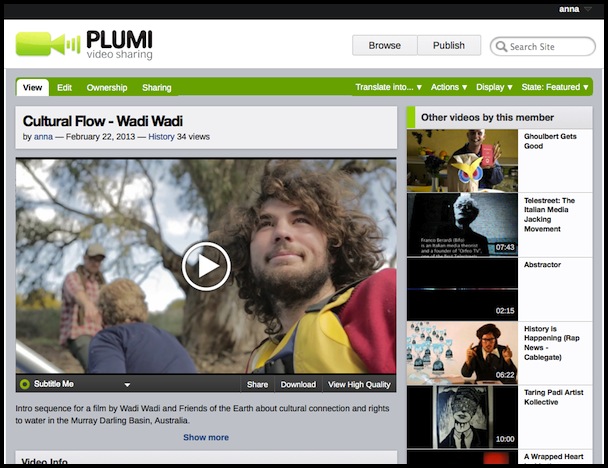
Video View Page
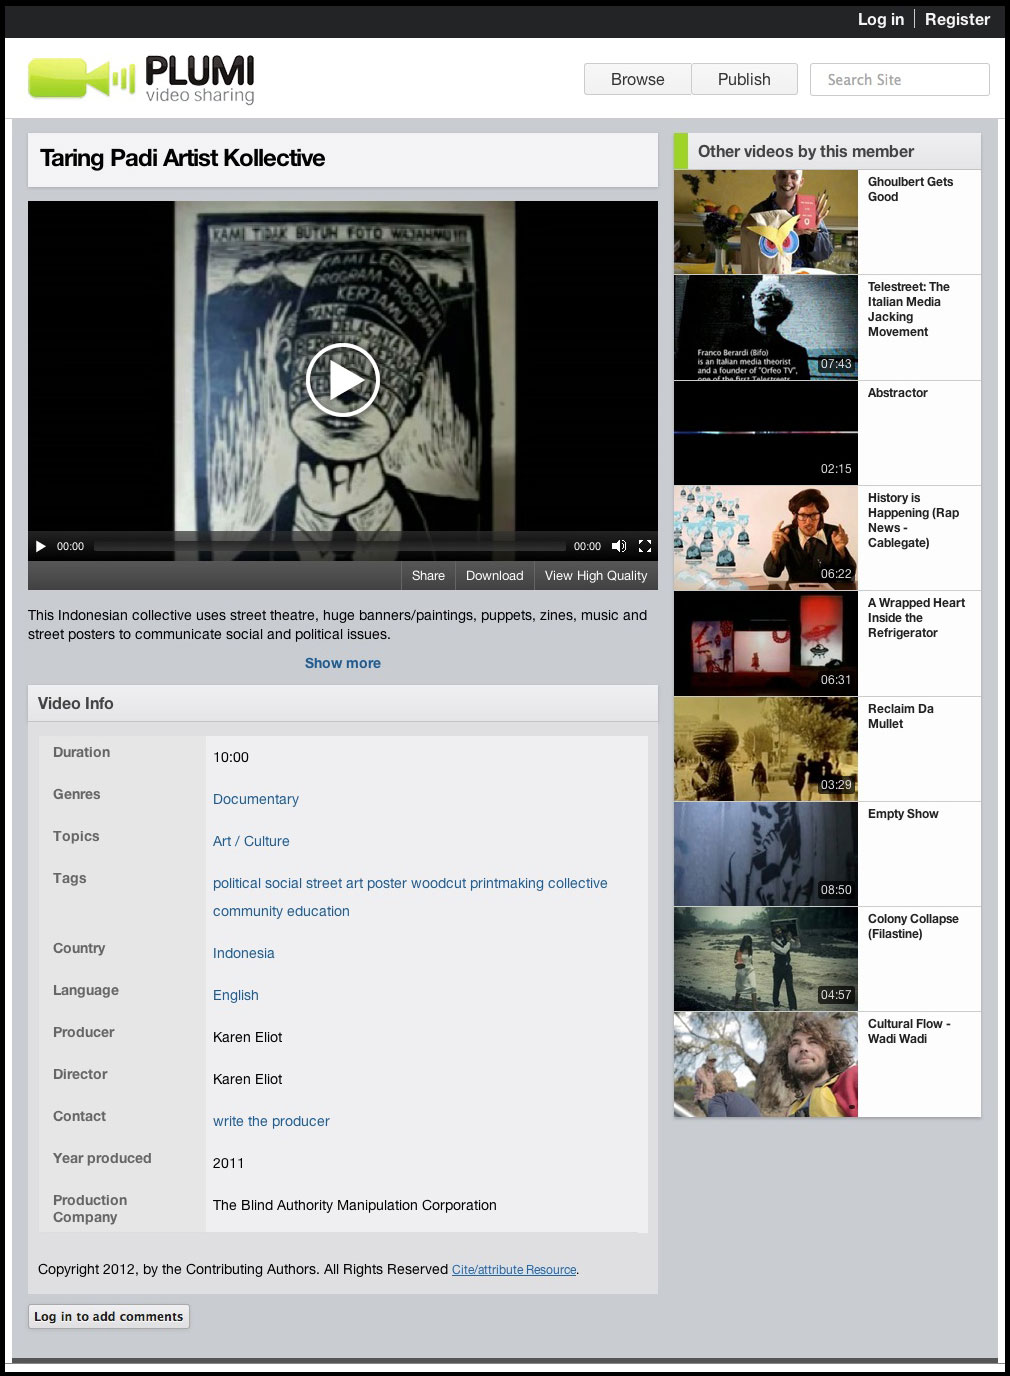
On the video view page, you can view metadata added by the user, watch the video (in fullscreen, in high or low resolution), watch any subtitles that have been added, click to add your own subtitles (using Amara), and view a list of other videos by the same author. You can also log in to add comments.
Feature List
Plumi's benefits can be understood in three main categories - video functionality, community features and development.
Video Features

Upload Any Video Format
Plumi automatically transcodes most video codecs to webm & mp4. Through the web
or via FTP.

HTML5 Video Player
Play videos in high/low resolution, fullscreen, share, embed and download.

Subtitles Using Amara
Watch videos with subtitles or easily add
your own using the Amara system that is implemented into Plumi.
|
Community Features

Browse videos
User-friendly browsing and feeds by genre, topic, country or member.

Moderation
Control publishing of videos, news, events and comments. Email notifications.

Discussion
Threaded comments, feedback for members and site contact form.

Creative Commons
Choose how you want to share your video and attach a licence.

Advanced Search
Find content by live search and filter results.

Users and groups
Plone’s existing members functionality plus customised profiles.
|
Development
FOSS Plumi is written in Python and based on the Plone content management system. Code is released under the GPL.
Installer Package Plumi comes as a packaged buildout, containing everything you need to run your Plumi site – Plone, the Plumi.app, Nginx, Supervisor, Varnish and more.
Documented Consult the Plumi manual for all the details on how to install, set up and customise Plumi.
Supported Join the discussion list with any questions you have about getting Plumi up and running. The Plumi community will point you in the right direction.
|
Sef-Hosting or Video Service
What is the difference between using a video service and self-hosting your own video?
Using a Video Service involves uploading a video file to a service like YouTube, Daily Motion or Vimeo. Your viewers will normally watch your 'channel' on the website of the service.
Self-hosting a video means that you upload the video file to your website or some other webspace you are renting.
Advantages to Self-Hosting Video
Let's compare self-hosting to using YouTube.
No Length Limits: You do not have a default length limit of 15 minutes.
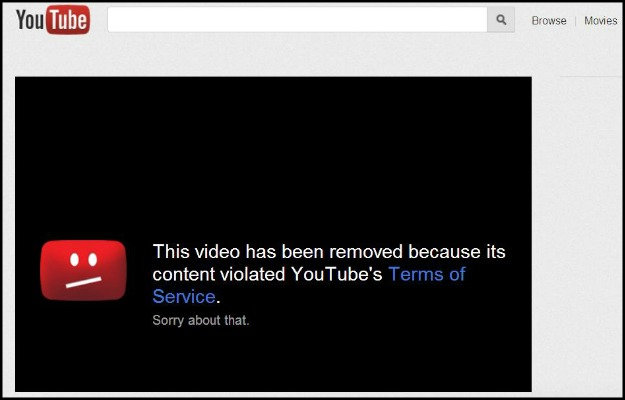
No Takedowns: When YouTube removes one of your videos (a takedown), the process can be quite random and often difficult to reverse. Hosting your own video allows you to keep your video online and deal with any legal issues directly.
Less Blocking: Many companies and some countries block YouTube viewing. You may be able to avoid this blanket blocking.
No Adverts: YouTube has 'pre-roll' ads, overlay ads, banner ads and more ads in 'related videos', 'promoted videos'. Self-hosting avoids this distraction from your message.
Choice of Images and Design: Self-hosting gives you a lot of flexibility when choosing how your video content is displayed.
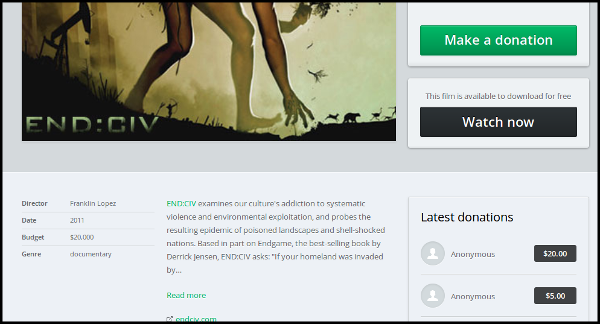
vodo.net encourages viewers to make a donation to the filmmakers
in the way the page is laid out
Show Video in Context: The freedom to be able to display your videos in the context of other video content and other contextualising information is a huge advantage. You can design your pages to offer additional resources, including text, audio and information about relevant campaigns and supporting organisations.
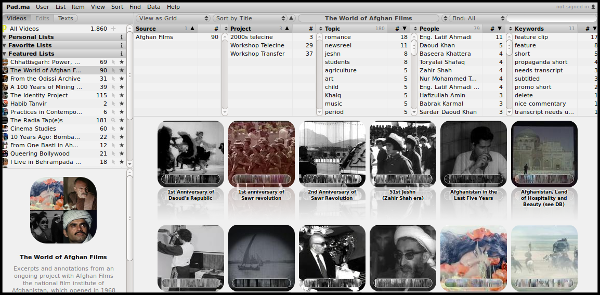
The pad.ma video website has many options to view by categories, areas and keywords
making it very suitable for a video archive
No Account Shutdowns: YouTube can shut down or suspend your account at any time and there is limited customer service to be able to dispute or reverse this decision.
Membership or Restricting Viewers: You may have reasons to restrict viewing of certain videos. Self-hosting allows you to do this with greater flexibility than any of the limited options offered by YouTube and similar services.
Barriers to Self-Hosting Video
Bandwidth Costs and Limits: YouTube and similar services are free and remain so even if your video is very popular. When you are self-hosting content, you will have to pay for the bandwidth (data transfer) and for a successful video this could be significant.
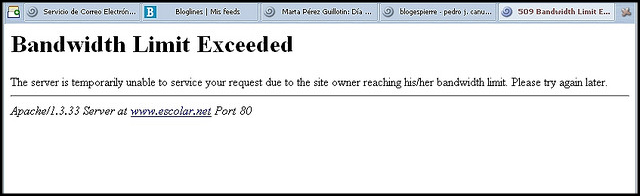
If your self-hosted video 'goes viral' then you may exceed your bandwidth limit.
Audience Searchability: Good Search Engine Optimisation (SEO) can make your video content visible for web searches. However, it must be remembered that YouTube is the second most popular internet search engine.
Multiple Encoding of Videos: To effectively distribute your video to a wide range of different devices and users with varying internet connections, it is advised to encode your videos to different resolutions and formats.

A playlist view on YouTube
Limited Embedding Options: YouTube has done a lot of work to allow you to make it easy for users to embed videos in blogs and social media outlets. You can alter the player dimensions and embed playlists or entire channels.
Uploading Video Files in Drupal
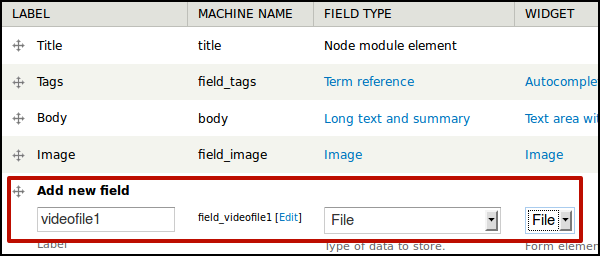
If we want a simple approach to uploading and playing our videos inside an HTML5 player, we can use the built-in File field provided in the Drupal core to hold our uploaded video and an added module to provide a player.
To start, add a field of the 'File' field type to a content type. In this example we use a default Article type. In your admin screen, navigate to Home » Administration » Structure » Content types » Article and click on the Manage Fields tab. Add a new File field type in the way below.
Choose Upload destination: Public files.
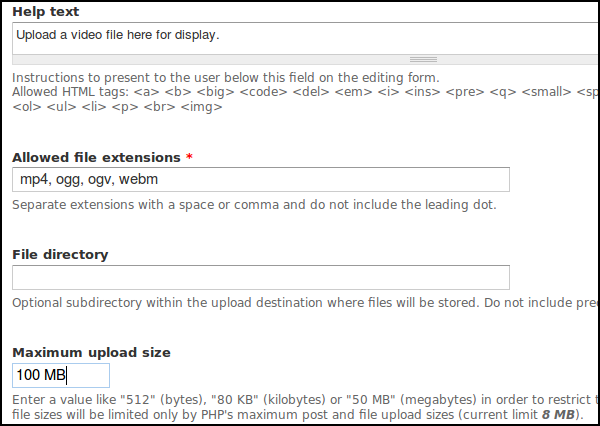
On the next screen, enter a Help text, a list of the Allowed file extensions to be uploaded and the Maximum file size.
The result is that users of the site can upload a video for others to download. No player so far.
As seen below.
Adding an HTML5 Player
The next stage is to add video player functionality so users can click and play the video online. In this case we will use the Media Element player.
Install the Media Element module and the Libraries module that it depends on. You can find details here: https://drupal.org/project/mediaelement
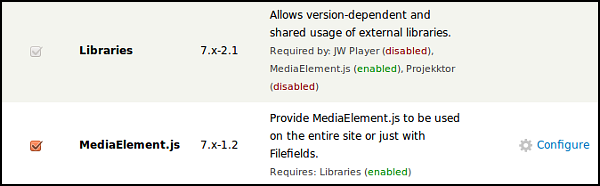
This module depends on some extra code. We call this code a library. To install it, download MediaElement code library from http://mediaelementjs.com/
Unzip it into a libraries directory as supported by the libraries module with the name mediaelement (e.g. /sites/all/libraries/mediaelement).
Test if the installation has worked by clicking on the Configure link next to MediaElement.js in the modules list.
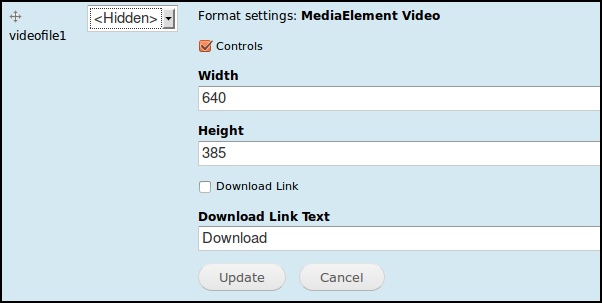
Go back to the Manage Display tab of your content type. Edit the setting of your video file field and choose MediaElement Video.

You can see a default Width and Height.
To change this and to add a download link, click on the image of the cog to configure the player.
Clear your cache and return to your uploaded video to test.
You should now see a player with a large play button to easily allow your visitors to click and play, as well as a Download link if you chose that option.

Video Aggregation in Drupal
In other parts of the guide we have dealt with the advantages of aggregating video clips to present them in one place. Let's find out how to do that in Drupal. This hands on guide will pull videos from RSS feeds into Drupal content nodes.
Hands On: Using the Feeds Module to Aggregate RSS Feeds
Install and enable the following modules in the normal way; media, media_youtube, media_element, feeds, media_feeds, media_internet_sources (part of media), feeds admin (part of feeds). You should also install the Simple Pie library, see these notes for instructions on how to do this.
Set up a content type for your video as in the previous chapter. In this case, a new one called Imported Video.
Use a File field as a Media file selector widget.

Under Manage Display, set the format to MediaElement Video.
Tech Note: if you are importing videos other than YouTube, you may need to choose the Rendered file or oEmbed method as MediaElement may not work.
Add an Importer
A feed importer is the way we add and configure our site to accept data from RSS feeds. It allows us to set different configurations for different kinds of feeds.
Select Structure > Feed Importers > Add Importer
Add relevant name and description.
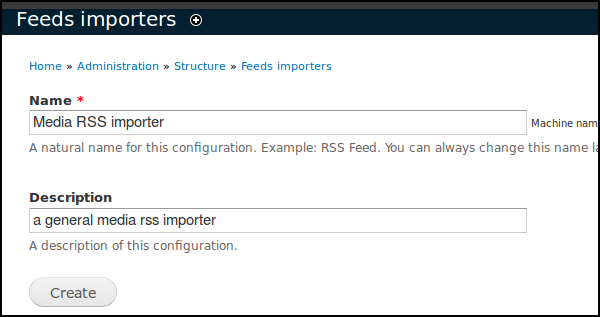
Complete Basic Settings. Make sure Attach to Content Type is set to Stand alone form.
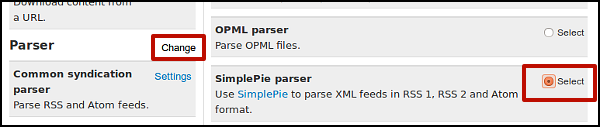
Under Parser click Change and set to Simple Pie.
Make sure Processor is set to Node Processor.
Node Processor settings to the name of your content type. Imported Video.
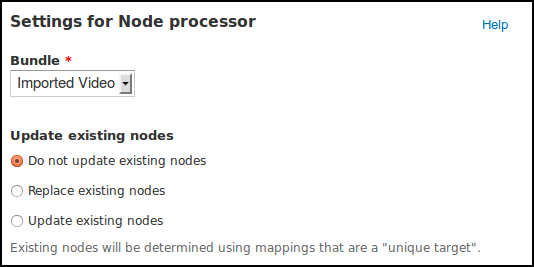
Set Text Format to Filtered HTML.
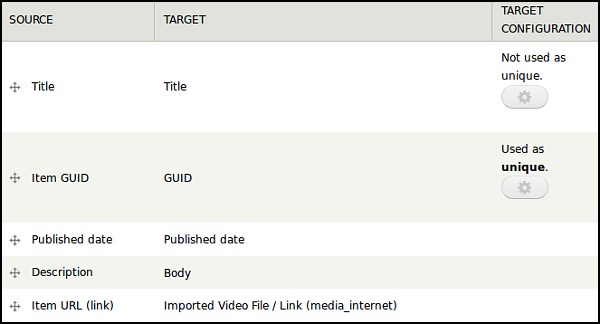
Now click on Mapping link under the Processor settings on the left of the screen.
Now start to add mapping settings. These are different, depending on your source. Read on to see two possible mappings with a YouTube feed and a standard podcast RSS feed.
Map a YouTube Feed
Fill out the mapping sections as follows.
Map a RSS feed with Enclosures (Podcast)
We can now import a WordPress feed as an example of a podcast with links to media files.
To do this, we need to create another importer and repeat the above procedure but we will map Enclosures to our Imported Video File field.

Importing the Video Items
To import our media items, go back to basic settings and click the link for stand alone import page.

We should see our two importers.
Click on one of them. Enter your RSS feed and click on Import.
When you check your imported videos, they should display with an HTML player.
Finding YouTube Feeds
If you are not sure where to find RSS feeds for YouTube videos, there is some good help here.
There is much more detailed help here.
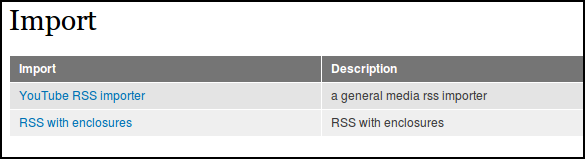
Video Aggregation in WordPress
WordPress was first designed as a blogging platform. It has grown into a more flexible system and can be used for much more than its original purpose of single author blogs, arranging their posts in date order. When it comes to more complicated tasks like membership systems and community portals, there are other systems that are more flexible.
In other chapters we outline the use of Drupal CMS to aggregate large amounts of video content. However, if you want to use WordPress to do simple aggregation and presentation of video content it is possible using the WP RSS Multi Importer plugin.
Hands On: Using the WP RSS Multi Importer
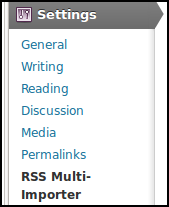
Install and activate the plugin in the normal way.
Navigate to the settings page of RSS Multi Importer.
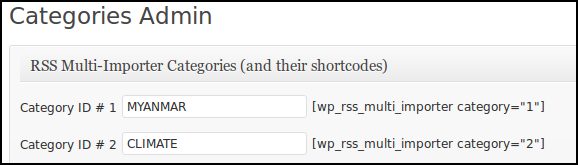
Click on the Categories tab.
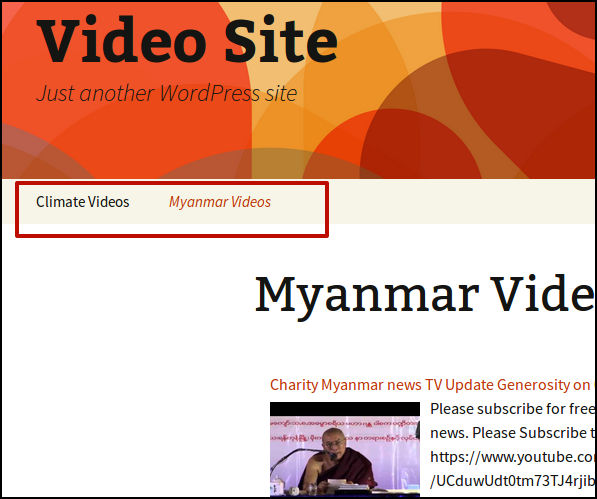
Decide what categories you want to create. In this example we will create two - Climate and Myanmar.
Our aim is to create two pages on our website that display videos from multiple sources on the subjects of Climate and Myanmar.
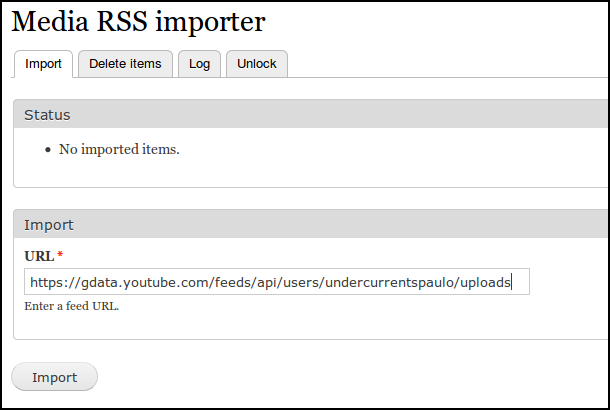
To add the feeds, click on the Feeds tab in the RSS Importer settings page.
After adding feeds and assigning them to categories, you can now create pages of imported videos using the short codes listed next to the categories.
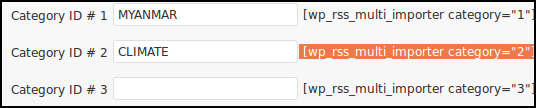
Copy and paste the relevant short codes into a post or page.
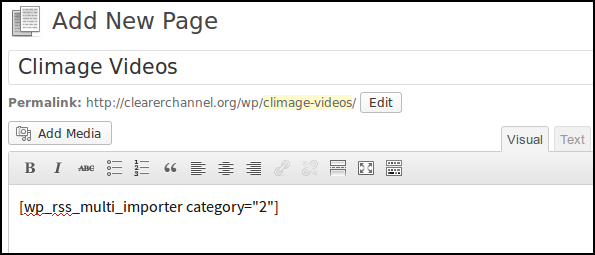
Click Publish and review your page.
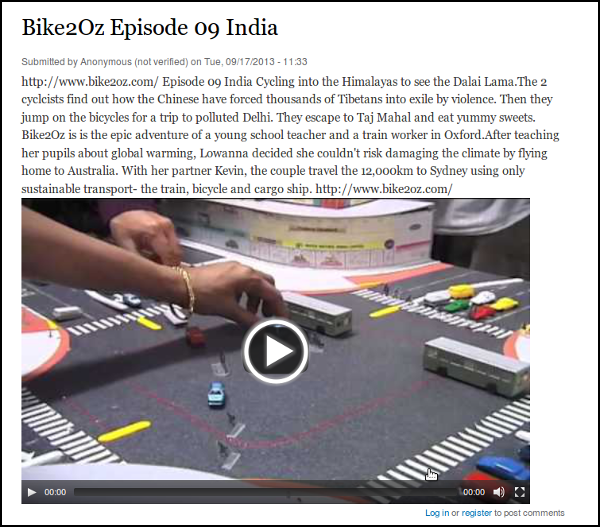
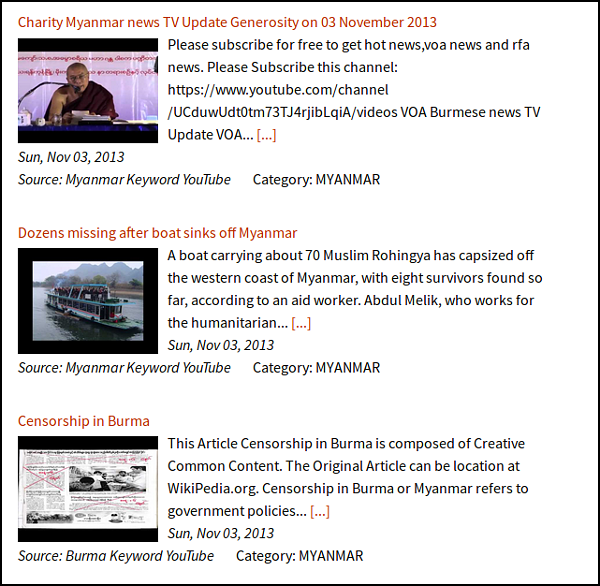
You should see a list of videos of the appropriate category coming in from the different feeds you have entered.
You can add these pages/posts to your site's menu to make it easy for your visitors to find.
More Options for WP RSS Multi Importer
There are many many options for this plug in. You may want to try some of the following features.
-
Number of Posts per Page: This setting allows you to control how many videos posts appear on your category pages.
-
Change the Layout: There are several templates to change the way your posts appear. The shortcode parameter choices allow you to change the look as well.
-
Feeds to Posts: This setting turns each feed item into a post. This can make it easier to present these incoming videos in flexible ways.


