This manual on Video Subtitling is for those who find themselves with the desire but not the practical knowledge to produce, translate or watch subtitles for digital video using free, libre and open source software (FLOSS) tools. Not intended as a professional training guide, the Video Subtitling manual seeks to provide a basic overview of the available FLOSS tools to work effectively with translated video in different target languages.
The broad field of video translation includes audio dubbing, but this is not discussed within the manual as yet. For us video translation takes the form of text subtitles overlaying the video in a target language. There are many ways in which this can be accomplished - for the purposes of this manual the discussion is on using FLOSS desktop and web tools. The intended goal is to build up the community of open translation, creating an open knowledge base for making video content accessible to a global audience.
The peer produced manual process
This manual was designed and written by a community of Open Translation innovators using the FLOSSManuals platform to collaboratively author the content. It is the outcome of the first-ever Open Translation Tools Book Sprint, and builds on work done at two Open Translation Tools convergences, a pair of live events designed by Aspiration (www.aspirationtech.org). and realized in collaboration with a wonderful set of partner organizations and the support of generous and forward-looking funders.
The Open Translation Tools Book Sprint was held in De Waag, a very beautiful historic building in the middle of Amsterdam. The venue for the Book Sprint was kindly sponsored by De Waag Society for Old and New Media (www.waag.org). Many thanks to Lucas Evers and Christine van den Horn for organising the venue and being fantastic hosts.
The first Open Translation Tools Convergence (OTT07) took place in late 2007 in Zagreb, Croatia, co-organized by Aspiration and Multimedia Institute (www.mi2.hr), and was supported by the generosity of the Open Society Institute (www.soros.org), with additional support provided by TechSoup Global (www.techsoupglobal.org). That event produced the initial framing paper on Open Translation, www.aspirationtech.org/paper/opentranslationtools .
The second Open Translation Tools event was held in Amsterdam in June 2009, and was co-organised by Aspiration, FLOSS Manuals (www.flossmanuals.net), and Translate.org.za. OTT09 was again supported by Open Society Institute, with generous additional travel support from the Ford Foundation (www.fordfound.org). OTT09 was held at Theater de Cameleon (www.decameleon.nl), who provided a stunning facility and top-notch hospitality.
Both OTT events ran for three days, and were attended by a total of more than 140 people from over 40 different countries, speaking over 50 different languages.
The OTT agendas were collaboratively developed by participants and event organizers in the time leading up to and during the gatherings, and the proceedings were directed using Aspiration's collaborative approach to event facilitation (facilitation.aspirationtech.org). Each session was run as a discussion lead by one of the participants. All sessions were documented with notes that can be found on the OTT wiki (ott09.aspirationtech.org).
Throughout the OTT09 conference, participants were invited to contribute to the proposed index for the Open Translation Tools book and to learn the FLOSS Manuals tool set so they could contribute remotely.
The Open Translation Tools Book Sprint immediately followed OTT09 at De Waag. Directed by Adam Hyde of FLOSS Manuals, over a dozen participants worked from 10.00 to 22.00 each day on the book, iteratively developing content and grouping chapters while chatting about terminology, technology, licensing and a wealth of other Open Translation topics.
The manual was written in 5 days but the maintenance of the manual is an ongoing process to which you may wish to contribute.
How to contribute to this manual
If you would like to contribute then follow these steps:
It's a good idea to talk with us so we can help co-ordinate all contributions. We have a chat room embedded in the FLOSS Manuals website so you can use it in the browser.
If you know how to use IRC you can connect to the following:
server: irc.freenode.net
channel: #flossmanuals
This manual exists as a dynamic document on flossmanuals.net, and over time will have an ever-increasing pool of authors and contributors.
The following individuals were part of the 2009 Open Translation Tools Book Sprint. We thank them for their tireless efforts to create this first-of-its-kind volume.
Adam Hyde, FLOSS Manuals
Ahrash Bissell, Creative Commons
Allen Gunn, Aspiration
Anders Pedersen
Andrew Nicholson, Engage Media
Ariel Glenn, Wikimedia
Ben Akoh, Open Society Initiative for West Africa
Brian McConnell, Worldwide Lexicon
David Sasaki, Global Voices Online
Dwayne Bailey, translate.org.za
Ed Bice, Meedan
Ed Zad, dotSUB
Edward Cherlin, Earth Treasury
Ethan Zuckerman, Berkman Center for Internet and Society
Eva-Maria Leitner, University of Vienna
Francis Tyers, Universitat d'Alacant
Georgia Popplewell, Global Voices Online
Gerard Meijssen, Stichting Open Progress
Javier Sola, WordForge Foundation
Jeremy Clarke, Global Voices Online
Laura Welcher, dotSub and Global Lives
Lena Zuniga, Sula Batsu
Matt Garcia, Aspiration
Mick Fuzz, Clearer Channel
Patrice Riemens
Philippe Lacour, Zanchin
Sabine Cretella, Anaphraseus
Silvia Florez, Universitat Jaume I
Thom Hastings, City Year
Thomas Middleton
Wynand Winterbach, translate.org.za
Yves Savourel
Acknowledgments
This manual is a culmination of almost three years research, planning, convening and collaboration.
Aspiration first proposed a program in Open Translation to the Open Society Institute (OSI) in 2006. OSI subsequently funded two Open Translation Tools convergences, in Zagreb in 2007 (OTT07) and in Amsterdam in 2009 (OTT09), as well as the Open Translation Tools Book Sprint after OTT09. Ford Foundation and TechSoup Global also provided generous travel support for event participants. We are deeply grateful to all our funders for their generous and forward-looking support.
Aspiration would like to formally thank the following individuals and organizations:
Contributors to the Open Translation Tools Book Sprint, who worked tirelessly over five days to create a first-of-its-kind volume on Open Translation.
All the participants and facilitators at OTT07 and OTT09, whose shared wisdom and knowledge are aggregated in these pages. In particular, thanks to those who took notes during sessions for the wiki, as that material forms the basis for substantial parts of this document, and to those who contributed ideas towards the design of the book.
FLOSS Manuals (www.flossmanuals.net) and Adam Hyde, who co-organized OTT09 and directed the Book Sprint which generated this volume. We salute FLOSS Manuals' vision and leadership in the field of free and open documentation, and the innovative platform they have developed.
Translate.org.za (translate.org.za) and Dwayne Bailey, who co-organized OTT09 and whose leadership in the fields of FLOSS translation and localization is unparalled.
Tomas Krag, who pioneered the Book Sprint concept with the creation of Wireless Networking in the Developing World (www.wndw.net).
De Waag Society for Old and New Media (www.waag.org) and Lucas Evers and Christine van den Horn, who provided an amazing venue for the Book Sprint and fantastic hospitality, and also organized the book publication reception.
Theater de Cameleon (www.decameleon.nl), who provided a stunning facility and top-notch hospitality for OTT09.
Hotel Van Onna (www.hotelvanonna.nl), who provided wonderful accommodations and hospitality for the OTT09 Book Sprint participants in Amsterdam's Jordaan neighborhood.
Multimedia Institute of Zagreb (www.mi2.hr), who co-organized the OTT07 event that started all the fun, serving as passionate participants and collaborative partners without equal. OTT07 simply would not have been possible without their leadership and support, and the high quality of participant experiences there was a direct result of their exhaustive attention to detail and hospitality.
Open Society Institute (www.soros.org), who provided the funding to make OTT07, OTT09 and the Open Translation Tools Book Sprint possible, and Janet Haven, whose guidance and support in the development of Aspiration's program in Open Translation have been ongoing.
Ford Foundation (www.fordfound.org), who provided support for travel to OTT09 that allowed key participants to join in the proceedings.
TechSoup Global (www.techsoupglobal.org), who provided support for travel to OTT07 that allowed key participants to join in the proceedings.
In short, we thank everyone who has been involved in the Open Translation program to date, and we hope to find many opportunities to meet together again and further strengthen this nascent network of practice.
Subtitles are generally text translations of the source language of the video that show up on screen. They allow videos to be translated into any language that has an available script, called character set, and thus can potentially have a global viewership.
Photo courtesy of Antoniot78 on Flickr (Creative Commons License)
Subtitles come in a few file formats and can be attached to video in a few different ways. This variety can give subtitled video a greater flexibility but at the same time less standardization can also create headaches. However, the basic construction of a subtitle is a block of text linked to a time code that matches a certain point of time within the video. During video playback, when that point happens in the video, the subtitle also appears.
Captions are another type of text overlay for video content. Captions are used mainly for accessibility purposes - for deaf or hard of hearing people. Captioning is used to describe a wider range of information than subtitles, for example descriptions of non-spoken events such as noise, music and dramatic events. See this article by Joe Clark for more information about online captioning - http://joeclark.org/access/captioning/bpoc/ST.html
A subtitle file format specifies the format of a file (text or image) containing the subtitle and timing information. Some text-based formats also allow for specifying styling information, such as colours or location of the subtitle.
Some subtitle file formats are:
Micro DVD (.sub) - a text-based format, with video frame timing, and no text styling
Sub Rip (.srt) - a text-based format, with video duration timing, and no text styling
VOB Sub (.sub, .idx) - an image-based format, generally used in DVDs
Sub Station Alpha / Advanced Sub Station (.ssa, .ass) - a text-based format, with video duration timing, and text styling and metadata information attributes.
Sub Viewer (.sub) - a text-based format, with video duration timing, text styling and metadata information attributes.
Examples
Lets look at the actual content of some subtitle files. They will all be simply showing "This is my first subtitle!" in the first 10 seconds of video playback. These were all produced by the FOSS subtitling software Jubler.
The first thing to note is that each file is simply a text file, and is editable by any text editor, such as vi on GNU/Linux, or Text Edit on Mac, or Notepad on Windows.
The following is how our example is realised in a Micro DVD subtitle file (presuming 25 frames per second):
{0}{250}This is my first subtitle!
As a Sub Rip subtitle file:
 1
00:00:00,000 --> 00:00:10,000
This is my first subtitle!
As a Sub Station Alpha (.ssa) file:
[Script Info]
; Edited with Jubler subtitle editor
Title:
Original Script: andycat
Update Details:
ScriptType: v4.00
Collisions: Normal
PlayResX: 320
PlayResY: 288
PlayDepth: 0
Timer: 100,0000

[V4 Styles]
Format: Name, Fontname, Fontsize, PrimaryColour, SecondaryColour, TertiaryColour, BackColour, Bold, Italic, BorderStyle, Outline, Shadow, Alignment, MarginL, MarginR, MarginV, AlphaLevel, Encoding
Style: Default,Arial Unicode MS,31,&HFFFFFF,&H00FFFF,&H000000,&H404040,0,0,1,0,2,2,20,20,20,255,0

[Events]
Format: Marked, Start, End, Style, Name, MarginL, MarginR, MarginV, Effect, Text
Dialogue: 0,0:00:00.00,0:00:10.00,*Default,,0000,0000,0000,,This is my first subtitle!
[INFORMATION]
[TITLE]
[AUTHOR]andycat
[SOURCE]
[FILEPATH]
[DELAY]0
[COMMENT]Edited with Jubler subtitle editor
[END INFORMATION]
[SUBTITLE]
[COLF]&HFFFFFF,[STYLE]bd,[SIZE]18,[FONT]Arial
00:00:00.00,00:00:10.00
This is my first subtitle!
For some subtitle translation, pre-made subtitles may be a useful resource particularly if the video is a well-known or commercial work. For example, if you are including a scene from an American documentary in a video, there are resources to search for existing subtitles in a given language. However, outside of well-known video and cinema, pre-created subtitle resources are few and open source resources are even fewer. When they do exist, they come in the form of open source corpora and translation memories. Both are a type of repository for parallel translated language phrases and segments. Subtitles are then able to be translated with a search and find technique. This can be an especially useful tool for translating idiomatic expressions and common word strings.
There are a few issues that come up when searching for subtitles. For cinematic films, for example, there are almost invariably many different versions of the film. One can imagine that any extra scene, extended title sequence or formatting change can alter the timing of subtitles onscreen which many times renders subtitles useless. Therefore, it is important to find subtitles that are accurate for the audio of the particular film version. There are tools like the open source Sub Downloader (http://www.subdownloader.net/) that help with this problem by matching subtitle sets to specific film versions. Another issue that comes up is the file format of the subtitle file itself. There are different formats for different types of video as well as different types of physical media (HD, DVD, Blu Ray etc.) which affect the selection of subtitles for a given piece of film. In short, details about the film and audio change the availabilty of subtitle resources.
Subtitles files can be created by text editors, or more specialised software like Jubler, GnomeSubtitle, Gaupol and SubtitleEditor. Lets look into a specific example of a subtitle file, and open it in a text editor (eg Text Edit on MacOS, Notepad on Windows or GEdit on GNU/Linux) and modify the subtitles to see it change in video playback.
As a side note, in TextEdit, remember you need to be in 'Plain Text' mode to edit SRT files. Go to Format -> Make Plain Text, if you happen to be in Rich Text mode, as show below:
Using VLC (an Open Source media player), I can start Kafka and load this subtitle, as show below:
Remembering to load the subtitle file associated with it. Note it could be in a different location, or named differently from what is shown below:
As you can see in the above screenshot of the SRT file, the first real dialogue is approximately at 00:04:13 in hh:mm:ss format. That is 4 minutes 13 seconds. We can see this subtitle in the video window of VLC, as shown below:
Now, lets return to our text editor, and make some changes to the file to show how easy it is to create and/or modify subtitles.
Lets change this text to 'This is my first subtitle!' just as an example. Here is the modified, and saved, subtitle file.
Now, replaying the Kakfa video with the subtitle shows:
The above shows how easy it is to manually edit subtitles within a simple text editor. We have not show any time code modifications, nor have gone into file format specifics. You should know the details of the file format you are manually editing if you want to go further into hand crafting subtitle files.
To go further with subtitle production, we need to start to investigate specific subtitle editing software.
Video translation through subtitles is largely useless if the media cannot be distributed. There are many issues that come up when considering how to distribute subtitled video. First, file format differences and preferences can affect the accessibility of your content. Second, the method of distribution, actually how the video is sent out. Third, the resting place or home of the video content is important. Lastly, the license and re-usability of the content must be considered. All of these topics are dependent both on the intentions for the video and the audience which can change significantly from project to project. Therefore, some basic definitions and concepts are explained for further explanation and exploration of the options available.
You can choose to burn in the subtitles onto the video, ie have video editing software permanently render the subtitle text, at the correct times as indicated by the subtitle file, over the top of the video image. This means the video can be distributed as only one file, and the users dont need to worry about separate subtitle files and enabling subtitles in their players. However, you cannot get rid of the subtitles from this video, and need to produce separate video files for every translation you have.
On the other hand, you can simply produce separate subtitle files for every language which gives you and your audience extra flexibility. You need only distribute one version of your video, however now you will need to distribute subtitles for multiple languages, generally available as separate downloads.
Its also possible to explore the video container formats that allow embedding subtitles within the container, which provides the best of both worlds described above - the ability to not show subtitles, or one choosen from among the translations you make available, all within one file. Patent-unencumbered copyleft video container formats that support this include Matroska Multimedia Container (MKV) and the Ogg container format.
Lets briefly describe the tools you would use to render or distribute the subtitles you produce for your video. Avidemux, a FLOSS video editor, allows you to render subtitles over a video, and re-export this video with the text permanently embedded into the video. For distribution of web video, you can combine certain FLOSS video players, such as Flowplayer, with SRT files for embedding your video into a web page, and allow users to see subtitles render over the top of the video. At the cutting edge, you can experiment with the new <video> tag of HTML5 for playback of Ogg Theora video with Firefox 3.5 , using Java Script to control playback of the captions from SRT files.
Attaching Subtitles to Video
There are a few ways in which subtitles can be associated with the media they are translating:
Including Subtitles as a Separate File
Allowing more flexibility for the media and subtitles as a whole, including the subtitles as a separate files allows that file to be accessed, changed and even taken out without affecting the video file itself. The disadvantage of this technique is that the subtitle file format becomes an issue. Players must accept the format in order to properly display the subtitles.
Burning Subtitles into the Video Itself
Attaching the subtitles to the actual video "burns in" the subtitles with no separate file needed. This allows for a more universally playable subtitled video. However, at the same time, the video will then not be able to play without the subtitles and the subtitles themselves will not be editable or accessed. They are, for all intents and purposes, part of the video picture itself.
Multiple Language Streams within a Single Video File
An emerging open source video technology is grouping different language subtitles into the one video container. These are multimedia container format streams that keep various streams of data separate within a single multimedia file. Just as audio and video are separate streams within a single movie file, this technique places the different subtitled languages together within the file allowing both increased playability and language choice for a single video. The Ogg and Matroska container format both support embedding various subtitle formats along with the video and audio streams, encapsulated within one digital file.
Disseminating Subtitled Video Online
Fortunately, there are many FLOSS video hosting services that allow people around the world to see their videos and find out about the information important to them. One of the advantages of using an FLOSS hosting service is that both the multimedia content and the software platform is open to community contribution and collaboration. As with most web services, each has its own flavor and advantages.
EngageMedia
http://engagemedia.org
EngageMedia.org is a video sharing site centered around social justice and environmental issues in the Asia Pacific region. They aim to create an online community based on open video. Video uploads are focused on social justice and the Asia Pacific. The not-for-profit Engage Media collective sponsor the software development of Plumi - http://plumi.org/ - a FLOSS video sharing platform, which is the software that powers engagemedia.org
EngageMedia have also produce a guide for activists and NGOs on distributing video online - http://www.engagemedia.org/guide-to-digital-video-distro
Archive.org
http://www.archive.org
The Internet Archive is an American nonprofit that seeks to provide public access to historical content and media in the form of a library online. Content uploaded and accessible includes text, audio, images, video and software. Valuing the preservation of historical content, this content highlights cultural and national milestones and the everyday. Registered users can upload content including video if they own the rights.
V2V.cc
http://v2v.cc
V2V.cc is a user-submitted video content website that focuses on the OpenTranslationTools.ShareAlike Creative Commons license which allows you to "to copy, distribute, display, perform and derivative the content as long as it will be specified by the author and put under the license identical to [the existing] one."
Miro
http://www.getmiro.com
Miro is an internet video application that allows you to view television from the internet through a downloaded application. Open source and free, Miro encourages community contributions both in the form of development to the platform and video content. When publishing, Miro assigns a video RSS feed so that users around the world can "subscribe" to your channel being notified when new content is added to your channel.
Torrents
Another option for distributing video content online is the use of BitTorrent. This method allows a user to upload video (or other content) onto a network, in effect "seeding" the network with the content. Peers on the network are then able to download the content and can become seeds themselves. In this way, the information for a large amount of content is spread out across a large number of users as more and more people download the content. The more people that then have the content and offer it as a seed, the more likely a successful and quick download will occur. This method is best for content that needs an efficient method of distribution rather than publicity and visual exposure.
Jubler enables you to create and translate subtitles for video files. Using Jubler you can export the subtitles as a text file which can then be used by a variety of applications including VLC to play back the subtitles with the video. These text files can also be used by DVD authoring programs to embed the subtitle file in multilingual DVDs.
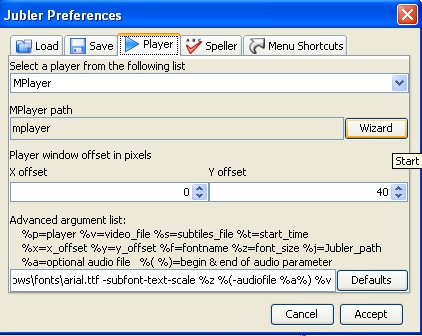
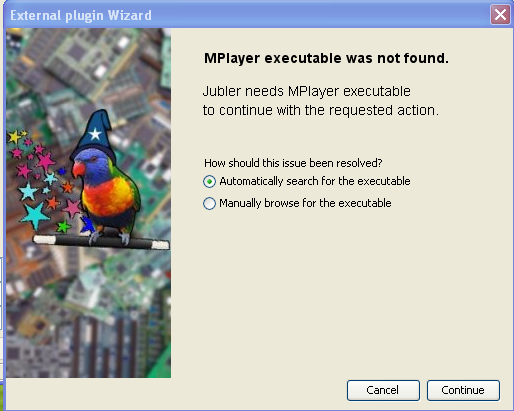
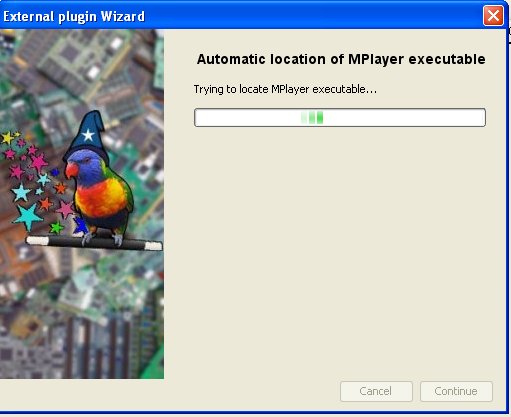
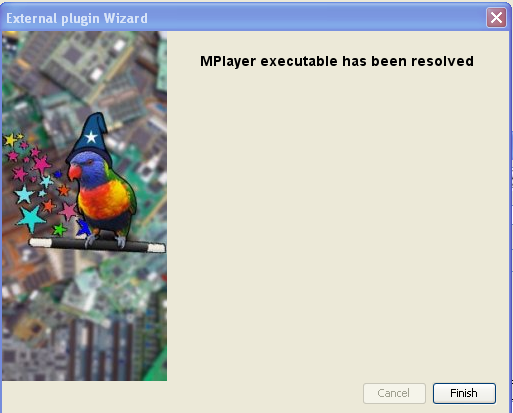
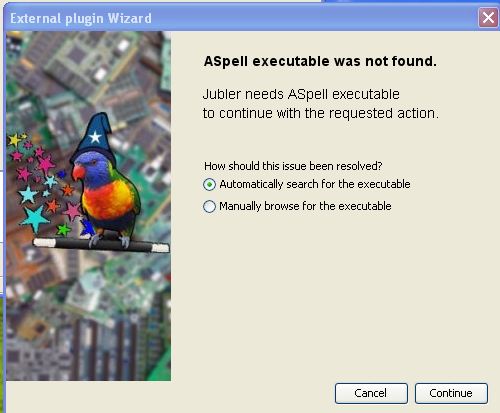
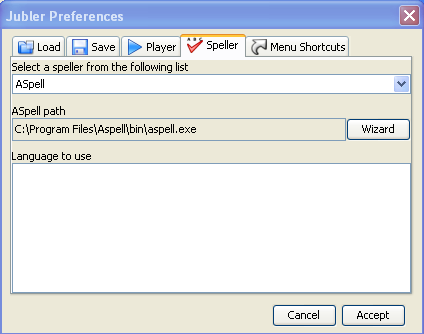
For playback Jubler uses MPlayer (video player software) to preview files and aspell (spell checking software) to spell check the subtitles. You need these two programs installed for Jubler to operate and hence it's trickier to install than similar programs. The good news is that once it is installed it works beautifully and it works the same on OSX, Linux, and Windows.
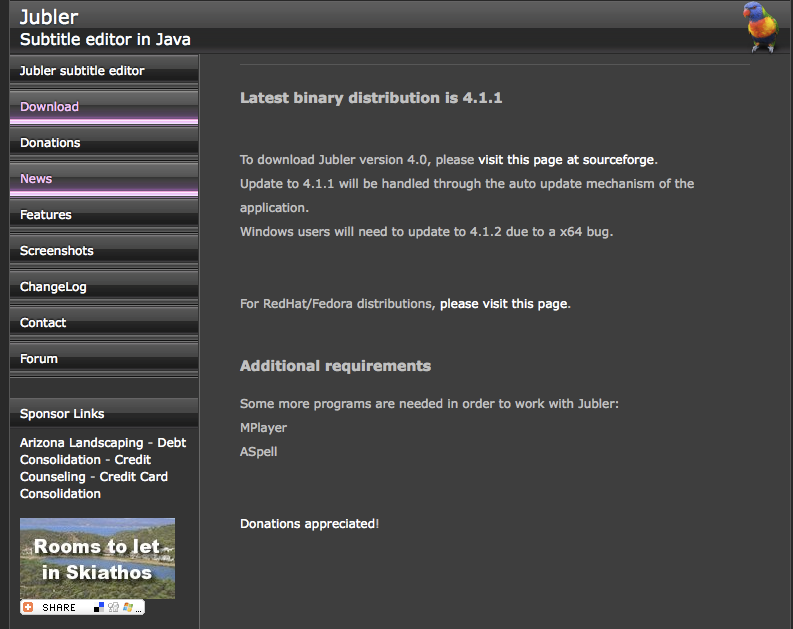
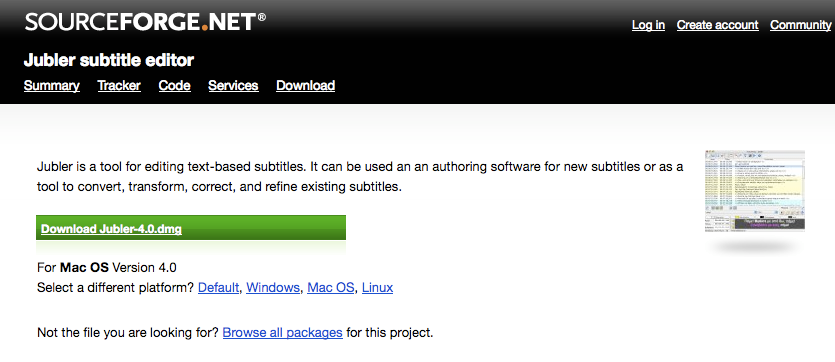
Installing Jubler
For further instructions on installing Jubler, please see the specific Jubler manual at FLOSSManuals - http://en.flossmanuals.net/
Lets prepare Jubler for subtitling a video. I will imagine you have a video file ready you wish to subtitle.
Create a New Project
First we create a new subtitle file. Its a pretty simple and quick process. Jubler will be open on your computer :
First select File from the manu bar and then slide down to New... and the left to File (alternatively you could just press CTRL and N on your keyboard at the same time) :
When you do this you will notice the interface change :
So Jubler is in a 'ready' state for creating new subtitles.
Load a Video
Next you need to choose the video file that the subtitles are for. To choose this video file select Tools > Preview (or press F7) :
You will see a window pop up like this :
Press the 'browse' button next to the 'Use the following video file' and you will be presented with a 'File Browser' with which you can browse your computer looking for the video file you wish to subtitle.
When you have located that file click "Open" :
You are now returned to the "Select video" window you were at earlier. Now...there are some other options displayed but we will not worry about these. You would only check the "Use a different audio stream" if there was another audio file other than the one in the selected video that you wished to subtitle. You might wish to use this option if you had been editing audio to fit with the video but had not yet combined the two (audio and video). If this was the case you would check the box and press the second "Browse" button to select the new audio file.
The last box is just the location of a temporary file that Jubler will create for its own purpose while you create the subtitle. In the above example the location is on the Desktop of my computer. This is not a very good place for the file but we will leave it there for this example.
Now press "OK" and Jubler should load the video :
When you load a video you will see a preview image. Note: when Jubler plays the video file it opens in a separate window and does not play 'within' Jubler. This is because Jubler asks MPlayer to play the video.
Setting Basic Preferences
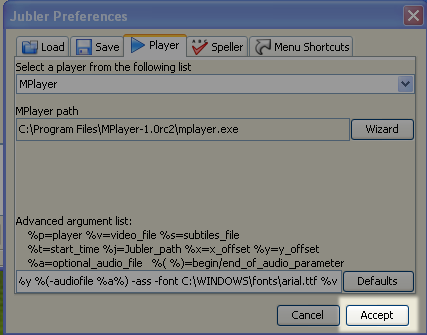
Before we start creating the subtitles we have to set some basic preferences. Open the preferences again by selecting File> Preferences
You should see this :
Under the Load Tab (the Tab that is opened by default). Normally the first encoding should be UTF-8. If you know the frame rate of the video set it in the drop down box otherwise leave it set with the default.
Next choose the Save Tab :
Make sure to select Format as "SubRip *.srt" and Encoding should be "UTF-8"
Click "Accept" and that's it for preparing Jubler for creating subtitles.
There are many options for working with audio in Jubler. Before we look at audio you need to have prepared a video and loaded a preview video file (the video you wish to prepare subtitles for) :
Viewing Audio Wave Form
It can be very useful to view the audio track when creating subtitles. A audio track is represented by lines that look like a 'wave'. This wave is a graphic illustration of the shape of the actual sound wave. If you can see when a sound waves starts it can help to time the subtitles more accurately and add extra comments for noises the occur in the background.
By default the audio track is displayed. However it maybe that your window is not wide enough to see it. If this is the case you will see something to the right of the video image preview similar to this :
In the above example there is a small area for displaying the audio track but it is too small to be useful. To extend it click on the right edge of Jubler and drag to the right. This will extend the window and give the audio track more display space.
It is also possible to see the audio displayed below the video which might be better if your screen isn't wide enough. To do this press the 'orientation' button :
Pressing this button will change the position of the audio. I prefer the audio below the video so use the orientation button to place the audio in this position :
Scrolling
If you grab the blue section and drag it then Jubler will display a video still corresponding to the video at that point on the timeline. The video still will only display once you have dragged the video and released the mouse button.
It is also possible to magnify the timeline with the slider :
This is useful if you want to focus on a small section of audio or wish to see the entire audio timeline displayed at once.
Maximising Audio Display
If you wish to maximise the audio waveform displayed vertically then you need to press the maximise button :
When you have the audio maximised this button will change its appearance from having blue lines to red lines at the top and bottom. Now your audio display will scale the wave form to the maximum space vertically. This is a selection of my audio before maximising :
and after :
Changing the Active (blue) Area
There are different tools for changing the active area of the audio preview.
The default one is a wand with a star. This automatically decides if you want to adjust the edge of the blue active area to change the length of the selected area, or slide the whole area unchanged in length to earlier or later in the clip. Use this one. If you want to change the length of the highlighted clip go the edge and the cursor should change to a double ended arrow. Hold down the mouse and slide it to change the length.
And if you want to move the whole area forward or backwards without changing the length move your cursor over the highlighted area and it will turn into a hand. Hold down the mouse and move it left or right it to change the position of the active area.
It's a good idea to save the project and keep saving regularly so you don't lose your work.
When you are ready to save your file select File > Save As
Browse for a folder to save the subtitle file, give it a name and click "Save".
Exporting Subtitles
The files that Jubler saves are the same files you can use to "burn in" the subtitles, or distribute separately with your video for other people to use with their video player software. The file format Jubler uses, by default, is Advanced Sub Station Alpha (.ass) format.
FILE FORMATS
A subtitle file format specifies the format of a file (text or image) containing the subtitle and timing information. Some text-based formats also allow for specifying styling information, such as colours or location of the subtitle.
Some subtitle file formats are:
Micro DVD (.sub) - a text-based format, with video frame timing, and no text styling
Sub Rip (.srt) - a text-based format, with video duration timing, and no text styling
VOB Sub (.sub, .idx) - an image-based format, generally used in DVDs
Sub Station Alpha / Advanced Sub Station (.ssa, .ass) - a text-based format, with video duration timing, and text styling and metadata information attributes.
Sub Viewer (.sub) - a text-based format, with video duration timing, text styling and metadata information attributes.
Examples
Lets look at the actual content of some subtitle files. They will all be simply showing "This is my first subtitle!" in the first 10 seconds of video playback. These were all produced by the FOSS subtitling software Jubler.
The first thing to note is that each file is simply a text file, and is editable by any text editor, such as vi on GNU/Linux, or Text Edit on Mac, or Notepad on Windows.
The following is how our example is realised in a Micro DVD subtitle file (presuming 25 frames per second):
{0}{250}This is my first subtitle!
As a Sub Rip subtitle file:
 1
00:00:00,000 --> 00:00:10,000
This is my first subtitle!
As a Sub Station Alpha (.ssa) file:
[Script Info]
; Edited with Jubler subtitle editor
Title:
Original Script: andycat
Update Details:
ScriptType: v4.00
Collisions: Normal
PlayResX: 320
PlayResY: 288
PlayDepth: 0
Timer: 100,0000

[V4 Styles]
Format: Name, Fontname, Fontsize, PrimaryColour, SecondaryColour, TertiaryColour, BackColour, Bold, Italic, BorderStyle, Outline, Shadow, Alignment, MarginL, MarginR, MarginV, AlphaLevel, Encoding
Style: Default,Arial Unicode MS,31,&HFFFFFF,&H00FFFF,&H000000,&H404040,0,0,1,0,2,2,20,20,20,255,0

[Events]
Format: Marked, Start, End, Style, Name, MarginL, MarginR, MarginV, Effect, Text
Dialogue: 0,0:00:00.00,0:00:10.00,*Default,,0000,0000,0000,,This is my first subtitle!
[INFORMATION]
[TITLE]
[AUTHOR]andycat
[SOURCE]
[FILEPATH]
[DELAY]0
[COMMENT]Edited with Jubler subtitle editor
[END INFORMATION]
[SUBTITLE]
[COLF]&HFFFFFF,[STYLE]bd,[SIZE]18,[FONT]Arial
00:00:00.00,00:00:10.00
This is my first subtitle!
With Jubler opens on your computer and a video preview loaded, you must first select the time and duration of your first subtitle.
The start time and duration is visually represented by the blue highlighted area in the audio display timeline. So, I will select the audio area I wish to create a subtitle for by moving the blue area and stretching/shrinking it to fit :
You should also note that the exact start time and end time of the selected area is displayed numerically :
The three columns of number represent Start Time, End Time, and Duration. The format is hours:minutes:seconds,1000ths of a second
In the above example we see the duration is 1.185 seconds, probably too short to be read on the screen so I will drag the blue area to make the subtitle display longer. In this situation it is ok to do this as there is no other audio after the current selected area. So I make the blue area about 3 seconds.
You can now type the subtitle in the dark grey box at the bottom of the main window.
You will also see the text appear overlayed on the video still :
The above example is a very short subtitle. In most cases the text will be much longer and you may find that you have too many words to fit in the lines. 35-40 characters is about right per line. If you have more than 35-40 words you may need to split the subtitles up and juggle the timing.
Setting Font Size
If your text is too long you could make the font size smaller. To do this click on the Green button with "Aa" on it (at the bottom of the Jubler window) :
This will display some font options for the subtitle you are working on (the current selected start and end time). These options appear below the video still preview window.
You can now set a new font size. 18 and Arial is what I generally use as this is very readable but it is hard to recommend a setting as it is always dependant on the width of your video.
Adding more Subtitles
When you are happy with the first subtitle and wish to enter the next one select Edit > Insert > After or hit Control and Enter at the same time on the keyboard :
Several things happen when you do this:
the area you entered your subtitle is shown in green on the timeline
the bottom (grey) text area becomes blank ready for you to enter your next line
Jubler searches for the next probable place you may wish to insert a subtitle
Jubler integrates with Google Translation for doing machine translations.
Navigate to the Tools menu, and click 'Translate'
The next screen you will see is the dialog box to select which caption to translate, and from what source language to what target language.
Here I will leave it at the default, 'By user selection', as my only caption is selected. Also, I make sure its English to French translation. Click 'OK', and if you are conneted to the internet, your translation should appear automatically. The French translation of my caption above is shown below.
I assume you have VLC player installed and you have a file or DVD with subtitles which you want to display when you are playing the Video.
There are three ways you may want to use VLC to display subtitles.
1) From a DVD
2) From a Multilingual file (ie Matroska)
3) From a separate subtitle file which is distributed with the Video file.
Play subtitles on a DVD disk
To do this put the DVD disk into your DVD drive. Open up VLC player and select File > Open Disk.
Enter the DVD Drive letter. It may appear automatically. Mine is drive D:
Then click OK.
The menu page of your DVD should appear.
Click on the video you want to watch. Then when the video starts quickly right hand click the mouse on the Video image. Select the Subtitle track you wish to view.
The subtitles should then appear on screen.
Play subtitles in Matroska files
The process for this is exactly the same as above except when starting the process you select File > Open File
You then see this screen.
You should then click on the Browse button to select the video file you want to play. If this file is a matroska file with an *.mkv extension then you can click OK after browsing for the file as the file already has the subtitle infomation.
Then Select the subtitle language stream by right clicking the video screen and selecting Subtitle Track > and choose the language
Play Video files with external subtitles
Using VLC to play Video file with external subtitle files.
If you want to play an external subtitle file for example a srt file.
Select File > Open File
In the Open box click the Browse button and choose your video file.
Then put a tick in the box Use a subtitle file, and click Browse to locate your external subtitle file.
Then Select the subtitle language stream by right clicking the video screen and selecting Subtitle Track > and select the track of subtitles (for an external file like an srt file there will normally only be one track).
Avidemux is a free video editor and converter. It is not really designed for beginners but isn't too hard to get your head around with a little effort.
Avidemux is available for Linux, BSD, Microsoft Windows and Mac OS X (under x11) and is designed for simple cutting, filtering and encoding tasks. It supports many file types, including AVI, DVD compatible MPEG files and MP4.
It has one of the only Graphic User Interfaces (GUI) for encoding files that works on different platforms. It's quite advanced in what it can do but is not the most user friendly of applications. However there are some presets available and it is possible to save custom settings that may make it easier for beginner users to operate.
Installing Avidemux
For further instructions on installing Avidemux, please see the specific Avidemux manual at FLOSSManuals - http://en.flossmanuals.net/
If you want your subtitles to be 'burned' permanently into the video image rather than overlayed then you can do this with the Subtitlerfilter in Avidemux. It is much quicker to create an external timecoded subtitle file and burn it to the image than to manually create and place them in a video editing programme.
First open your video file. In this case we are using a MPEG-2 file in order to create a DVD but the process will work with an MP4 or MPEG-1 file or similar.
Select 'File' and 'Open':
In this example we are going to select the 'Auto' and 'DVD' option to create an MPEG2 file ready for a DVD. Look at other parts of the help to make sure that you choose the right encoding options.
Add Subtitler Filter
Click on the 'Filters' button on the left of the screen
Then in the filters menu click on the 'Subtitles' image on the left.
Click on the 'Subtitler' option and click on the '+' button at the bottom of the window.
Choose the srt file you want to add to the video file.
Change Font Type and Size
Choose the font. Make sure this window points to a valid font. The default is set for a Linux installation. So if you are on Windows or Mac you will need to choose one from your fonts directory. A typical location for a font in windows is 'C:WINDOWS\Fonts\arial.ttf'
To change the font size and position, click on the 'Set Size and Position' button.
Choose a size for your font. '32' seems a good choice if your video file is full screen (ie 720 pixels wide). A font size of '24' seems to work quite will for a video file that is quarter screen (around 320 pixels wide).
There is a slider on the left which allows you to alter the position of the subtitle on the screen. The slider at the top of the screen allows you to preview the video file and check that the position is correct.
Click 'OK'.
Previewing the Subtitles
In the 'Filters' menu click on 'Preview' to check that the subtitles are readable and appear in the right place.
There is a slider at the bottom of the screen to allow you to preview each part of the video.
Then click 'Close' to return to the main menu
Saving your File
Click on the 'Save' button at the top of the screen and choose a location for your video file.
Your file with hard burned subtitles is now ready to use in a DVD project or to upload to the Internet as you need.
GNOME Subtitles is a subtitle editor for the GNOME desktop, an open source desktop environment. GNOME Subtitles enables manual translation of text segments within a specific time frame. As the video plays, the display shows the time length of the segment selected for the text.
If the subtitle file turns out to be off the timing of the corresponding video segment, the subtitle file can be adjusted in its entirety in order to fit with the video file.
GNOME Subtitles adds a second parallel column aligned with the original subtitle time stamp to allow an alternate translation for the text. This allows for easy translation, timing and comparison.
GNOME Subtitles also features built-in video previewing that has:
Gaupol is an open source software tool for translating subtitles within video. Gaupol works with open source systems such as Arch Linux, Debian, Fedora, FreeBSD, Frugalware Linux, Gentoo Linux, NetBSD, openSUSE and Ubuntu, but it will also work with Windows.
What is it used for?
Created to translate previously-created subtitles, Gaupol is not made primarily for initial subtitle creation or editing the original subtitles in the video. Like many programs used for subtitles, Gaupol gives you parallel columns to translate line by line.
As a translation tool, Gaupol is simple to use for text-based subtitles with many small but useful features like the ability to find and replace text, framerate conversion and previews of the edits in an external video player. Gaupol is designed so that users can easily translate a group of subtitles at the same time and assign each to a specific time in the video.
Gaupol works in the following subtitle formats:
Fully supported formats: MicroDVD, MPL2, MPsub, SubRip, Sub Viewer 2.0 and TMPlayer
Partially supported formats: Sub Station Alpha and Advanced Sub Station Alpha
Subtitle Editor is a tool to edit subtitles for the Linux operating system. Designed primarily for the creation and editing of subtitles within a video, Subtitle Editor nevertheless has translation features that are being consistently updated and improved. It offers, like many subtitle managers, a two-column view with each language in a column enabling side-by-side translating line by line.
With a prominent waveform window, voice to text subtitling is made easier so Subtitle Editor can be used to easily create subtitles rather than just translating pre-existing subtitles. The waveform and parallel translation view provide Subtitle Editor with a simple editing interface and can then offer a user-friendly tool for editing subtitles for video.
We will explore some examples of hand maintained video distribution techniques. That is, methods where we will be doing each necessary step manually. The overall goal is to host our video online on a web server, and publish the subtitles if they are separate.
Hosting 'burnt-in' subtitled video on a web server
We will assume you have burnt in your subtitles onto the video itself, and have a FTP account on a web server you can host files and web pages. We aim to publish our subtitled video on the web to allow anyone to download it, and to give them a HTML preview page in their web browser, and a link to download the video. To do this will take a few steps.
Convert your video to the Ogg Theora video codec.
You should start by exporting your video to Ogg Theora, from whatever video editor you have been using. If you already have an exported video file, but not in Ogg Theora codec, then you may like to refer to the manual for ffmpeg2theora at FLOSS Manuals : http://en.flossmanuals.net/FFmpeg2Theora/Introduction
ffmpeg2theora is a conversion utility for transcoding from various video codecs to Ogg Theora.
Transfering your video with File Transfer Protocol (FTP) to a web hosting server. Assuming you have your username and password at the ready, its time to transfer your video file to the web server. If you need to help getting started with installing an FTP client, and using one , please refer to the FireFox manual on FLOSSManuals, specifically the section on using FireFTP - a FireFox plugin : http://en.flossmanuals.net/Firefox/FireFtp
The end result of the this step should be a URL you can use for referring to your publicly accessible video, as hosted on your web server. You can give this URL out to people so that they can download your video.
Construct a simple HTML web page for previewing your video.
To enable a web preview of Theora video you can use at least two methods. One is to use Cortado, a Java applet embedded in a web page, which will allow web browsers to display the video in a web page. Read more about this method in the Theora Cookbook: http://en.flossmanuals.net/TheoraCookbook/Cortado
The second method is to use the latest HTML5 standard's <video> tag, which for Theora video is supported by Firefox 3.5, and Safari 4 with the Xiph QT components : http://www.xiph.org/quicktime/
A simple HTML document is shown below, which includes the <video> tag. You should use the URL you obtained at the end of Step 2, in place of the example URL http://my-server.org/video.ogm
<!DOCTYPE html PUBLIC "-//W3C//DTD XHTML 1.0 Transitional//EN" "http://www.w3.org/TR/xhtml1/DTD/xhtml1-transitional.dtd">
<html xmlns="http://www.w3.org/1999/xhtml" xml:lang="en" lang="en"><head><title>My Video Test</title></head>
<body>
<video src="../http://my-server.org/video.ogm" width="480" height="320" autoplay="autoplay" controls="controls">
Sorry, your browser does not support the video tag. Try using Firefox 3.5+
</video></body>
</html>
You should inspect the HTML source of that webpage to see the reference to a real Theora video, in this case a link to a EngageMedia.org hosted video.
Hosting external subtitle files along with video on a web server
We will assume you have not burnt in your subtitles onto the video itself, ie you have possibly multiple subtitle files (in SRT format) as well as your video and have a FTP account on a web server you can host files and web pages. We aim to publish our subtitled video on the web to allow anyone to download it, and to give them a HTML preview page in their web browser, and a link to download the video. To do this will take a few steps.
Convert your video to the Ogg Theora video codec.
You should start by exporting your video to Ogg Theora, from whatever video editor you have been using. If you already have an exported video file, but not in Ogg Theora codec, then you may like to refer to the manual for ffmpeg2theora at FLOSS Manuals - http://en.flossmanuals.net/FFmpeg2Theora/Introduction
ffmpeg2theora is a conversion utility for transcoding from various video codecs to Ogg Theora.
Transfering your video with File Transfer Protocol (FTP) to a web hosting server.Assuming you have your username and password at the ready, its time to transfer your video file and your subtitle files to the web server. If you need to help getting started with installing an FTP client, and using one , please refer to the FireFox manual on FLOSS Manuals, specifically the section on using FireFTP - a FireFox plugin : http://en.flossmanuals.net/Firefox/FireFtp
The end result of the this step should be URLs you can use for referring to your publicly accessible video and subtitle files, as hosted on your web server. You can give these URLs out to people so that they can download your video and/or subtitles.
Construct a simple HTML web page for previewing your video
To enable a web preview of Theora video you can use at least two methods. One is to use Cortado, however, Cortado cannot currently show subtitles.
The second method is to use the latest HTML5 standard's <video> tag, which for Theora video is supported by Firefox 3.5, and Safari 4 with the Xiph QT components : http://www.xiph.org/quicktime/ along with prototype Javascript technologies to display the subtitles in sync with the video.
A simple HTML document is shown below, which includes the <video> tag. You should use the URL you obtained at the end of Step 2, in place of the example URL http://my-server.org/video.ogm
<!DOCTYPE html PUBLIC "-//W3C//DTD XHTML 1.0 Transitional//EN" "http://www.w3.org/TR/xhtml1/DTD/xhtml1-transitional.dtd">
<html xmlns="http://www.w3.org/1999/xhtml" xml:lang="en" lang="en"><head><title>My Video Test</title></head>
<body>
<video src="../http://my-server.org/video.ogm" width="480" height="320" autoplay="autoplay" controls="controls">
Sorry, your browser does not support the video tag. Try using Firefox 3.5+
</video></body>
</html>
HTML5 video tag and SRT file format technologies
We can now modify the above HTML page that includes the video tag, to include our SRT files dynamically, ⁞⁞ showing as the video plays.
Firstly, notice below that we will integrate JQuery - a GPL Javascript library available (http://jquery.com/) and an example Javascript implementation of using displaying subtitles in a webpage from a SRT file available at :
http://v2v.cc/~j/jquery.srt/jquery.srt.jsA simple HTML document is shown below, which includes the modification to include the Javascript files and to reference to your subtitle file. Only one subtitle file can be referenced at a time, unless you start developing further with Javascript. To customise this for your video and subtitle, you should use the URLs you obtained at the end of Step 2, in place of the example URL http://my-server.org/video.ogm and http://my-server.org/video.srt
<!DOCTYPE html PUBLIC "-//W3C//DTD XHTML 1.0 Transitional//EN" "http://www.w3.org/TR/xhtml1/DTD/xhtml1-transitional.dtd">
<html xmlns="http://www.w3.org/1999/xhtml" xml:lang="en" lang="en"><head><title>My Video Test</title>
<script type="text/javascript" src="../http://v2v.cc/~j/jquery.srt/jquery.js"></script>
<script type="text/javascript" src="../http://v2v.cc/~j/jquery.srt/jquery.srt.js"></script>
</head>
<body>
<video id="video" src="../http://my-server.org/video.ogm" width="480" height="320" autoplay="autoplay" controls="controls">
 Sorry, your browser does not support the video tag. Try using Firefox 3.5+
 </video>
<div class="srt" data-video="video" data-srt="http://my-server.org/video.srt"> subtitle content </div>
</body>
</html>
You should inspect the HTML source of that webpage to see the reference to a real Theora video, and a real SRT file.
The original example of playing a SubRip (.srt) subtitle, along side a Ogg Theora video, using the HTML5 video tag can be seen at : http://v2v.cc/~j/jquery.srt/
To research further into emerging open standards for video on the web in HTML5, see the mailing list of whatwg, specifically a thread around captions for web video:
There are a number of FLOSS web Content Management Systems (CMS) that offer specialised video functionality - such as Plumi http://plumi.org/ and various video specific Drupal modules.
Some of the interesting functionality these web applications bring to online video distribution include:
automatic video transcoding to various formats and sizes to match the different playback devices
workflows for community review and moderation
classification systems
syndication technologies such as RSS2
web preview capabilities through flash video plugins or native playback.
We can not give examples of FLOSS web CMSs that do video hosting and have integrated subtitle production, translation and playback functionality as these systems has not been sufficiently developed.
Critical Commons (http://criticalcommons.org/) is one example of a FLOSS video annotation service, based on the Plumi CMS, that allows uploading of audio commentary per video, which is then integrated into video playback via the open source JW Player (http://www.longtailvideo.com/players/jw-flv-player/). That is, you can choose to listen to the video's original audio track, the commentary or both. It also allows uploading of text commentaries on individual videos, however it has not developed into system for subtitling or captioning of the videos using these text commentaries yet.
The Plumi video CMS allows the functionality as mentioned above, however no subtitling production or playback is possible out-of-the-box.
It is possible to use the combination of Plumi, the new HTML5 video tag, and Javascript to build FLOSS web applications to allow "peer produced" subtitling production, translation and playback. This technology is expected to evolve rapidly through 2009.
Kultura has a released an alpha version of its community edition of its video hosting software at http://www.kaltura.org/project/kalturaCE (28th June 2009). Their commercial service has integration with a commercial proprietary service for translation and subtitling video (http://corp.kaltura.com/technology/editing_and_annotation). The video subtitling functionality is produced by a third-party software company who have developed a plugin for the open source Flash video player, JW Player.
ASCII (American Standard Code for Information Interchange) is one of the early character encoding systems for computers. It is a 7 bit, 128 character system that was designed to represent the Latin alphabet, numerals and punctuation. It is not designed to represent characters from other alphabets. This often causes problems because many programming languages were originally developed for ASCII, and only later added support for Unicode and other character sets.
ATOM
ATOM is a content syndication standard, similar to RSS, which allows websites to publish feeds that allow other sites, news readers and web servers to automatically read or import content from each other.
See also RSS.
bridge language
A bridge language is a widely spoken, international language, such as English, French or Spanish, that is used as an intermediate language when translating between two less widely spoken languages. For example, to translate from Romanian to Chinese, one might translate first from Romanian to English, and then English to Chinese because few people speak Romanian and Chinese directly.
See also interlingua.
character Set
A character set can be as simple as a table that maps numbers to characters or symbols in an alphabet. ASCII, for example, is an old system that represents the American alphabet (the number 65 in ASCII equals 'a', for example).Unicode, in contrast, can represent a much larger range of symbols, including the large pictographic symbol sets for languages such as Chinese and Japanese.
character encoding
Character encoding is a representation of the sequence of numeric values for characters in text. For many character set standards, there is only one coding, so it is possible to confuse the two ideas. In Unicode, on the other hand, there is one numeric value for each character, but that value can be represented (encoded) in binary data of different lengths and formats. Unicode has 16-bit, 32-bit, and variable length encodings. The most important is UTF-8, which is to be used for all data transmission, including Web pages, because it is defined as a byte stream with no question of size or byte order. Fixed-length formats also have to specify processor byte order (Big-Endian or Little-Endian).
CMS (Content Management System)
A content management system is a piece of software that manages the process of editing and publishing content to a website or blog. A CMS enables editors to supervise the work of writers, manage how articles or posts are displayed, and so on. These systems also make it easier to separate content production (writing) from design related tasks, such as a page layout. Word Press, Movable Type, Drupal and Joomla are examples of widely used content management systems.
corpus
A corpus (plural corpora) is a large and structured collection of texts used for linguistic research. In the context of translation tools, a corpus consist of one or more aligned texts. These corpora typically contain texts that are about a certain domain and consequently can help to find the terminology used in a domain.
copyleft
Copyleft is a use of copyright law to enforce policies that allow people to reprint, share and re-use published content without prior written permission from the author. Copyleft licences require that derivative works use the same licence, so that they are as Free as the original work.
copyright
Copyright is a form of intellectual property law giving the author of a work control over its use, re-use in different media, translation, and distribution.
Creative Commons
Creative Commons is an organization that was founded to promote new types of copyright terms, also known as copyleft. The organization has developed legal templates that define new policies for sharing and distributing online content without prior knowledge or consent from the original producer.
disambiguation
Disambiguation is the process of determining or declaring the meaning of a word or phrase that has several different meanings depending on its content. The English word "lie", for example, could mean "to recline" (I need to lie down), or "to tell a falsehood". Machine translation systems often have a very difficult time with this, while it is an easy task for humans, who can usually rely on context to determine which meaning is appropriate.
disambiguation markup
Disambiguation markup is a way to embed hints about the meaning of a word or phrase within a text, so that a machine translator or other automated process can understand what the author intended. For example, the expression "<div syn=similar>like</div>" would tell a text processor that the word like is synonymous with similar, information a program could use to avoid misinterpreting like as "to like someone".
Ethnologue
The principal database and catalogue of human languages, providing linguistic and social data for each language. In particular, Ethnologue lists estimates of the number of speakers of each language in each country and worldwide. It is available in printed form and on the Internet at http://www.ethnologue.org. Ethnologue's database includes information on more than 6,900 known languages, and continues to grow.
FLOSS
Free, Libre and Open Source Software. An umbrella term for all forms of software which is liberally licensed to grant the right of users to study, change, and improve its design through the availability of its source code. FLOSS is an inclusive term generally synonymous with both free software and open source software which describe similar development models, but with differing cultures and philosophies.
fuzzy matching
Fuzzy matching is a technique used with translation memories that suggests translations that are not perfect matches for the source text. The translator then has the option to accept the approximate match. Fuzzy matching was meant to speed up translation however there is a greater risk of inaccuracy.
gettext
gettext is a utility, available in several programming languages, for localizing software. It works by replacing texts, or strings, with translations that are stored in a table, usually a file stored on a computer's disk drive. The table contains a list of x=y statements (e.g. "hello world" = "hola mundo").
GNU / GPL
GNU or GNU's Not Unix, is a recursive acronym for a set of software projects announced in 1983 by a computer scientist at MIT named Richard Stallman. The GNU project was designed to be a free, massively collaborative software, open source software initiative. In 1985 the Free Software Foundation was founded and took up the GNU project. It 1989 Stallman drafted a legal license for his software and called it the GPL or the GNU Public License. The GPL, a copyleft license, is the most popular license for free software.
interlingua
An interlingua is a artificial language with extremely regular grammar that is used as an intermediate step when translating from one human language to another. This is an alternative to machine translation systems that translate the original text to an intermediate machine representation such as a parse tree, and then to the target human language.
The artificial language Interlingua is sometimes used as an interlingua in this sense. Several other artificial languages, including Esperanto, Loglan, and Lojban, have been proposed for the same purpose.
language code
A language code (see ISO) is a two or three letter code that uniquely identifies a human language. For example, en = English, while es = espanol / Spanish. There are two different code sets in widespread
use. ISO 639-1 is a two letter code that represents several hundred languages, most of the widely spoken languages in use today, while ISO 639-2 and ISO 639-3 is a three letter code that represents a much larger set of languages (several thousand languages).
license / licensing
Licensing is the process of adding a legal license to your copyrighted work. This copyrighted work may be either a piece of content that can be translated or a software tool for translation. For more information on licensing, please see the chapter on it under Intellectual Property.
locale / locale code
A locale code, which is usually a suffix to a language code, provides additional geographical information. For example, Spanish varies by country, so you would identify Mexican Spanish as es-mx, while
Argentine Spanish would have the code es-ar, where the suffix is the two letter ISO country code.
localization
Localization is the process of translating and culturally adapting the prompts, instructions and user interface for a software application or web service. Most applications have dozens to hundreds of system menus and prompts that need to be translated.
machine translation
Machine translation is the computerised process of automatically generating a translation of text from one language to another.
machine translation (rules based)
A rules based translation engine tries to analyze a sentence, break it down into its parts of speech, and to interpret and disambiguate vocabulary to transform it into an intermediate, machine readable form. It then re-generates the intermediate form into the target language.
machine translation (statistical)
A statistical machine translation system works by sifting through extremely large sets of parallel or aligned texts (sentences that have been directly translated by humans from one language to another). With a sufficiently large training set, or corpora, it learns which phrases are strongly associated with counterparts in the other language. When translating texts, it works by breaking a text down into smaller fragments, called N-grams, and searches for the best statistical match into the target language, and generates a translation by stitching these translated texts together.
microformat
A microformat is an open data format standard for exchanging small pieces of information.
open content
Open Content, a neologism coined by analogy with "Open Source", describes any kind of creative work, or content, published under a licence that explicitly allows copying and modifying of its information by anyone, not exclusively by a closed organization, firm or individual. The largest Open Content project is Wikipedia.
Open Data Format Initiative
Initiative aiming to convince software companies to release data format documentation and to pass laws that governments can only store user in an open format.
open source software / licensing
To make software Open Source means to put it under a licence requiring that the human-readable source code be available freely on demand, with further rights to modify the program and redistribute the results. Source code under these licences is usually made available for download without restriction on the Internet.
Open Source software was originally defined as a derivative of the Debian Free Software guidelines, when Bruce Perens removed references to Debian from the definition. The current version of the definition is at http://www.opensource.org/docs/definition.php
Open Source software is very similar to Free Software, but not at all like Freeware, which is provided at no cost, but without source code. Most Open Source software licences qualify as Free Software licences in the judgment of the Free Software Foundation. The term FLOSS is used to include both: Free (as in Libre) and Open Source Software.
open standards
An open standard is one created in a publicly accessible, peer reviewed, consensus-based process. Such standards should not depend on Intellectual Property unless it is suitably licensed to all users of the standard without fee and without application. Furthermore, open standards that define algorithmic processes should come with a GPLed or other Open Source reference implementation.
optical character recognition (OCR)
OCR is the conversion of images to text data, using various methods of shape recognition. The OCR software must recognize layout in addition to character glyphs, in order to represent word and paragraph spacing correctly in the resulting text, and if possible, columns and table layouts. Trainable OCR software can recognize text in a wide variety of fonts, and in some cases multiple writing systems. OCR for Chinese characters and for Arabic presents special problems, which have been to a considerable extent solved.
peer review
The process of reviewing a document by independent, possibly anonymous reviewers for quality defined by an appropriate professional standard and the requirements of a particular publication. Standards differ widely in different disciplines.
PO file
PO files (extension .po), are text files in a specified format, containing source and translated strings used by the gettext() localization system. Typically, you create one PO file for each language or locale that an application has been localized to.
RSS
Really Simple Syndication - a XML standard for syndicating information from a website, commonly frequently updated databases such as news and events websites or blogs.
semantic network
A semantic network is a graph representation of words or phrases and their relationships to each other. In a semantic network, a word is linked to other words via paths, with descriptions of how they are linked. It can represent many types of relationships between words, such as: is similar to, is the opposite of, is a member of a set (e.g. "red" belongs to the set "colors").
standard
A standard is defined by an authority or by general consent as a general rule or representation for a given entity.
standards body
A standards body is an organisation tasked with the definition and maintenance of standards, such as the IETF, which governs Internet standards, or the ITU (International Telecommunicaton Union), which sets standards for telephonic communication systems and networks.
SVG / Scalable Vector Graphics
SVG is a XML-based open format for resolution-independent vector graphic files, usually with extension .svg. This allows editing, and thus translation, of any <text> elements.
timebase / timebase code
A timebase code is used in video editing and subtitling to indicate where in a video a particular action, caption, etc takes place. The time is typically expressed as an offset from the beginning of the video clip, usually in a hh:mm:ss:ff form, where hh = hours, mm = minutes, ss=seconds and ff=frame number (e.g. 32 seconds, 12 frames into a clip display the caption "Hello World". There are a wide variety of ways this is done, but the basic concept is similar regardless of file format details.
translation memory
A translation memory is a database of source texts and their translations to one or more languages, as well as meta data about the translations, such as: who created the translation, subjective quality scores, revision histories, etc. The main characteristic of translation memories is that texts are segmented into translation units (blocks, paragraphs, sentences, or phrases) that are aligned with their corresponding translations. The standard for translation memory exchange between tools and/or translation vendors is TMX, an XML-based format developed by the Localization Industry Standards Association (LISA).
transliteration
Transliteration is a systematic conversion of text from one writing system to another. It is not, in general, simple substitution of one letter for another. The purpose of a transliteration may be to represent the exact pronunciation of the original, or not; to indicate word structure and other linguistic attributes, or not; to represent text in a form familiar to the casual user, or not. There are more than 200 transliteration systems for representing Chinese in European alphabets, mostly Latin with some Cyrillic. Of these, only Pinyin is a standard recognized in China.
Changing fonts is not transliteration. There is, however, an unfortunate practice of creating so-called transliteration fonts, which substitute for the glyphs of a writing system glyphs from some other writing system. The practice is unfortunate because it produces bad transliterations even in the best of cases. Should the Korean family name 로 be transliterated Ro, as written, or No, as pronounced? Should the Spanish name Jimenez be transformed to Chimène in French, as happens sometimes to immigrants? It depends.
Unicode
Unicode is the principal international character set, designed to solve the problem of large numbers of incompatible character sets using the same encoding. Unicode text can contain symbols from many languages, such as Arabic, English, and Japanese, along with Dingbats, math symbols, and so on. While not all languages are covered by Unicode, almost all official national languages are now part of the standard, except for traditional Mongolian script. In addition to encoding characters as numbers independent of any data representation, the Unicode standard defines character properties, Unicode Transformation Formats for representing Unicode text on computers, and algorithms for issues such as sorting (collation), and bidirectional rendering.
UTF-8
UTF-8 is a variable length Unicode Transformation Format that represents text as a stream of bytes. It was designed so that any ASCII text file (7 bits, with the 8th bit set to 0) is also a Unicode text file. This property does not extend to the 8-bit ISO 8859-1 or Windows Code Page 1252 character repertoires. Extended Latin characters require two bytes each, as do several other alphabets. Chinese characters and some other writing systems require three or four bytes per character. UTF-8 is specified as the appropriate form for transmitting Unicode text, regardless of the internal representation used on any particular computer.
Wiki
A user editable website where users are authorized to create pages, and to create and edit content. Wikis range from open systems, where anyone can edit pages, to closed systems with controlled membership and access rights.
Word / Word Length
A computer word is a fixed-length sequence of bits, usually the same length as the registers in the processor. Thus 8-bit, 16-bit, and 32-bit words have been common in the history of computing, and other lengths have occasionally been used.
There is an unfortunate tendency to confuse computer word length with a variety of data types, including numbers and characters. This is most often seen in the mistaken notion that a character is a byte. Even during the period when all character set standards specified 7-bit or 8-bit representations, this was incorrect. Any byte could in fact represent dozens of characters, depending on its interpretation according to a particular character set definition. The idea became more wrong in the case of double-byte character sets for Chinese, Japanese, and Korean, where most characters had 16-bit representations. It is completely untenable in Unicode, where characters can be represented using 16-bit elements (including Surrogate pairs), 32-bit elements, or variable-length byte sequences, as in UTF-8.
XLIFF
XLIFF (XML Localization Interchange Format) is a standard format for storing localization data. It is widely used by translation memories and translation management tools as an interchange format.
XML
eXtensible markup language is a system for expressing structured data within a text or html document. XML is similar in structure to HTML, and can be used as an interchange format for exchanging complex data structures between different computers. It is often described as a machine readable counterpart to HTML, which is designed to be read by humans. RSS, ATOM, SVG, and XLIFF are all XML based formats.
All chapters copyright of the authors (see below). Unless otherwise stated all chapters in this manual licensed with GNU General Public License version 2
This documentation is free documentation; you can redistribute it and/or modify it under the terms of the GNU General Public License as published by the Free Software Foundation; either version 2 of the License, or (at your option) any later version.
This documentation is distributed in the hope that it will be useful, but WITHOUT ANY WARRANTY; without even the implied warranty of MERCHANTABILITY or FITNESS FOR A PARTICULAR PURPOSE. See the GNU General Public License for more details.
You should have received a copy of the GNU General Public License along with this documentation; if not, write to the Free Software Foundation, Inc., 51 Franklin Street, Fifth Floor, Boston, MA 02110-1301, USA.
Copyright (C) 1989, 1991 Free Software Foundation, Inc.
51 Franklin Street, Fifth Floor, Boston, MA 02110-1301, USA
Everyone is permitted to copy and distribute verbatim copies
of this license document, but changing it is not allowed.
Preamble
The licenses for most software are designed to take away your freedom to share and change it. By contrast, the GNU General Public License is intended to guarantee your freedom to share and change free software--to make sure the software is free for all its users. This General Public License applies to most of the Free Software Foundation's software and to any other program whose authors commit to using it. (Some other Free Software Foundation software is covered by the GNU Lesser General Public License instead.) You can apply it to your programs, too.
When we speak of free software, we are referring to freedom, not price. Our General Public Licenses are designed to make sure that you have the freedom to distribute copies of free software (and charge for this service if you wish), that you receive source code or can get it if you want it, that you can change the software or use pieces of it in new free programs; and that you know you can do these things.
To protect your rights, we need to make restrictions that forbid anyone to deny you these rights or to ask you to surrender the rights. These restrictions translate to certain responsibilities for you if you distribute copies of the software, or if you modify it.
For example, if you distribute copies of such a program, whether gratis or for a fee, you must give the recipients all the rights that you have. You must make sure that they, too, receive or can get the source code. And you must show them these terms so they know their rights.
We protect your rights with two steps: (1) copyright the software, and (2) offer you this license which gives you legal permission to copy, distribute and/or modify the software.
Also, for each author's protection and ours, we want to make certain that everyone understands that there is no warranty for this free software. If the software is modified by someone else and passed on, we want its recipients to know that what they have is not the original, so that any problems introduced by others will not reflect on the original authors' reputations.
Finally, any free program is threatened constantly by software patents. We wish to avoid the danger that redistributors of a free program will individually obtain patent licenses, in effect making the program proprietary. To prevent this, we have made it clear that any patent must be licensed for everyone's free use or not licensed at all.
The precise terms and conditions for copying, distribution and modification follow.
TERMS AND CONDITIONS FOR COPYING, DISTRIBUTION AND MODIFICATION
0. This License applies to any program or other work which contains a notice placed by the copyright holder saying it may be distributed under the terms of this General Public License. The "Program", below, refers to any such program or work, and a "work based on the Program" means either the Program or any derivative work under copyright law: that is to say, a work containing the Program or a portion of it, either verbatim or with modifications and/or translated into another language. (Hereinafter, translation is included without limitation in the term "modification".) Each licensee is addressed as "you".
Activities other than copying, distribution and modification are not covered by this License; they are outside its scope. The act of running the Program is not restricted, and the output from the Program is covered only if its contents constitute a work based on the Program (independent of having been made by running the Program). Whether that is true depends on what the Program does.
1. You may copy and distribute verbatim copies of the Program's source code as you receive it, in any medium, provided that you conspicuously and appropriately publish on each copy an appropriate copyright notice and disclaimer of warranty; keep intact all the notices that refer to this License and to the absence of any warranty; and give any other recipients of the Program a copy of this License along with the Program.
You may charge a fee for the physical act of transferring a copy, and you may at your option offer warranty protection in exchange for a fee.
2. You may modify your copy or copies of the Program or any portion of it, thus forming a work based on the Program, and copy and distribute such modifications or work under the terms of Section 1 above, provided that you also meet all of these conditions:
a) You must cause the modified files to carry prominent notices stating that you changed the files and the date of any change.
b) You must cause any work that you distribute or publish, that in whole or in part contains or is derived from the Program or any part thereof, to be licensed as a whole at no charge to all third parties under the terms of this License.
c) If the modified program normally reads commands interactively when run, you must cause it, when started running for such interactive use in the most ordinary way, to print or display an announcement including an appropriate copyright notice and a notice that there is no warranty (or else, saying that you provide a warranty) and that users may redistribute the program under these conditions, and telling the user how to view a copy of this License. (Exception: if the Program itself is interactive but does not normally print such an announcement, your work based on the Program is not required to print an announcement.)
These requirements apply to the modified work as a whole. If identifiable sections of that work are not derived from the Program, and can be reasonably considered independent and separate works in themselves, then this License, and its terms, do not apply to those sections when you distribute them as separate works. But when you distribute the same sections as part of a whole which is a work based on the Program, the distribution of the whole must be on the terms of this License, whose permissions for other licensees extend to the entire whole, and thus to each and every part regardless of who wrote it.
Thus, it is not the intent of this section to claim rights or contest your rights to work written entirely by you; rather, the intent is to exercise the right to control the distribution of derivative or collective works based on the Program.
In addition, mere aggregation of another work not based on the Program with the Program (or with a work based on the Program) on a volume of a storage or distribution medium does not bring the other work under the scope of this License.
3. You may copy and distribute the Program (or a work based on it, under Section 2) in object code or executable form under the terms of Sections 1 and 2 above provided that you also do one of the following:
a) Accompany it with the complete corresponding machine-readable source code, which must be distributed under the terms of Sections 1 and 2 above on a medium customarily used for software interchange; or,
b) Accompany it with a written offer, valid for at least three years, to give any third party, for a charge no more than your cost of physically performing source distribution, a complete machine-readable copy of the corresponding source code, to be distributed under the terms of Sections 1 and 2 above on a medium customarily used for software interchange; or,
c) Accompany it with the information you received as to the offer to distribute corresponding source code. (This alternative is allowed only for noncommercial distribution and only if you received the program in object code or executable form with such an offer, in accord with Subsection b above.)
The source code for a work means the preferred form of the work for making modifications to it. For an executable work, complete source code means all the source code for all modules it contains, plus any associated interface definition files, plus the scripts used to control compilation and installation of the executable. However, as a special exception, the source code distributed need not include anything that is normally distributed (in either source or binary form) with the major components (compiler, kernel, and so on) of the operating system on which the executable runs, unless that component itself accompanies the executable.
If distribution of executable or object code is made by offering access to copy from a designated place, then offering equivalent access to copy the source code from the same place counts as distribution of the source code, even though third parties are not compelled to copy the source along with the object code.
4. You may not copy, modify, sublicense, or distribute the Program except as expressly provided under this License. Any attempt otherwise to copy, modify, sublicense or distribute the Program is void, and will automatically terminate your rights under this License. However, parties who have received copies, or rights, from you under this License will not have their licenses terminated so long as such parties remain in full compliance.
5. You are not required to accept this License, since you have not signed it. However, nothing else grants you permission to modify or distribute the Program or its derivative works. These actions are prohibited by law if you do not accept this License. Therefore, by modifying or distributing the Program (or any work based on the Program), you indicate your acceptance of this License to do so, and all its terms and conditions for copying, distributing or modifying the Program or works based on it.
6. Each time you redistribute the Program (or any work based on the Program), the recipient automatically receives a license from the original licensor to copy, distribute or modify the Program subject to these terms and conditions. You may not impose any further restrictions on the recipients' exercise of the rights granted herein. You are not responsible for enforcing compliance by third parties to this License.
7. If, as a consequence of a court judgment or allegation of patent infringement or for any other reason (not limited to patent issues), conditions are imposed on you (whether by court order, agreement or otherwise) that contradict the conditions of this License, they do not excuse you from the conditions of this License. If you cannot distribute so as to satisfy simultaneously your obligations under this License and any other pertinent obligations, then as a consequence you may not distribute the Program at all. For example, if a patent license would not permit royalty-free redistribution of the Program by all those who receive copies directly or indirectly through you, then the only way you could satisfy both it and this License would be to refrain entirely from distribution of the Program.
If any portion of this section is held invalid or unenforceable under any particular circumstance, the balance of the section is intended to apply and the section as a whole is intended to apply in other circumstances.
It is not the purpose of this section to induce you to infringe any patents or other property right claims or to contest validity of any such claims; this section has the sole purpose of protecting the integrity of the free software distribution system, which is implemented by public license practices. Many people have made generous contributions to the wide range of software distributed through that system in reliance on consistent application of that system; it is up to the author/donor to decide if he or she is willing to distribute software through any other system and a licensee cannot impose that choice.
This section is intended to make thoroughly clear what is believed to be a consequence of the rest of this License.
8. If the distribution and/or use of the Program is restricted in certain countries either by patents or by copyrighted interfaces, the original copyright holder who places the Program under this License may add an explicit geographical distribution limitation excluding those countries, so that distribution is permitted only in or among countries not thus excluded. In such case, this License incorporates the limitation as if written in the body of this License.
9. The Free Software Foundation may publish revised and/or new versions of the General Public License from time to time. Such new versions will be similar in spirit to the present version, but may differ in detail to address new problems or concerns.
Each version is given a distinguishing version number. If the Program specifies a version number of this License which applies to it and "any later version", you have the option of following the terms and conditions either of that version or of any later version published by the Free Software Foundation. If the Program does not specify a version number of this License, you may choose any version ever published by the Free Software Foundation.
10. If you wish to incorporate parts of the Program into other free programs whose distribution conditions are different, write to the author to ask for permission. For software which is copyrighted by the Free Software Foundation, write to the Free Software Foundation; we sometimes make exceptions for this. Our decision will be guided by the two goals of preserving the free status of all derivatives of our free software and of promoting the sharing and reuse of software generally.
NO WARRANTY
11. BECAUSE THE PROGRAM IS LICENSED FREE OF CHARGE, THERE IS NO WARRANTY FOR THE PROGRAM, TO THE EXTENT PERMITTED BY APPLICABLE LAW. EXCEPT WHEN OTHERWISE STATED IN WRITING THE COPYRIGHT HOLDERS AND/OR OTHER PARTIES PROVIDE THE PROGRAM "AS IS" WITHOUT WARRANTY OF ANY KIND, EITHER EXPRESSED OR IMPLIED, INCLUDING, BUT NOT LIMITED TO, THE IMPLIED WARRANTIES OF MERCHANTABILITY AND FITNESS FOR A PARTICULAR PURPOSE. THE ENTIRE RISK AS TO THE QUALITY AND PERFORMANCE OF THE PROGRAM IS WITH YOU. SHOULD THE PROGRAM PROVE DEFECTIVE, YOU ASSUME THE COST OF ALL NECESSARY SERVICING, REPAIR OR CORRECTION.
12. IN NO EVENT UNLESS REQUIRED BY APPLICABLE LAW OR AGREED TO IN WRITING WILL ANY COPYRIGHT HOLDER, OR ANY OTHER PARTY WHO MAY MODIFY AND/OR REDISTRIBUTE THE PROGRAM AS PERMITTED ABOVE, BE LIABLE TO YOU FOR DAMAGES, INCLUDING ANY GENERAL, SPECIAL, INCIDENTAL OR CONSEQUENTIAL DAMAGES ARISING OUT OF THE USE OR INABILITY TO USE THE PROGRAM (INCLUDING BUT NOT LIMITED TO LOSS OF DATA OR DATA BEING RENDERED INACCURATE OR LOSSES SUSTAINED BY YOU OR THIRD PARTIES OR A FAILURE OF THE PROGRAM TO OPERATE WITH ANY OTHER PROGRAMS), EVEN IF SUCH HOLDER OR OTHER PARTY HAS BEEN ADVISED OF THE POSSIBILITY OF SUCH DAMAGES.
Open Translation describes a nascent field of practice emerging at the crossroads of three dynamic movements of the information and internet eras:
Open Content
Free/Libre/Open Source Software (FLOSS)
Open/Peer Production
Open Content encompasses a diverse range of knowledge resources available under open licenses such as Creative Commons (CC) and Free Document License (FDL), from books to manuals to documents to blog posts to multimedia. These resources are published on terms that encourage their redistribution, modification, and broad re-use. Open content resources like Wikipedia have dramatically changed the way knowledge is authored, maintained, and accessed.
The Free/Libre/Open Source Software (FLOSS) movement is a vibrant global phenomenon which has, over the past 30-plus years, generated a sprawling ecology of software tools that are freely and openly available to anyone who wants them. This movement has established an alternative to proprietary, corporate-controlled software and corresponding closed data formats, which greatly benefits translators and localization practitioners. Given access to the underlying source code, they can create new versions of tools to support underserved audiences.
Open- or peer-production models use the internet's connected-but-distributed nature to bring broad human resources to bear on specific tasks or problems. Wikipedia is the flagship example of this, existing today as the single largest knowledge set in history. Other examples of peer production include Project Gutenberg's distributed proofreading community (www.gutenberg.org) and the FLOSSManuals authoring platform (www.flossmanuals.net) on which this book is produced.
Open Translation synthesizes these three models of open production and open collaboration into a new discipline. It is the set of practices and work processes for translating and maintaining open content using FLOSS tools, and using the the internet to make that content and those tools and processes available to the largest number of writers and readers. Open Translation tools comprise a body of software that supports or performs language translation and is distributed under a FLOSS license.
Open Translation's open components are fundamentally interrelated.
If translation of open content depends on non-free or non-open software, it creates a critical bottleneck in the open knowledge ecosystem. When translation access and flow are controlled by proprietary tool vendors, those vendors can charge high prices and can disregard the best interests of open publishers and their readers.
Because FLOSS projects are open source, FLOSS translation tools can always be further localized and customized to support new language pairs and locales.
For free and open source software, open content is appropriate. Using FLOSS tools to translate and manage non-open content is prevalent and mostly license-compliant (with the GNU General Public License version 3 a notable exception). Free and open tools should ideally operate on free and open data.
The open production models of Open Translation lower the barriers to participation in cross-language knowledge exchange, and help avoid replication of the "expert culture" that permeates the professional translation industry.
Open translation can be viewed as translation's movement from an individual sport to a team sport. Additionally, social translation on the Internet is, as Ethan Zuckerman has suggested, a way for communities of translators to become journalists, deciding which content to move between language communities. Journalism on the web, as a social practice, is as much about curating, annotating, rating, and linking as it is about writing. This is a powerful and emergent form of journalism, encyclopedia creation, social networking, and much more.
The Promise of Open Translation
Open content projects like Wikipedia have rewritten conventional wisdom on who can publish knowledge. Global Voices Online has dramatically prefixed the role of 'journalist' with the adjective 'citizen'. The Free and Open Source software movements have inverted software production models from centralized, opaque and often lurching processes into decentralized, transparent and frequently agile endeavors.
Open Translation promises to profoundly broaden access to knowledge across language barriers. Wikipedia may exist in hundreds of languages, but many language versions lag in terms of coverage. General cross-lingual access to open content and digital knowledge is still the exception rather the rule. The future of Open Translation lies in establishing richer, better-connected sets of online and offline tools while growing a global network of volunteer translators who understand and follow best practices for translating content and building open translation memories.
The vision for Open Translation is predicated on the notion that anyone can be a translator by contributing to Open Translation projects. Just as FLOSS projects have project managers, testers, community moderators, and documenters in addition to developers, Open Translation projects welcome the efforts of proofreaders, editors, and project managers in addition to actual translators.
But there are also opportunity costs to adhering to a vision of Open Translation. Open Translation tools are in many instances not as mature or full-featured as their proprietary counterparts. Those wishing to blaze the trail of an all-open approach to translation face a worse-before-better situation, where near-term sacrifice is necessary to support the improvement and evolution of the open tool set.
Getting to Open Translation
As the field of Open Translation continues to emerge and evolve, there are a number of projects, networks, issues and trends driving and gating that evolution.
As much as open content, FLOSS, and peer production models have profoundly impacted our world and culture, they are not yet well integrated for the purposes of Open Translation. Open Translation tool coverage is incomplete, and existing tools rarely inter-operate or share standards for data interchange. Ubiquitous web publishing platforms like Drupal and Wordpress have minimal built-in support for maintaining multi-lingual sites. Add to these facts that open content license publishers like Creative Commons have not fully resolved licensing implications for translated works, and it is clear there is still much work to be done.
Open Translation is synonymous with a new ecology of participation, and one for which the roles are still being established. What is known is that there are two under-tapped human resources which can be brought to bear: translators who want to volunteer their skills, and poly-lingual individuals who want to serve as volunteer translators. But leveraging such contributions is dependent on having well-defined ways in which to get involved. Global Voices and Wikipedia have fundamentally different models for volunteer translation, and are still evolving their community processes. Most open content projects have no idea how to establish sustainable volunteer translation models, and many that do utilize rudimentary processes centered on exchanging large email attachments.
Scaling the pool of volunteer translators is its own challenge. Bi-lingual abilities are but a pre-requisite to being an effective translator; practice and experiential learning are required to effectively translate. Establishing community hubs for open translators is also an unsolved problem; while several professional translation communities such as OpenTranslationTools.ProZ thrive on the internet, open translator communities are only now beginning to gain momentum, and individuals who translate for open content projects are usually operating in project-specific networks.
A fundamental challenge in an open environment is quality control. Traditional, centralized translation models have dedicated editors and proofreaders whose job it is to verify accuracy and consistency of translation. It remains for the Open Translation movement to establish quality processes and transparent mechanisms for reputation measurement.
Also, the significance of regional and cultural issues in translation work can not be overstated; as norms and values vary, a range of secondary connotations and associations must be considered in crafting appropriate translations. While professional translators spend years learning the nuances of idiom and linguistic mapping in specific language pairs, open translators will not as often have the benefit of such learning curves. Creating better open repositories of essential empirical knowledge and best practices will further accelerate the ramp-up of volunteer translators and the quality of translations.
The Vision Turns on When, Not Whether
An openly translated internet is ultimately a matter of time, and the great unknown is how long it will take to realize the vision. Open Translation will scale in proportion to the open tools and open content upon which it rests, and on the corresponding efforts of those leading the way.
This book exists as a step along the path, an attempt to both capture essential knowledge and take measure of the tools, processes and learnings of Open Translation to date. As you read on, consider yourself a part of this movement by virtue of your very interest. We invite you to contribute to the Open Translation movement in any way that taps your passion and inspires your participation.
Video translation is defined as the process of translating the meaning of any linguistic content (including speech and writings) of the source language of video material into text of the target language, which is can be played with the video in a separate file.
At the core of video translation is the translators interpretation of the source language of the video.
The proces of video translation is currently facilitated by a number of different programmes, which enable the writing of the subtitle file, timing the text file accordingly and adding additional target languages to the original translation.
One part of video translation enable the writing of text for the video. Another part of video translation includes the option of translating video subtitles in one language into another. So far no FLOSS web video services have started applying collaborative systems for translating. Only DotSUB and similar are doing this, but these web service are not FLOSS.
GNOME Subtitles is a subtitle editor for the GNOME desktop. It supports the most common text-based subtitle formats and allows for subtitle editing, translation and synchronization.
Gnome also features built-in video previewing
Uses GStreamer backend
Built-in subtitle display
Video length and current position display
Set subtitle timings based on the video position
Automatically select video when opening subtitles
Internationalization (i18n) support, currently for:
Gaupol is a software for the Windows operating system that translates subtitles on video from one language to another. Gaupol works in the following subtitle format:
Partially supported formats: Sub Station Alpha and Advanced Sub Station Alpha
Created to translate previously-created subtitles, Gaupol is not the best tool for initial subtitle creation or editing the original subtitles in the video.
However, as a translation tool, Gaupol is effective and simple to use for text-based subtitles with many small but useful features like the ability to find and replace text, framerate conversion and previews of the edits in an external video player. Gaupol is designed so that users can easily translate a group of subtitles at the same time and assign each to a specific time in the video.
The editing tools include:
Unlimited undo and redo
Inserting, removing, splitting and merging subtitles
Find and replace, including regular expressions
Toggling of italics and dialog lines
Case changes
Spell-check
Common text error correction
Hearing impaired text removal
Breaking lines to a maximum length
Capitalizing lower case texts
Joining or splitting words based on spell-check suggestions
PLEASE DELETE ALL TEXT ON THIS PAGE BEFORE WRITING YOUR CHAPTER
Things you should know:
By default all chapters written using FLOSS Manuals are licensed under the GNU General Public License version 2. This license allows anyone to use this material for any purpose, with certain requirements. There is a copy of this license here : http://www.flossmanuals.net/license. To know more about this license look here : http://www.gnu.org/copyleft/gpl.html
You, having created this page, are the copyright holder for this content.
If you have copied the chapter content from another source then please contact info@flossmanuals.net and ask for the copyright notice to be changed to credit the original author. Please make sure any information copied is also licensed under the GNU General Public License version 2. If the material has no copyright notice or uses another license then contact the author and ask their permission to publish the material using the GPL.
Software name : Jubler Homepage :http://jubler.org/ Software version used for this installation : 3.9 Operating System use for this installation : Microsoft Windows (XP) Recommended Hardware : 200 Mhz processor (CPU) minimum
Note : Jubler can be tricky to install. If at any point you get stuck installing Jubler then one tip is to try the freeware Subtitle Workshop instead as it is easier to install but not as feature rich. Jubler requires MPlayer and Aspell to play video files and spell check subtitles. Before proceeding with this installation first install these two applications. If you need some help we have provided information on how to install MPlayer and Aspell (in the sections after installing Jubler - you can follow the process exactly as see below, installing first Jubler and then MPlayer an then Aspell.
Click on "Visit this page on SourceForge" and you will see something like this:
Click on "Download Jubler-3.9.0.exe" (the green button) and Jubler should start downloading to your hard drive. I am using Firefox (a type of browser) to download Jubler so I first see this window:
I press 'Save File' and then when the download is completed I see this:
If you are using another browser like Internet Explorer or Opera then the above two steps would be slightly different.
Now you must know where the file has downloaded to. I always save my files to the Desktop so when I look there I see the installer file I just downloaded:
Double click on the icon to start the install process. The first screen you should see is this :
Click "Next >" and you see the following :
Put a tick in the "I accept the terms of the Licence Agreement" box and click "Next >":
Leave the above set with the defaults and click "Next >":
Click "Install" and the installer will start doing its magic. If you do not have JavaRuntime Environment (also just called 'Java') installed then the installer will download and install it for you (if Java is already installed then you will not see the following installation screens for Java). In this case you will see something like this:
When Java is downloaded you need to accept the license agreement from the pop-up window that appears:
Just press "Accept >" and you will see the progress bar displayed for the installation process of Java:
Click "Finish" and then the last screen should appear:
Click "Finish" and then start the programme from the Start Menu or from the icon on the Desktop.
Installing MPlayer on Windows
Software name : MPlayer Homepage :http://www.mplayerhq.hu Software version used for this installation : 1.0rc2 Operating System use for this installation : Microsoft Windows (XP) Recommended Hardware : 200 Mhz processor (CPU) minimum
We want to select a version from the "HTTP" column. The choices in the columns reflect ways of downloading the files - it is not necessary to understand the difference between HTTP (Hyper Text Transfer Protocol) and FTP (File Transfer Protocol) and BT (Bittorrent) - just choose the 'HTTP' column.
Choose the second download line which reads "Mplayer1.0rc.2 Windows" (the name may alter slightly as a new version may be available by the time you read this). Regardless of the version you choose, don't choose the "GUI" version (line 3). I clicked on the 'UK' link - this is not a choice of language it is a choice of download locations (ie. which country you download the file from - choose the one closest to you).
I am using the Firefox browser and so I see this :
You may see something slightly different depending on what browser you use.
Save the file, it will most likely download to your Desktop (but not necessarily, depending on how you have configured your browser). This file will end in '.zip' and is known as a ZIPfile. The icon may be a folder icon with a 'chain' around it like this:
ZIP files are compressed collections of files and you must first 'decompress' or 'unzip' the file. Windows XP and Vista have built-in helper applications for this. You need to Unzip the file to a location in your "Program File" directory (technically, it doesn't matter where you install the files, but it is good practiceto put them all software in the 'Program Files' directory). Do this by right-clicking on the file and choosing "Extract All"
This will display the first screen of the 'unzip' process :
Now press "Next >" and you will see the following :
You must choose "Browse" and then a 'file browser' window opens :
Highlight the 'Program Files' folder similar to how I have done it in the example above. Then press 'OK'. You will see the following :
Click "Next >" and the Unzip process will actually start (!) :
When the process is complete you will see this final screen :
Now click "Finish".
Installing Aspell on Windows
Now to install aspell...first download the Aspell windows installer by visiting the following page http://aspell.net/win32/
Click on Full Installer link:
Depending on your browser you will see something similar to this:
Save it to your hard drive. Double click on the exe file:
This will start the installation of Aspell
Click Next for this window and for the following screens :Welcome, Licence, Install Location. Then Click "Install" when presented with the Ready to Install screen (see below):
.
The installation process will start. You should see this screen when it is completed:
And then click "Next >" and the final screen appears:
Finally, click "Finish".
Configuring Jubler on Windows
Now we need to configure Jubler so it can use MPlayer and Aspell.
Configure Jubler for MPlayer
Now open Jubler (when Jubler starts you will see a 'splash screen' - a picture of a parrot. Click on this and it will disappear and the Jubler window will appear). Select File > Preferences:
The Preferences Window then opens:
Click on the Player Tab at the top.
Click on "Wizard":
Now select "Automatically search for the exexutable" rather than the manual option, and press Continue. Jubler will then search your computer for the location of MPlayer.
This wizard should then pick up where your MPlayer file is. If so it will say MPlayer executable has been found.
If so Click Finish.
Then Click Accept.
Configuring Jubler for Aspell
Now open Jubler and once again Select File > Preferences.
You will see the Preferences Window:
Click on the "Speller" tab :
Click on "Wizard" and you will see the following :
Select "Automatically search for the executable"
Click on "Continue" and Jubler will start searching for Aspell and Juber should come back with a message that the executable has been found.
Software name : Jubler Homepage :http://jubler.org/ Software version used for this installation : 4.1.1 Operating System use for this installation : Mac OS X 10.5.7 Recommended Hardware : 200 Mhz processor (CPU) minimum
Note : Jubler can be tricky to install. If at any point you get stuck installing Jubler then one tip is to try the freeware Subtitle Workshop instead as it is easier to install but not as feature rich. Jubler requires MPlayer and Aspell to play video files and spell check subtitles. Before proceeding with this installation first install these two applications. If you need some help we have provided information on how to install MPlayer and Aspell (in the sections after installing Jubler - you can follow the process exactly as see below, installing first Jubler and then MPlayer an then Aspell.
Click on "Visit this page on SourceForge" and you will see something like this:
Click on "Download Jubler-4.0.dmg" (the green button) and Jubler should start downloading to your hard drive. I am using Firefox (a type of browser) to download Jubler so I first see this window:
I press 'OK' and then when the download is completed I see this:
If you are using another browser like Internet Explorer or Opera then the above two steps would be slightly different.
Now you must drag the Jubler icon into the Applications folder. Thats it!
Now double click on the Applications folder to find where the Jubler application is installed, so we can start it up for the first time.
The first screen you should see is this :
Double click the Jubler icon and you see the following :
Click Open to accept this warning about downloading apps from the Internet, and you should see Jubler loading:
After starting Jubler, it checks for new versions for installing. If a new version is found, you may see this screen:
You can skip versions, by reminded later, or install it now. If you click 'Install Update', you should see a download progress bar as the new version is downloaded, and if you are connected online properly, eventually you will see:
Click 'Restart Application', and Jubler will close, then reopen. I have noticed some versions dont restart properly. If Jubler doesnt start , go to the Finder -> Applications -> Jubler , and double click to start Jubler again.
You can also use Apple+SPACEBAR to open Spotlight. Start typing 'Jubler', and then select 'Jubler - Applications'.
Installing MPlayer OSX
Software name : MPlayer OSX Homepage :http://www.mplayerhq.hu Software version used for this installation : 1.0 rc2 [ MPlayer-dev-SVN-090416-01.dmg ] Operating System use for this installation : Mac OS X 10.5.7 Recommended Hardware : 200 Mhz processor (CPU) minimum
Also, even with this latest version of Mplayer OSX, you may not see the Video Preview and Audio Waveform Preview - see this forum post - http://jubler.org/smf/index.php?topic=126.0 After you have successfully installed Jubler, you will need to go to the Applications folder, CTRL+click on the Jubler icon and select 'Get Info'. Inside this screen, select the 'Open in 32 Bit Mode' checkbox.
Basically, You need to install the previous rc version of MPlayer. it can be downloaded from http://www.mplayerhq.hu/MPlayer/releases/ The name that you are looking for is MPlayerOSX_1.0rc1.dmg
We want to select a version from the "HTTP" column. The choices in the columns reflect ways of downloading the files - it is not necessary to understand the difference between HTTP (Hyper Text Transfer Protocol) and FTP (File Transfer Protocol) and BT (Bittorrent) - just choose the 'HTTP' column.
Choose the second from the bottom, download line which reads "Mplayer1.0rc.2 outdated" (the name may alter slightly as a new version may be available by the time you read this). The link for me was http://www.mplayerhq.hu/MPlayer/releases/MPlayerOSX_1.0rc2.dmg
I am using the Firefox browser and so I see this :
Click 'OK' to start downloading MPlayer. In the Download window for Firefox, I see:
You may see something slightly different depending on what browser you use.
After the download has completely finished the MPlayer Disk Image should open automatically. That is, the following screen should open up:
Now drag and drop the 'Mplayer OSX' icon into the 'Applications' icon, under the PLACES heading.
A progress bar will appear while the application is being copied. After that finishes, move to the Applications folder, like so:
You should be able to find 'MPlayer OSX' now in Applications, like so:
Doubleclick the 'MPlayer OSX' icon to start MPlayer. Since this is the first time it has run, you will see a warning like so:
If you trust the application, you should click Open to start MPlayer. You should then see:
At this stage, MPlayer OSX is successfully installed.
Installing Aspell on Mac OS X
Aspell has no native installer for Mac OS X. The most automated way to install at the moment would be to use Darwin Ports - a low level command line interface to most open source software available for downloading/compiling/installing FOSS for Mac OS X. See this article for help with aspell - http://aspell.darwinports.com/
Configuring Jubler on Mac OS X
Now we need to configure Jubler so it can use MPlayer and Aspell.
Configure Jubler for MPlayer
Now open Jubler - when it starts you will see a 'splash screen' - a picture of a parrot. Eventually the Jubler window will appear. Select Jubler> Preferences:
The Preferences Window then opens:
Click on "Wizard":
Now select "Continue" using the Automatically serarch option rather than the manual option. Jubler will then search your computer for the location of MPlayer.
This wizard should then pick up where your MPlayer file is. If so it will say MPlayer executable has been resolved, as below.
Click Finish, and you should end up back at the Jubler Preferences with the MPlayer path setup properly, as below.
Then Click Accept.
Configuring Jubler for Aspell
Since Mac OS X doesnt have a native installer for aspell, configuring Aspell for Jubler on Mac OS X is unsupported.
Software name : Avidemux Homepage :http://avidemux.sourceforge.net/ Software version used for this installation : 2.4 Preview 2 Operating System use for this installation : Windows 2000 Recommended Hardware : 500MHz
You now need to click on the 'downloads' button on the left and your browser should display something like this:
In this example we will choose the first link under the 'Windows' download section. You will then see a page with a list of files you can download :
Choose the latest version. For me this was the top link. If you click on this you will be directed to a second page with download options :
If you click on either link the installer will start downloading. Download it to your Desktop or somewhere else you will be able to find it. Once the download is complete then you will see the installer file on your desktop, or in the folder you chose to save it to. It should look something like this :
Double click on this icon and the installer window will appear :
For this installation process you will need only to select the default settings. So in the above window just press 'Next >' :
This is the license agreement. Unless you are a bored lawyer press 'I Agree' :
You should just leave the above screen as the default unless you wish to add any more languages. Press 'Next >' :
The above options only dictate if you will have icons placed in the listed places so you can quickly start Avidemux by clicking on them. Leave it as the default unless you have any reason you do not wish to create these 'short cuts'. Press 'Next >' :
This window merely asks you what the name of the folder that appears in the Windows Start menu should be. Its wise to leave this with the default setting. Press 'Next >' and you will be lead to the following window which asks you where on your harddrive all the installation files should be kept :
If you ask me, all these options can just be fast forwarded through. It will be a relief the day when Windows installers have a simple 'Install with all defaults' button as these processes are a little tedious. However the above screen is that last screen so just press‚ 'Install' and the installation progress window will appear showing you that everything is being installed :
When all is done you will see this last window :
If you wish to open Avidemux now then leave the top option checked. The second option will (perhaps a little annoyingly) pop up a browser window infront of Avidemux. Perhaps best to uncheck the last option and press 'Finish' and Avidemux should appear in front of you :
Installing Avidemux on Ubuntu
Software name : Avidemux Homepage :http://avidemux.sourceforge.net/ Software version used for this installation : 2.3 Operating System use for this installation : Ubuntu 7.10 Recommended Hardware : 500MHz CPU
Installing Avidemux on Ubuntu is fairly straight forward. First you need to configure what is known as the Package Manager for Ubuntu. The Package Manager is a program that assists you when you wish to install software.
Synaptic Package Manager
The Synaptic Package Manager (SPM) is used for more than just installing software. It can also upgrade your entire operating system, and manage all software installed on your computer. However most people use SPM for just installing new software. Before you embark on this process, there are a few concepts that you may wish to get familiar with. It's not crucial you understand them thoroughly, so just read the explanations and then let it soak in over time. The ideas behind SPM will become clearer with use.
What is a repository?
SPM can automate the installation of software on your computer because it has a direct connection to one or more online software repositories. These repositories are vast archives of programs that have been pre-configured for installation on your operating system. When your computer is online, SPM can connect to these archives, check what software is available for installation, and present you with a list of installable software. All you have to do is select the software from the list that you want. SPM then downloads the software from the repository and takes care of the installation process.
So SPM is actually a repository manager: it manages which repositories (there are many) you wish to access, and which programs to download and install from those repositories.
SPM allows you to choose which repositories it accesses through its settings. The default repositories used by Ubuntu can be extended through the SPM settings so you can access a wider range of programs. Ubuntu calls each repository by a simple name. They are: Main, Universe, Multiverse, Restricted. By default Ubuntu only uses the Main online repository. If you wish to access you the other repositories, you must do this by changing repository settings of SPM.
What is a package?
When SPM downloads a programs for installation, it is in the form known as a 'package'. This means that it is a compressed archive of the program, pre-configured so that it can install nicely on your computer. If the package has been configured nicely (and the Ubuntu project team spends a lot of time making sure this is the case), then many of the headaches that installing software can bring are taken away — it's the aspirin of software installation. One of the biggest issues with installing software on any form of Linux (Ubuntu is one of many types of Linux), is dependencies. Dependencies are all the other packages required by a particular package. If, for example, I want to install an audio editor, that audio editor software may use some functionality of other programs to do its job.
SPM takes the (often) dark art of dependencies away from you, and manages this itself. So if you wish to install a program and it has dependencies (and the list can be long), you don't have to work this out yourself. SPM knows already what is needed, finds it, and installs it along with the software you have chosen.
So, SPM, as well as managing which repositories you access, is also a package management software. Hence the name: Synaptic Package Manager.
apt
You don't really need to know about 'apt', so if you are on the verge of being confused then don't read this short section. If you are a geek wannabe, then read on.
Ubuntu is a form of Linux that has derived from another form of Linux called Debian. This family of Linux has in common (amongst other things) the package/repository management system. Both Ubuntu and Debian use the apt system for managing packages. APT is an acronym for Advanced Package Tool.
SPM is actually a 'front end' (graphical interface) for controlling 'apt'. So SPM is the nice user interface that you see, but the real work is done by 'apt'. There are other ways of managing 'apt', such as the command line interface known as apt-get. In the world of Linux, there are many varieties of Linux users and they have their own ways of doing things. In general it's safe to say most Debian users use apt-get, and most Ubuntu users are happier using SPM.
Configuring Synaptic Package Manager
To install most software on Ubuntu, you need to change the default repository settings of SPM, because many programs are not contained in the default repository. To do this, you need to open the Synaptic Package Manager, which you can do via the System menu. If you haven't changed the default Desktop of Ubuntu, then the System menu can be accessed at the top left of your screen:
If all is good, you are prompted for a password.
Here you must enter your password (the same one you use to log into the system). If you don't know the password, then you have a problem and it's probably caused by the fact that the computer you are using is not yours. In this case you have to find the computer's owners and ask them for the password (which is usually not polite unless you know them well) or ask them to input the password while you look casually in the other direction.
Assuming the password entered is correct, you now see the SPM open in front of you. It may be that you first see the following 'Quick Introduction' (which appears if you haven't used SPM before).
Just click Close and move on.
Let's look at the Synaptic Package Manager interface.
Let's not worry about the details of the interface for now. All we want to do is change the repository settings. To do this, on the Settings menu, click Repositories.
Now we get to where we can do some business. Make sure that all the options are selected:
Now close that window by clicking the big Close button at the bottom right.
Next, you see a warning telling you the repository has changed:
Click the Close button.
Back in the SPM interface, you need to refresh the repositories as the warning suggests. To do this, click Reload:
You then see a status window saying the repositories are being updated and showing the progress.
Installing Avidemux with Synaptic Package Manager
Now that you have Synaptic configured you can use it to install Avidemux. To do this click on the Search button in the Synaptic Package Manager interface. The search button looks something like this :
when you click on this button you see something like this:
Now type 'avidemux' into the text field at the top:
Now click on the 'Search' button you can see here, and you should see the Package Manager searching for your request. The final result will be that the small search window will close automatically and you will be left with the main Package Manager window displaying something like this:
If you see Avidemux listed with a little star by its name then you are good to go! You can now actually install the software. So, right click on the title of the software and choose 'Mark for Installation' :
This should present you with a little pop-up window :
This lists all the software that must be installed so that avidemux can actually work. Don't be surprised if the list of software during your installation process to be installed looks different to the above list. Now, there is only one real choice here (as 'cancel' will stop the installation process) - click 'Mark'. When you do this the window will disappear and leave you, perhaps a little confusingly, with the main Synaptic Package Manager window again. It would probably be better if the Package Manager gave a little more feedback, but all things in time I guess...
Now you want to click on the 'Apply' button at the top of the window:
When you have clicked on this you be shown a confirmation window:
Just click on 'Apply 'once again and the download process will begin :
Followed by the installation process:
Then finally you will see a screen telling you all is complete :
You can now click on 'Close' and you will be left with a blank Synaptic Package Manager which you can quit :
Starting Avidemux
Now that Avidemux is installed, you can might wish to try starting it. The nice interface designers at Ubuntu place newly installed software automatically in the drop down menus at the top of the desktop for easy access. So we just need to kick on 'Applications' then mouse down to 'Sound & Video' and you will see Avidemux listed :
When you place you mouse over 'Avidemux' in the menu and release the mouse button you will see it open:
Dubbing Audio is the process of replacing parts or the entire existing audio track with new audio. Uses can include adding narration, correcting errors in the original audio as well as placing new lines over the source audio in another language.
 This manual was designed and written by a community of Open Translation innovators using the FLOSSManuals platform to collaboratively author the content. It is the outcome of the first-ever Open Translation Tools Book Sprint, and builds on work done at two Open Translation Tools convergences, a pair of live events designed by Aspiration (www.aspirationtech.org). and realized in collaboration with a wonderful set of partner organizations and the support of generous and forward-looking funders.


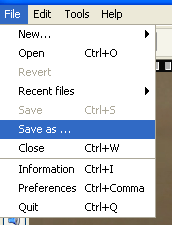


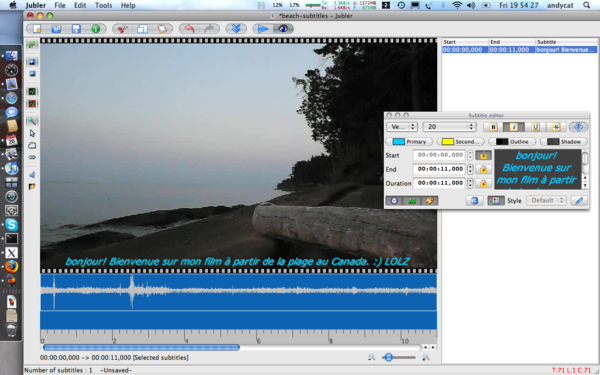
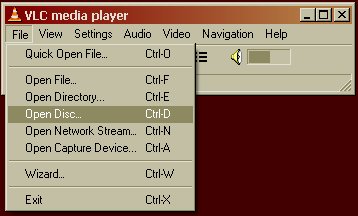
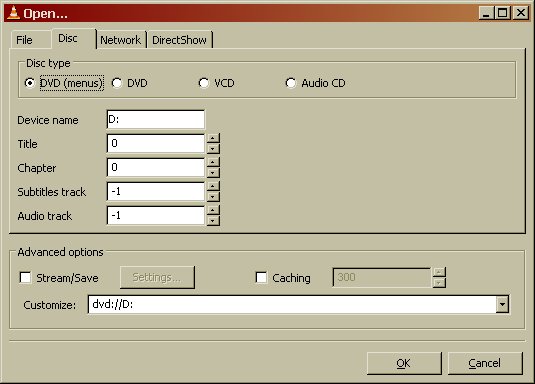

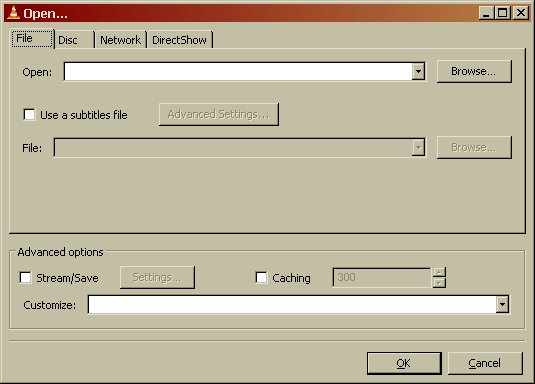


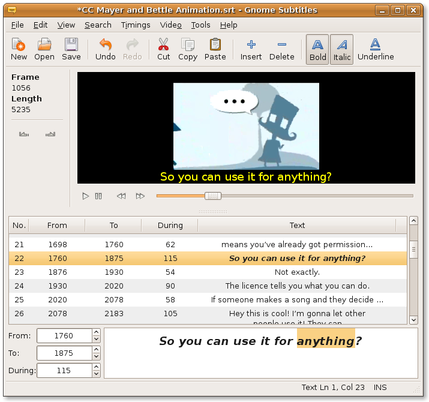
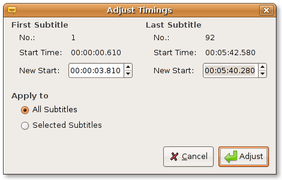
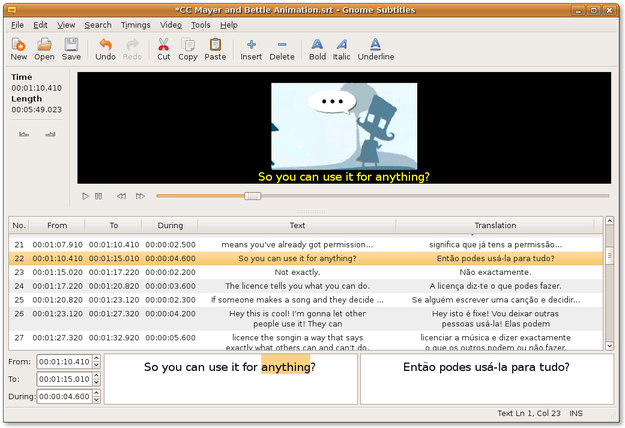

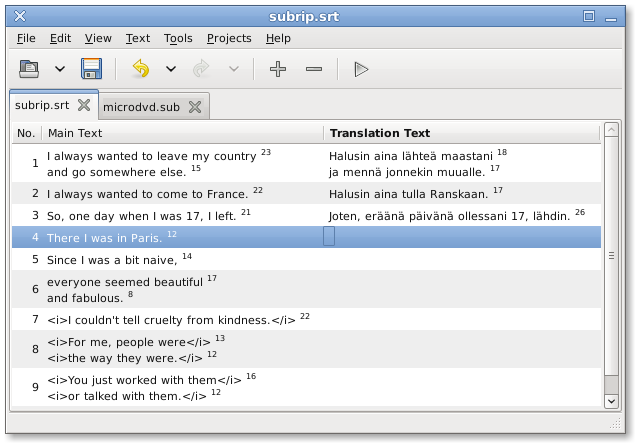
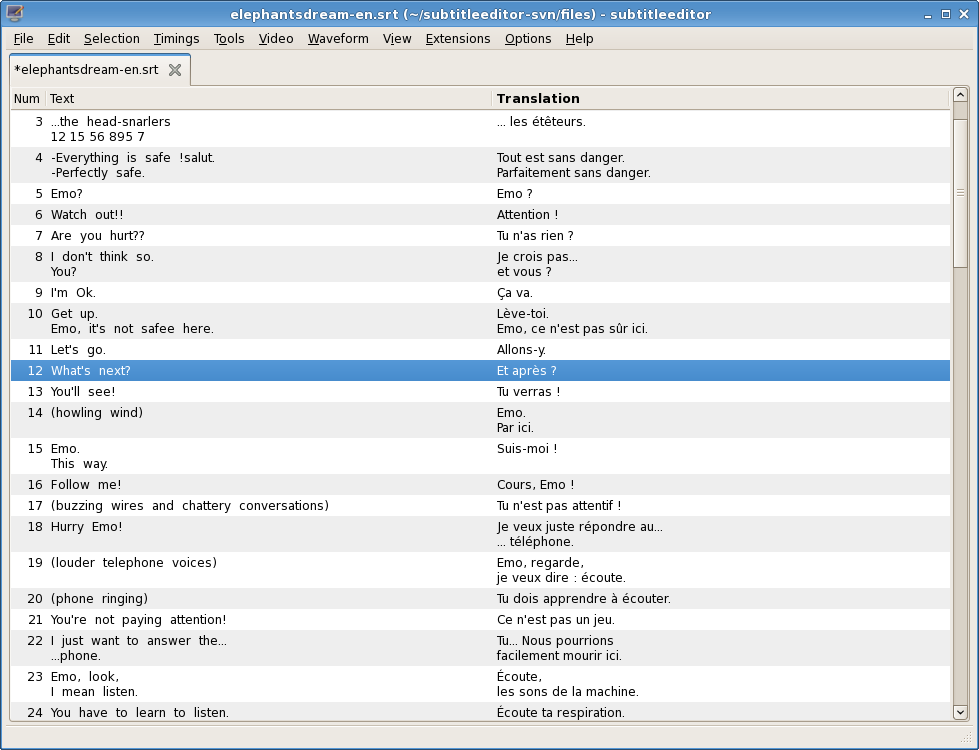
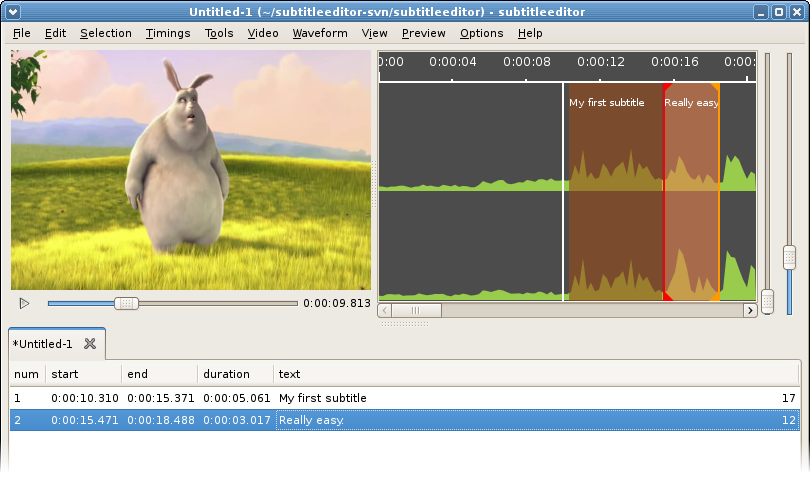 Supported subtitle formats:


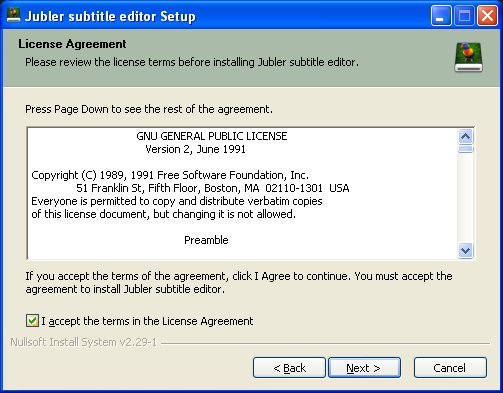
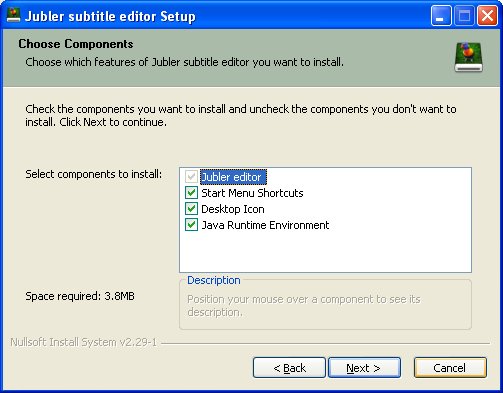


")


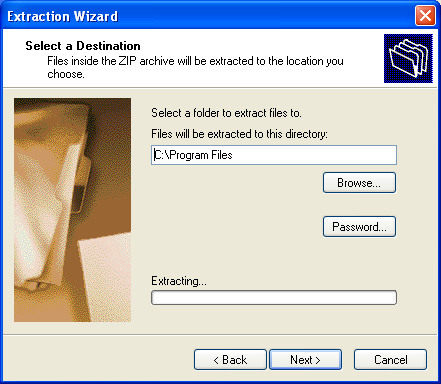


 .
.