


Rendering Quickstart Guide
'Rendering' can be understood as the whole process of calculating how objects in a scene respond to virtual light and presenting the result. This result will be drawn to an area of your computer screen or to a single image file - or both at the same time. Rendered animations are long sequence of these images that are compressed using a particular codec (like Ogg Theora or DivX) and stored in a container file (like AVI or MOV).
Blender provides two different rendering engines to use when making stills or animations: YAFRAY and the standard Blender Internal renderer.
YAFRAY (humbly derived from "Yet Another Free Ray tracer") is much more advanced than the standard Blender renderer as it makes calculations based on the implied casting of virtual light as though they were real 'rays'. This means it can calculate things such as the refraction of light through an object with a glass material, or the glow effect produced when light strikes a surface. The Blender Internal renderer doesn't calculate the bouncing of lights of surfaces. Instead it just calculates shadows as though the rays passed across the scene until they strike a surface at which point they are absorbed. YAFRAY can also exploit multiple-CPU systems, like rendering clusters.
Rendering with YAFRAY is an advanced topic and is best used after acquiring a solid understanding of how materials work. For this reason I won't cover it here.
The Render Panel
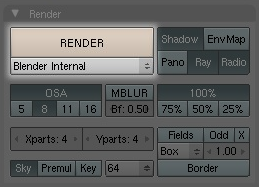
The rendering panel contains most of what we need in order to setup and start our render. Accessing this panel is done by clicking on the icon Scene (F10key) and then the button named Render Buttons.
There are 6 Tabs but we only need to deal with two of these to get results fast: Render and Format.
Under the button labelled Render in the Render tab is a drop down menu with the option to change the backend renderer that Blender will use, to Blender Internal or YAFRAY. The below image shows it set to Blender Internal.
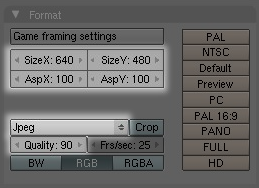
Changing the render format
Just as the name suggests, the Format tab is where we change the dimensions and type of image to be rendered. There are a wide variety of image formats to choose from with Jpeg as the default.
Placing a camera
You can only render with a camera in your scene as the rendered image is drawn from the camera view, not the viewport.
SPACEBAR->Add-Camera will add a camera to your scene. It will always be added with the viewplane of the camera being parallel to the viewport itself. This can be quite handy. You can position a camera in a viewport that has a view angle you like and move it from there accordingly until you get the right position. NumPad-0 will take you to the view of the camera in any viewport.
Working with lights.
Like materials, lights are intrinsic to the rendering process. A scene can be dense with elements but if it doesn't have a light, or surfaces that emit light, a black image will be all that's rendered.
So far we've only worked with the default Lamp object, which really doesn't offer us much control over the casting of light in our scene.
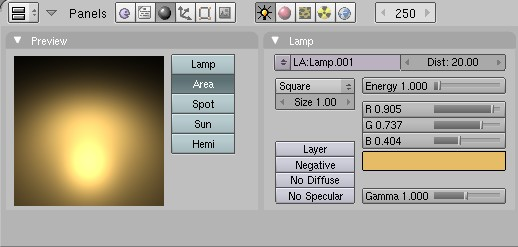
The Lamp Buttons panel provides you with a variety of options for manipulating the distribution, colour and type of light in your scene. To access this panel select your light and click on the Shading buttons icon (F10key) and then select the Lamp button, which has a lightbulb as an icon:
At any given point you can change a light type from one to another by clicking on the appropriate button. Here's an example of an Area Light with a modified colour. Note that the slider named Energy determines the strength (brightness) of this light.
Just as in the corporeal world, combinations of lights with different colours can work very well to produce interesting shadows and create more visible dimensional detail on a surface.
Rendering and saving the image to disk
Once your scene is setup, you've chosen the dimensions and format of the image and you have a camera in your scene, save your work. Then press the Render button or F12key to start a render process. A small window will pop-up and you'll see the render take place, piece by piece.
When it has finished you can save out this image to disk by going to the main Blender menu and File->Save Image (F3-key). This will pull up a file browser enabling you to save the image somewhere on your local hardisk.
The Blender Internal Renderer
First let's load and prepare a scene for some rendering.
Renderers in Blender pay special attention to materials; despite the fact that we can see the UV texture on our chair the renderer won't consider it when it makes its calculations. Our example (I'm using a chair) would just be rendered gray as though in the Shaded viewport drawing mode..
Note: the Blender Game Engine doesn't need materials on objects to render them in real time.
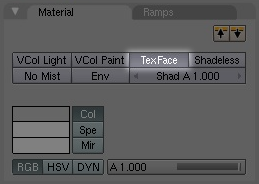
Perhaps a little confusingly, materials are found in the Shading (F5key) panel.Click on the Shading button and then on the Materials button.
![]()
To apply a material select your object (the chair) in Object Mode and click on the button Add New in the Links and Pipeline tab. The panel will change to include several tabs each with many options. This is the interface for manipulating materials and assigning them to objects.
The only setting we need to concern ourselves with here, in order to render a textured form, is the Tex Face button in the Material tab. When we select this option we're telling Blender to make sure it takes UV assigned textures into account when it's rendering.
The materials panel is very powerful: we could create a much more complex material here for rendering. For instance we could make the surface reflective, make it translucent or even appear 'bumpy' using other surface effects. We'll cover this later in another section.
Now that we have a very simple material we can move on to setting up our render camera.
In a Perspective View (F5-key toggles this) try to get a view angle you like and when ready add a camera with SPACEBAR->Add->Camera. Now click on the menu of that viewport and View->Align view->Align Active Camera to View. This will take the current camera and snap it to the implied position and orientation of that viewport.
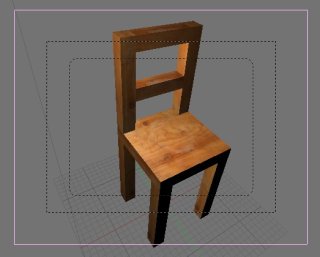
Right now we're looking through the view of that camera. The pink square around my chair is the camera object itself, which seen from another view looks like a pyramidal form. The outer-most black dotted lines show us the limits of the rendering area itself: anything outside these dotted lines won't be rendered. So we need to make sure our chair is right inside this area before we render.
The technique for doing this usually involves using the other views (Top and Side are good) to move the camera around until what you see in the Perspective view looks about right.
Here's what I have after a bit of playing around:


This certainly isn't all that exciting. It's just a raw render of the chair against a default background. No shadows are cast because there's nothing to cast those shadows on.
Let's make this better.
Make a cube around your chair about the size of a room and in UV Face Select mode, in the Texture Face tab, make the faces of this room two-sided and enable them for light and also shadow. If you can't remember how to do this, see the section Texturing. Make sure that the floor of this room is right under the feet of your chair.
Now let's play around with the lighting a little. The default Blender lamp doesn't provide us with any way of directing the light: the rays themselves cannot be oriented. Light in the real world however never operates like this, let alone indoors from artificial lights. Blender provides several different types of lights that give us more to play with in this regard.
Select your lamp and the Shading buttons (F10-key) and then click on the small icon that represents a light. Change that light to the type Spot and the light will suddenly change into a cone form. This represents the projection of the light in the scene. By rotating the Spot, repositioning it, changing the energy (strength of the light) and colour of the light you can get some good results easily. Here's my scene before rendering, with two spots - one of which has much less energy than the other and is coloured yellow.

Rendering this scene produced the following image:
