Audio Set Up
There are many options for working with audio in Jubler. Before we look at audio you need to have prepared a video and loaded a preview video file (the video you wish to prepare subtitles for) :

Viewing Audio Wave Form
It can be very useful to view the audio track when creating subtitles. A audio track is represented by lines that look like a 'wave'. This wave is a graphic illustration of the shape of the actual sound wave. If you can see when a sound waves starts it can help to time the subtitles more accurately and add extra comments for noises the occur in the background.
By default the audio track is displayed. However it maybe that your window is not wide enough to see it. If this is the case you will see something to the right of the video image preview similar to this :

In the above example there is a small area for displaying the audio track but it is too small to be useful. To extend it click on the right edge of Jubler and drag to the right. This will extend the window and give the audio track more display space.

It is also possible to see the audio displayed below the video which might be better if your screen isn't wide enough. To do this press the 'orientation' button :

Pressing this button will change the position of the audio. I prefer the audio below the video so use the orientation button to place the audio in this position :

Scrolling
If you grab the blue section and drag it then Jubler will display a video still corresponding to the video at that point on the timeline. The video still will only display once you have dragged the video and released the mouse button.
It is also possible to magnify the timeline with the slider :

This is useful if you want to focus on a small section of audio or wish to see the entire audio timeline displayed at once.
Maximising Audio Display
If you wish to maximise the audio waveform displayed vertically then you need to press the maximise button :

When you have the audio maximised this button will change its appearance from having blue lines to red lines at the top and bottom. Now your audio display will scale the wave form to the maximum space vertically. This is a selection of my audio before maximising :

and after :

Changing the Active (blue) Area
There are different tools for changing the active area of the audio preview.
The default one is a wand with a star. This automatically decides if you want to adjust the edge of the blue active area to change the length of the selected area, or slide the whole area unchanged in length to earlier or later in the clip. Use this one. If you want to change the length of the highlighted clip go the edge and the cursor should change to a double ended arrow. Hold down the mouse and slide it to change the length.

And if you want to move the whole area forward or backwards without changing the length move your cursor over the highlighted area and it will turn into a hand. Hold down the mouse and move it left or right it to change the position of the active area.

Automatic Translation Of Subtitles
Jubler integrates with Google Translation for doing machine translations.
Navigate to the Tools menu, and click 'Translate'
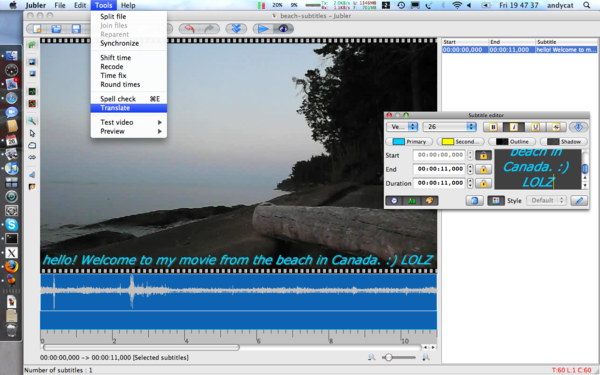
The next screen you will see is the dialog box to select which caption to translate, and from what source language to what target language.

Here I will leave it at the default, 'By user selection', as my only caption is selected. Also, I make sure its English to French translation. Click 'OK', and if you are conneted to the internet, your translation should appear automatically. The French translation of my caption above is shown below.

Installing Jubler on Windows
Software name : Jubler
Homepage : http://jubler.org/
Software version used for this installation : 3.9
Operating System use for this installation : Microsoft Windows (XP)
Recommended Hardware : 200 Mhz processor (CPU) minimum
Note : Jubler can be tricky to install. If at any point you get stuck installing Jubler then one tip is to try the freeware Subtitle Workshop instead as it is easier to install but not as feature rich. Jubler requires MPlayer and Aspell to play video files and spell check subtitles. Before proceeding with this installation first install these two applications. If you need some help we have provided information on how to install MPlayer and Aspell (in the sections after installing Jubler - you can follow the process exactly as see below, installing first Jubler and then MPlayer an then Aspell.
Downloading
Go to the Jubler download page http://jubler.org/download/index.html

Click on "Visit this page on SourceForge" and you will see something like this:

Click on "Download Jubler-3.9.0.exe" (the green button) and Jubler should start downloading to your hard drive. I am using Firefox (a type of browser) to download Jubler so I first see this window:

I press 'Save File' and then when the download is completed I see this:

If you are using another browser like Internet Explorer or Opera then the above two steps would be slightly different.
Now you must know where the file has downloaded to. I always save my files to the Desktop so when I look there I see the installer file I just downloaded:

Double click on the icon to start the install process. The first screen you should see is this :

Click "Next >" and you see the following :
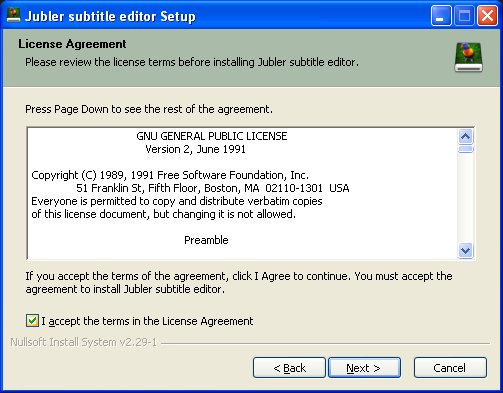
Put a tick in the "I accept the terms of the Licence Agreement" box and click "Next >":
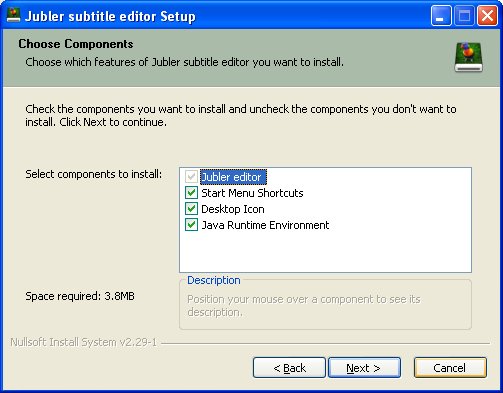
Leave the above set with the defaults and click "Next >":

Click "Install" and the installer will start doing its magic. If you do not have Java Runtime Environment (also just called 'Java') installed then the installer will download and install it for you (if Java is already installed then you will not see the following installation screens for Java). In this case you will see something like this:

When Java is downloaded you need to accept the license agreement from the pop-up window that appears:

Just press "Accept >" and you will see the progress bar displayed for the installation process of Java:

Click "Finish" and then the last screen should appear:

Click "Finish" and then start the programme from the Start Menu or from the icon on the Desktop.
Installing MPlayer on Windows
Software name : MPlayer
Homepage : http://www.mplayerhq.hu
Software version used for this installation : 1.0rc2
Operating System use for this installation : Microsoft Windows (XP)
Recommended Hardware : 200 Mhz processor (CPU) minimum
First go to http://www.mplayerhq.hu/design7/dload.html

We want to select a version from the "HTTP" column. The choices in the columns reflect ways of downloading the files - it is not necessary to understand the difference between HTTP (Hyper Text Transfer Protocol) and FTP (File Transfer Protocol) and BT (Bittorrent) - just choose the 'HTTP' column.
Choose the second download line which reads "Mplayer1.0rc.2 Windows" (the name may alter slightly as a new version may be available by the time you read this). Regardless of the version you choose, don't choose the "GUI" version (line 3). I clicked on the 'UK' link - this is not a choice of language it is a choice of download locations (ie. which country you download the file from - choose the one closest to you).
I am using the Firefox browser and so I see this :
")
You may see something slightly different depending on what browser you use.
Save the file, it will most likely download to your Desktop (but not necessarily, depending on how you have configured your browser). This file will end in '.zip' and is known as a ZIP file. The icon may be a folder icon with a 'chain' around it like this:

ZIP files are compressed collections of files and you must first 'decompress' or 'unzip' the file. Windows XP and Vista have built-in helper applications for this. You need to Unzip the file to a location in your "Program File" directory (technically, it doesn't matter where you install the files, but it is good practiceto put them all software in the 'Program Files' directory). Do this by right-clicking on the file and choosing "Extract All"

This will display the first screen of the 'unzip' process :

Now press "Next >" and you will see the following :
You must choose "Browse" and then a 'file browser' window opens :
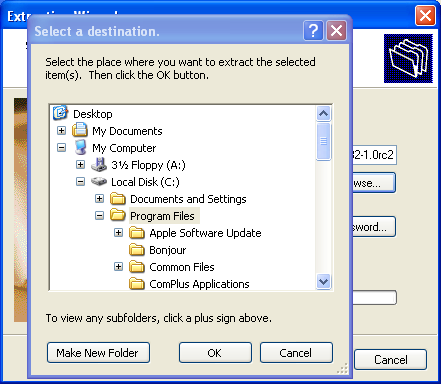
Highlight the 'Program Files' folder similar to how I have done it in the example above. Then press 'OK'. You will see the following :
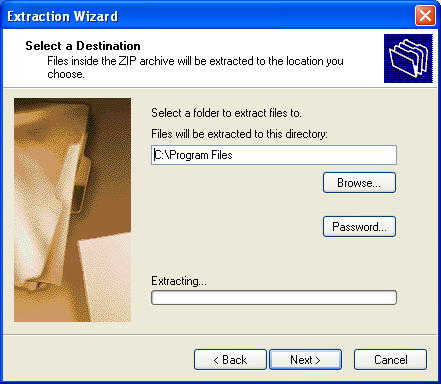
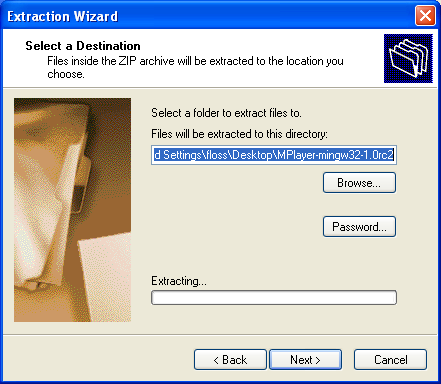
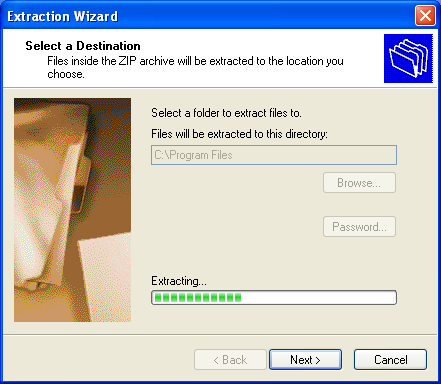
Click "Next >" and the Unzip process will actually start (!) :
When the process is complete you will see this final screen :
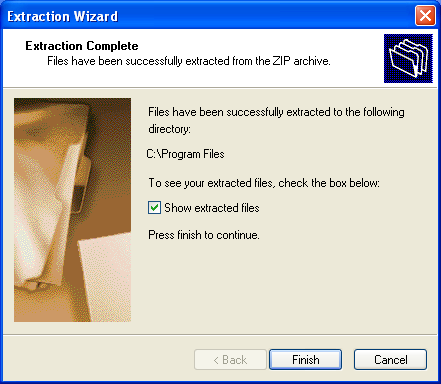
Now click "Finish".
Installing Aspell on Windows
Now to install aspell...first download the Aspell windows installer by visiting the following page http://aspell.net/win32/
Click on Full Installer link:

Depending on your browser you will see something similar to this:

Save it to your hard drive. Double click on the exe file:

This will start the installation of Aspell

Click Next for this window and for the following screens :Welcome, Licence, Install Location. Then Click "Install" when presented with the Ready to Install screen (see below):
 .
.
The installation process will start. You should see this screen when it is completed:

And then click "Next >" and the final screen appears:

Finally, click "Finish".
Configuring Jubler on Windows
Now we need to configure Jubler so it can use MPlayer and Aspell.
Configure Jubler for MPlayer
Now open Jubler (when Jubler starts you will see a 'splash screen' - a picture of a parrot. Click on this and it will disappear and the Jubler window will appear). Select File > Preferences:

The Preferences Window then opens:

Click on the Player Tab at the top.
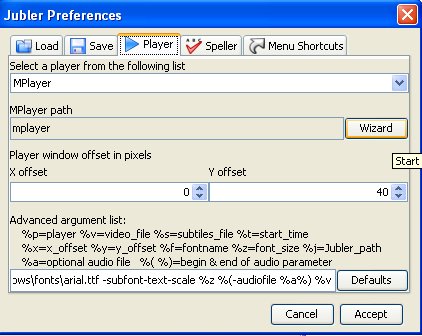
Click on "Wizard":
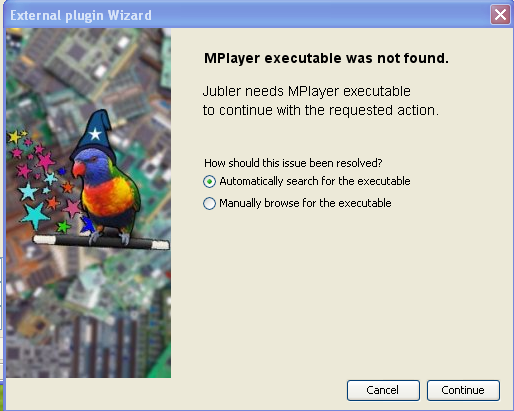
Now select "Automatically search for the exexutable" rather than the manual option, and press Continue. Jubler will then search your computer for the location of MPlayer.
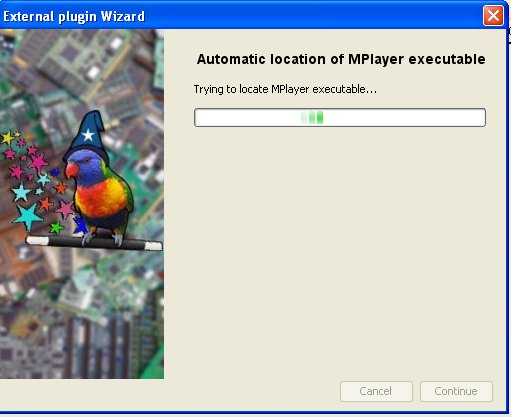
This wizard should then pick up where your MPlayer file is. If so it will say MPlayer executable has been found.

If so Click Finish.
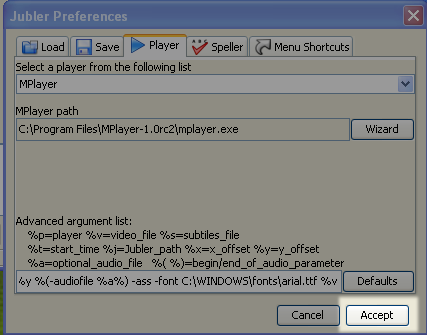
Then Click Accept.
Configuring Jubler for Aspell
Now open Jubler and once again Select File > Preferences.
You will see the Preferences Window:
Click on the "Speller" tab :

Click on "Wizard" and you will see the following :
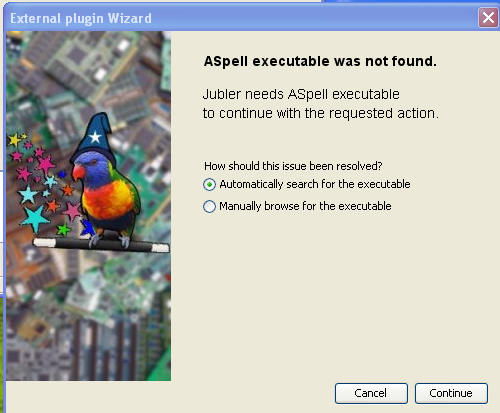
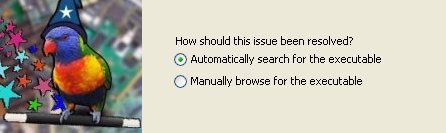
Select "Automatically search for the executable"
Click on "Continue" and Jubler will start searching for Aspell and Juber should come back with a message that the executable has been found.
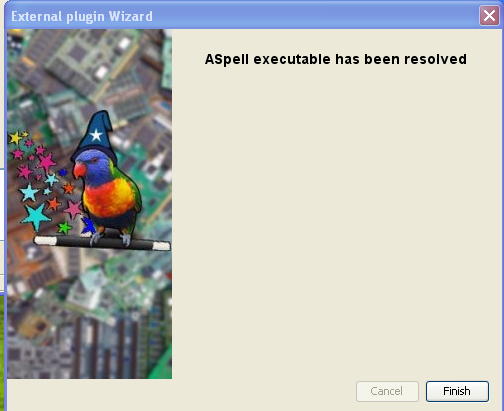
If so Click "Finish".
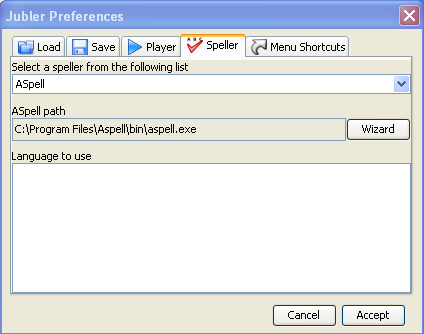
Then Click "Accept".
Installing Jubler on Mac OS X
Software name : Jubler
Homepage : http://jubler.org/
Software version used for this installation : 4.1.1
Operating System use for this installation : Mac OS X 10.5.7
Recommended Hardware : 200 Mhz processor (CPU) minimum
Note : Jubler can be tricky to install. If at any point you get stuck installing Jubler then one tip is to try the freeware Subtitle Workshop instead as it is easier to install but not as feature rich. Jubler requires MPlayer and Aspell to play video files and spell check subtitles. Before proceeding with this installation first install these two applications. If you need some help we have provided information on how to install MPlayer and Aspell (in the sections after installing Jubler - you can follow the process exactly as see below, installing first Jubler and then MPlayer an then Aspell.
Downloading
Go to the Jubler download page http://jubler.org/download/index.html
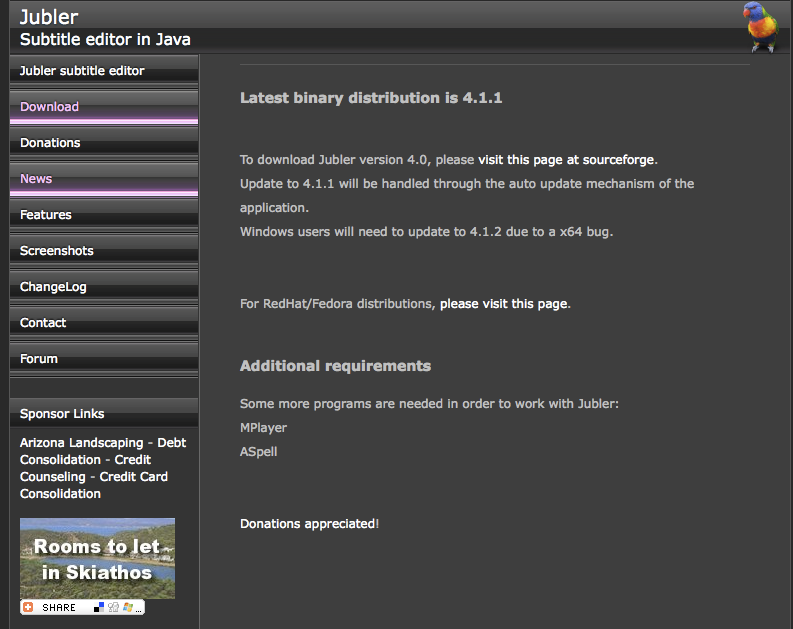
Click on "Visit this page on SourceForge" and you will see something like this:
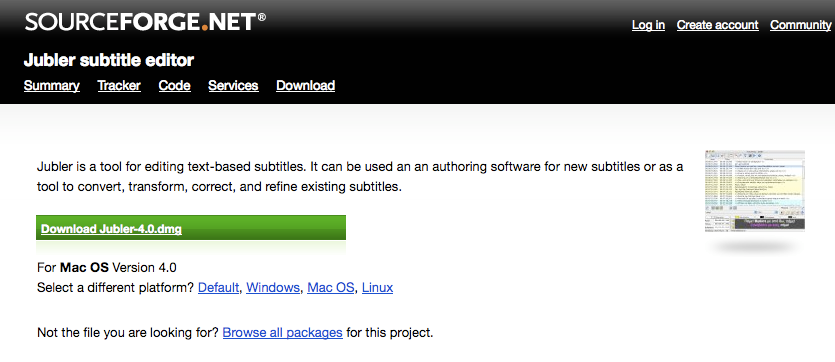
Click on "Download Jubler-4.0.dmg" (the green button) and Jubler should start downloading to your hard drive. I am using Firefox (a type of browser) to download Jubler so I first see this window:
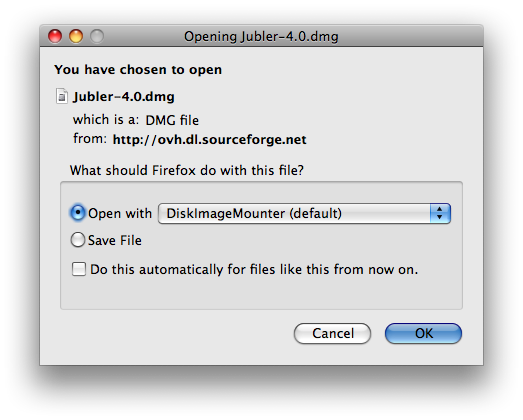
I press 'OK' and then when the download is completed I see this:
If you are using another browser like Internet Explorer or Opera then the above two steps would be slightly different.
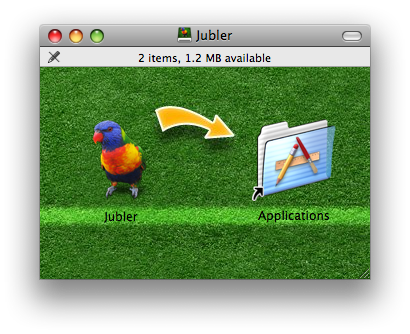
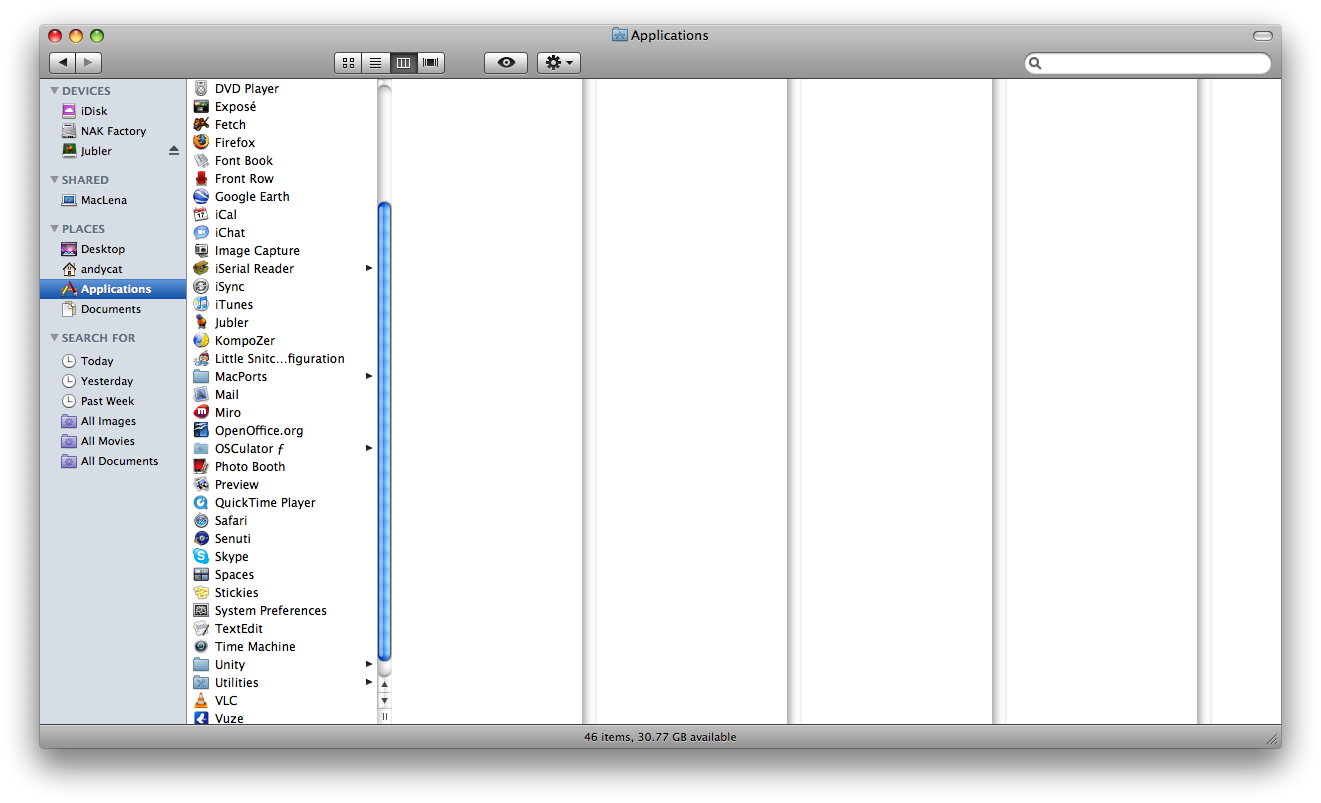
Now you must drag the Jubler icon into the Applications folder. Thats it!
Now double click on the Applications folder to find where the Jubler application is installed, so we can start it up for the first time.
The first screen you should see is this :
Double click the Jubler icon and you see the following :
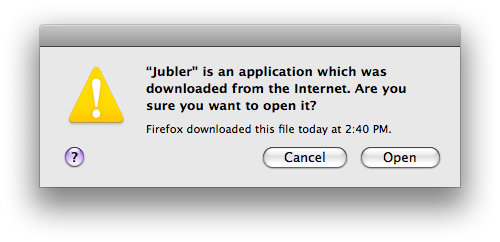
Click Open to accept this warning about downloading apps from the Internet, and you should see Jubler loading:
After starting Jubler, it checks for new versions for installing. If a new version is found, you may see this screen:

You can skip versions, by reminded later, or install it now. If you click 'Install Update', you should see a download progress bar as the new version is downloaded, and if you are connected online properly, eventually you will see:

Click 'Restart Application', and Jubler will close, then reopen. I have noticed some versions dont restart properly. If Jubler doesnt start , go to the Finder -> Applications -> Jubler , and double click to start Jubler again.
You can also use Apple+SPACEBAR to open Spotlight. Start typing 'Jubler', and then select 'Jubler - Applications'.
Installing MPlayer OSX
Software name : MPlayer OSX
Homepage : http://www.mplayerhq.hu
Software version used for this installation : 1.0 rc2 [ MPlayer-dev-SVN-090416-01.dmg ]
Operating System use for this installation : Mac OS X 10.5.7
Recommended Hardware : 200 Mhz processor (CPU) minimum
NOTE:: As of June 2009, the default MPlayer OSX doesnt work with Jubler - see this forum post - http://jubler.org/smf/index.php?topic=126.0 If MPlayer OSX doesnt work for you, you can use unofficial dmg packages downloaded from http://www.haque.net/software/mplayer/mplayerosx/builds/
Also, even with this latest version of Mplayer OSX, you may not see the Video Preview and Audio Waveform Preview - see this forum post - http://jubler.org/smf/index.php?topic=126.0 After you have successfully installed Jubler, you will need to go to the Applications folder, CTRL+click on the Jubler icon and select 'Get Info'. Inside this screen, select the 'Open in 32 Bit Mode' checkbox.
Basically, You need to install the previous rc version of MPlayer. it can be downloaded from http://www.mplayerhq.hu/MPlayer/releases/ The name that you are looking for is MPlayerOSX_1.0rc1.dmg
First go to http://www.mplayerhq.hu/design7/dload.html


We want to select a version from the "HTTP" column. The choices in the columns reflect ways of downloading the files - it is not necessary to understand the difference between HTTP (Hyper Text Transfer Protocol) and FTP (File Transfer Protocol) and BT (Bittorrent) - just choose the 'HTTP' column.
Choose the second from the bottom, download line which reads "Mplayer1.0rc.2 outdated" (the name may alter slightly as a new version may be available by the time you read this). The link for me was http://www.mplayerhq.hu/MPlayer/releases/MPlayerOSX_1.0rc2.dmg
I am using the Firefox browser and so I see this :

Click 'OK' to start downloading MPlayer. In the Download window for Firefox, I see:

You may see something slightly different depending on what browser you use.
After the download has completely finished the MPlayer Disk Image should open automatically. That is, the following screen should open up:

Now drag and drop the 'Mplayer OSX' icon into the 'Applications' icon, under the PLACES heading.
A progress bar will appear while the application is being copied. After that finishes, move to the Applications folder, like so:

You should be able to find 'MPlayer OSX' now in Applications, like so:

Doubleclick the 'MPlayer OSX' icon to start MPlayer. Since this is the first time it has run, you will see a warning like so:

If you trust the application, you should click Open to start MPlayer. You should then see:

At this stage, MPlayer OSX is successfully installed.
Installing Aspell on Mac OS X
Aspell has no native installer for Mac OS X. The most automated way to install at the moment would be to use Darwin Ports - a low level command line interface to most open source software available for downloading/compiling/installing FOSS for Mac OS X. See this article for help with aspell - http://aspell.darwinports.com/
Configuring Jubler on Mac OS X
Now we need to configure Jubler so it can use MPlayer and Aspell.
Configure Jubler for MPlayer
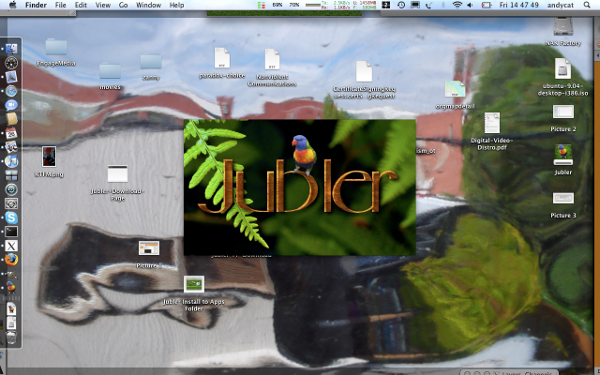
Now open Jubler - when it starts you will see a 'splash screen' - a picture of a parrot. Eventually the Jubler window will appear. Select Jubler > Preferences:

The Preferences Window then opens:

Click on "Wizard":

Now select "Continue" using the Automatically serarch option rather than the manual option. Jubler will then search your computer for the location of MPlayer.
This wizard should then pick up where your MPlayer file is. If so it will say MPlayer executable has been resolved, as below.

Click Finish, and you should end up back at the Jubler Preferences with the MPlayer path setup properly, as below.

Then Click Accept.
Configuring Jubler for Aspell
Since Mac OS X doesnt have a native installer for aspell, configuring Aspell for Jubler on Mac OS X is unsupported.
Preparing Jubler to Subtitle
Lets prepare Jubler for subtitling a video. I will imagine you have a video file ready you wish to subtitle.
Create a New Project
First we create a new subtitle file. Its a pretty simple and quick process. Jubler will be open on your computer :

First select File from the manu bar and then slide down to New... and the left to File (alternatively you could just press CTRL and N on your keyboard at the same time) :

When you do this you will notice the interface change :

So Jubler is in a 'ready' state for creating new subtitles.
Load a Video
Next you need to choose the video file that the subtitles are for. To choose this video file select Tools > Preview (or press F7) :

You will see a window pop up like this :

Press the 'browse' button next to the 'Use the following video file' and you will be presented with a 'File Browser' with which you can browse your computer looking for the video file you wish to subtitle.

When you have located that file click "Open" :
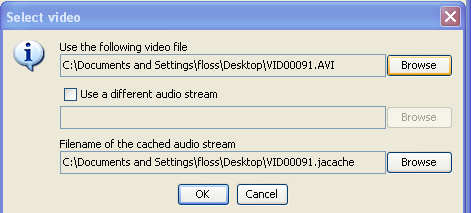
You are now returned to the "Select video" window you were at earlier. Now...there are some other options displayed but we will not worry about these. You would only check the "Use a different audio stream" if there was another audio file other than the one in the selected video that you wished to subtitle. You might wish to use this option if you had been editing audio to fit with the video but had not yet combined the two (audio and video). If this was the case you would check the box and press the second "Browse" button to select the new audio file.
The last box is just the location of a temporary file that Jubler will create for its own purpose while you create the subtitle. In the above example the location is on the Desktop of my computer. This is not a very good place for the file but we will leave it there for this example.
Now press "OK" and Jubler should load the video :
When you load a video you will see a preview image. Note: when Jubler plays the video file it opens in a separate window and does not play 'within' Jubler. This is because Jubler asks MPlayer to play the video.
Setting Basic Preferences
Before we start creating the subtitles we have to set some basic preferences. Open the preferences again by selecting File > Preferences

You should see this :

Under the Load Tab (the Tab that is opened by default). Normally the first encoding should be UTF-8. If you know the frame rate of the video set it in the drop down box otherwise leave it set with the default.
Next choose the Save Tab :

Make sure to select Format as "SubRip *.srt" and Encoding should be "UTF-8"
Click "Accept" and that's it for preparing Jubler for creating subtitles.
Audio Set Up
There are many options for working with audio in Jubler. Before we look at audio you need to have prepared a video and loaded a preview video file (the video you wish to prepare subtitles for) :
Viewing Audio Wave Form
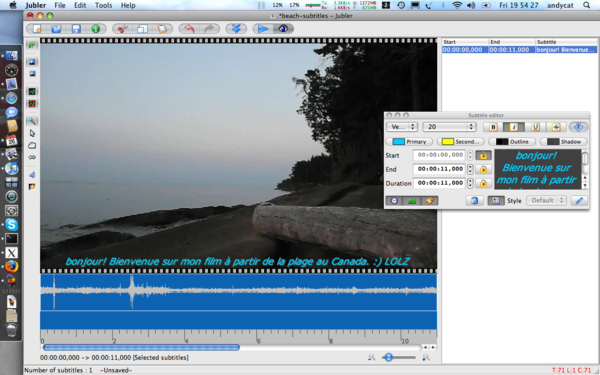
It can be very useful to view the audio track when creating subtitles. A audio track is represented by lines that look like a 'wave'. This wave is a graphic illustration of the shape of the actual sound wave. If you can see when a sound waves starts it can help to time the subtitles more accurately and add extra comments for noises the occur in the background.
By default the audio track is displayed. However it maybe that your window is not wide enough to see it. If this is the case you will see something to the right of the video image preview similar to this :
In the above example there is a small area for displaying the audio track but it is too small to be useful. To extend it click on the right edge of Jubler and drag to the right. This will extend the window and give the audio track more display space.
It is also possible to see the audio displayed below the video which might be better if your screen isn't wide enough. To do this press the 'orientation' button :
Pressing this button will change the position of the audio. I prefer the audio below the video so use the orientation button to place the audio in this position :
Scrolling
If you grab the blue section and drag it then Jubler will display a video still corresponding to the video at that point on the timeline. The video still will only display once you have dragged the video and released the mouse button.
It is also possible to magnify the timeline with the slider :
This is useful if you want to focus on a small section of audio or wish to see the entire audio timeline displayed at once.
Maximising Audio Display
If you wish to maximise the audio waveform displayed vertically then you need to press the maximise button :
When you have the audio maximised this button will change its appearance from having blue lines to red lines at the top and bottom. Now your audio display will scale the wave form to the maximum space vertically. This is a selection of my audio before maximising :
and after :
Changing the Active (blue) Area
There are different tools for changing the active area of the audio preview.
The default one is a wand with a star. This automatically decides if you want to adjust the edge of the blue active area to change the length of the selected area, or slide the whole area unchanged in length to earlier or later in the clip. Use this one. If you want to change the length of the highlighted clip go the edge and the cursor should change to a double ended arrow. Hold down the mouse and slide it to change the length.
And if you want to move the whole area forward or backwards without changing the length move your cursor over the highlighted area and it will turn into a hand. Hold down the mouse and move it left or right it to change the position of the active area.
Creating Subtitles
With Jubler opens on your computer and a video preview loaded, you must first select the time and duration of your first subtitle.
The start time and duration is visually represented by the blue highlighted area in the audio display timeline. So, I will select the audio area I wish to create a subtitle for by moving the blue area and stretching/shrinking it to fit :

You should also note that the exact start time and end time of the selected area is displayed numerically :

The three columns of number represent Start Time, End Time, and Duration. The format is hours:minutes:seconds,1000ths of a second
In the above example we see the duration is 1.185 seconds, probably too short to be read on the screen so I will drag the blue area to make the subtitle display longer. In this situation it is ok to do this as there is no other audio after the current selected area. So I make the blue area about 3 seconds.

You can now type the subtitle in the dark grey box at the bottom of the main window.

You will also see the text appear overlayed on the video still :

The above example is a very short subtitle. In most cases the text will be much longer and you may find that you have too many words to fit in the lines. 35-40 characters is about right per line. If you have more than 35-40 words you may need to split the subtitles up and juggle the timing.
Setting Font Size
If your text is too long you could make the font size smaller. To do this click on the Green button with "Aa" on it (at the bottom of the Jubler window) :

This will display some font options for the subtitle you are working on (the current selected start and end time). These options appear below the video still preview window.

You can now set a new font size. 18 and Arial is what I generally use as this is very readable but it is hard to recommend a setting as it is always dependant on the width of your video.
Adding more Subtitles
When you are happy with the first subtitle and wish to enter the next one select Edit > Insert > After or hit Control and Enter at the same time on the keyboard :

Several things happen when you do this:
- the area you entered your subtitle is shown in green on the timeline
- the bottom (grey) text area becomes blank ready for you to enter your next line
- Jubler searches for the next probable place you may wish to insert a subtitle

Saving and Exporting Subtitles
Saving Subtitles
It's a good idea to save the project and keep saving regularly so you don't lose your work.
When you are ready to save your file select File > Save As
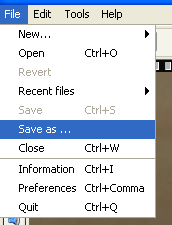
Browse for a folder to save the subtitle file, give it a name and click "Save".
Exporting Subtitles
The files that Jubler saves are the same files you can use to "burn in" the subtitles, or distribute separately with your video for other people to use with their video player software. The file format Jubler uses, by default, is Advanced Sub Station Alpha (.ass) format.
FILE FORMATS
A subtitle file format specifies the format of a file (text or image) containing the subtitle and timing information. Some text-based formats also allow for specifying styling information, such as colours or location of the subtitle.
Some subtitle file formats are:
- Micro DVD (.sub) - a text-based format, with video frame timing, and no text styling
- Sub Rip (.srt) - a text-based format, with video duration timing, and no text styling
- VOB Sub (.sub, .idx) - an image-based format, generally used in DVDs
- Sub Station Alpha / Advanced Sub Station (.ssa, .ass) - a text-based format, with video duration timing, and text styling and metadata information attributes.
- Sub Viewer (.sub) - a text-based format, with video duration timing, text styling and metadata information attributes.
Examples
Lets look at the actual content of some subtitle files. They will all be simply showing "This is my first subtitle!" in the first 10 seconds of video playback. These were all produced by the FOSS subtitling software Jubler.
The first thing to note is that each file is simply a text file, and is editable by any text editor, such as vi on GNU/Linux, or Text Edit on Mac, or Notepad on Windows.
The following is how our example is realised in a Micro DVD subtitle file (presuming 25 frames per second):
{0}{250}This is my first subtitle!
As a Sub Rip subtitle file:
 1
00:00:00,000 --> 00:00:10,000
This is my first subtitle!
As a Sub Station Alpha (.ssa) file:
[Script Info]
; Edited with Jubler subtitle editor
Title:
Original Script: andycat
Update Details:
ScriptType: v4.00
Collisions: Normal
PlayResX: 320
PlayResY: 288
PlayDepth: 0
Timer: 100,0000

[V4 Styles]
Format: Name, Fontname, Fontsize, PrimaryColour, SecondaryColour, TertiaryColour, BackColour, Bold, Italic, BorderStyle, Outline, Shadow, Alignment, MarginL, MarginR, MarginV, AlphaLevel, Encoding
Style: Default,Arial Unicode MS,31,&HFFFFFF,&H00FFFF,&H000000,&H404040,0,0,1,0,2,2,20,20,20,255,0

[Events]
Format: Marked, Start, End, Style, Name, MarginL, MarginR, MarginV, Effect, Text
Dialogue: 0,0:00:00.00,0:00:10.00,*Default,,0000,0000,0000,,This is my first subtitle!
As an Advanced Sub Station (.ass):
[Script Info]
; Edited with Jubler subtitle editor
Title:
Original Script: andycat
Update Details:
ScriptType: v4.00+
Collisions: Normal
PlayResX: 320
PlayResY: 288
PlayDepth: 0
Timer: 100,0000

[V4+ Styles]
Format: Name, Fontname, Fontsize, PrimaryColour, SecondaryColour, OutlineColour, BackColour, Bold, Italic, Underline, StrikeOut, ScaleX, ScaleY, Spacing, Angle, BorderStyle, Outline, Shadow, Alignment, MarginL, MarginR, MarginV, Encoding
Style: Default,Arial Unicode MS,31,&H00FFFFFF,&H0000FFFF,&H4B000000,&H4B404040,0,0,0,0,100,100,0,0,1,0,2,2,20,20,
20,0

[Events]
Format: Layer, Start, End, Style, Name, MarginL, MarginR, MarginV, Effect, Text
Dialogue: 0,0:00:00.00,0:00:10.00,*Default,,0000,0000,0000,,This is my first subtitle!
As a Sub Viewer (.sub) file:
[INFORMATION]
[TITLE]
[AUTHOR]andycat
[SOURCE]
[FILEPATH]
[DELAY]0
[COMMENT]Edited with Jubler subtitle editor
[END INFORMATION]
[SUBTITLE]
[COLF]&HFFFFFF,[STYLE]bd,[SIZE]18,[FONT]Arial
00:00:00.00,00:00:10.00
This is my first subtitle!
There are large numbers of file formats around (see http://diveintomark.org/archives/2009/01/07/give-part-4-captioning - the main ones mentioned by this article not covered here are MPEG4 Timed Text, SMIL and SAMI).
Comparisons of Formats
Tables of comparisons of subtitles file formats are found at the following:
http://www.annodex.net/node/8
http://en.wikipedia.org/wiki/Subtitles
Supported File Formats in FLOSS video players
A list of subtitles supported by the FLOSS video player, VLC, can be found at:
http://wiki.videolan.org/Subtitles
Automatic Translation Of Subtitles
Jubler integrates with Google Translation for doing machine translations.
Navigate to the Tools menu, and click 'Translate'
The next screen you will see is the dialog box to select which caption to translate, and from what source language to what target language.
Here I will leave it at the default, 'By user selection', as my only caption is selected. Also, I make sure its English to French translation. Click 'OK', and if you are conneted to the internet, your translation should appear automatically. The French translation of my caption above is shown below.
License
All chapters copyright of the authors (see below). Unless otherwise stated all chapters in this manual licensed with GNU General Public License version 2
This documentation is free documentation; you can redistribute it and/or modify it under the terms of the GNU General Public License as published by the Free Software Foundation; either version 2 of the License, or (at your option) any later version.
This documentation is distributed in the hope that it will be useful, but WITHOUT ANY WARRANTY; without even the implied warranty of MERCHANTABILITY or FITNESS FOR A PARTICULAR PURPOSE. See the GNU General Public License for more details.
You should have received a copy of the GNU General Public License along with this documentation; if not, write to the Free Software Foundation, Inc., 51 Franklin Street, Fifth Floor, Boston, MA 02110-1301, USA.
Authors
AUDIO SET UP
© mick fuzz 2007
Modifications:
adam hyde 2008
Andrew Lowenthal 2008
Andrew Nicholson 2009
Thomas Middleton 2008
AUTOMATIC TRANSLATION OF SUBTITLES
© Andrew Nicholson 2009
Modifications:
Lachlan Musicman 2009
CONFIGURING JUBLER ON WINDOWS
© adam hyde 2008
Modifications:
Andrew Lowenthal 2008
Andrew Nicholson 2009
CONFIGURING JUBLER ON MAC OS X
© Andrew Nicholson 2009
CREATING SUBTITLES
© adam hyde 2008
Modifications:
Andrew Lowenthal 2008
CREDITS
© adam hyde 2006, 2007, 2008
INSTALLING ASPELL ON MAC OS X
© Andrew Nicholson 2009
INSTALLING ASPELL ON WINDOWS
© adam hyde 2008
Modifications:
Andrew Lowenthal 2008
JUBLER ON MAC OS X
© Andrew Nicholson 2009
Modifications:
Sebastien Grenier 2009
INSTALLING MPLAYER ON MAC OS X
© Andrew Nicholson 2009
Modifications:
Lachlan Musicman 2010
INSTALLING MPLAYER ON WINDOWS
© adam hyde 2008
Modifications:
Andrew Nicholson 2009
JUBLER ON WINDOWS
© mick fuzz 2007
Modifications:
adam hyde 2007, 2008
Andrew Lowenthal 2008
Thomas Middleton 2008
INTRODUCTION
© mick fuzz 2007
Modifications:
adam hyde 2007, 2008
Thomas Middleton 2008
SAVING / EXPORTING SUBS
© adam hyde 2009
Modifications:
Andrew Nicholson 2009
Lachlan Musicman 2009
CREATE A NEW PROJECT
© mick fuzz 2007
Modifications:
adam hyde 2008
Andrew Lowenthal 2008
Thomas Middleton 2008

Free manuals for free software
General Public License
Version 2, June 1991
Copyright (C) 1989, 1991 Free Software Foundation, Inc.
51 Franklin Street, Fifth Floor, Boston, MA 02110-1301, USA
Everyone is permitted to copy and distribute verbatim copies
of this license document, but changing it is not allowed.
Preamble
The licenses for most software are designed to take away your freedom to share and change it. By contrast, the GNU General Public License is intended to guarantee your freedom to share and change free software--to make sure the software is free for all its users. This General Public License applies to most of the Free Software Foundation's software and to any other program whose authors commit to using it. (Some other Free Software Foundation software is covered by the GNU Lesser General Public License instead.) You can apply it to your programs, too.
When we speak of free software, we are referring to freedom, not price. Our General Public Licenses are designed to make sure that you have the freedom to distribute copies of free software (and charge for this service if you wish), that you receive source code or can get it if you want it, that you can change the software or use pieces of it in new free programs; and that you know you can do these things.
To protect your rights, we need to make restrictions that forbid anyone to deny you these rights or to ask you to surrender the rights. These restrictions translate to certain responsibilities for you if you distribute copies of the software, or if you modify it.
For example, if you distribute copies of such a program, whether gratis or for a fee, you must give the recipients all the rights that you have. You must make sure that they, too, receive or can get the source code. And you must show them these terms so they know their rights.
We protect your rights with two steps: (1) copyright the software, and (2) offer you this license which gives you legal permission to copy, distribute and/or modify the software.
Also, for each author's protection and ours, we want to make certain that everyone understands that there is no warranty for this free software. If the software is modified by someone else and passed on, we want its recipients to know that what they have is not the original, so that any problems introduced by others will not reflect on the original authors' reputations.
Finally, any free program is threatened constantly by software patents. We wish to avoid the danger that redistributors of a free program will individually obtain patent licenses, in effect making the program proprietary. To prevent this, we have made it clear that any patent must be licensed for everyone's free use or not licensed at all.
The precise terms and conditions for copying, distribution and modification follow.
TERMS AND CONDITIONS FOR COPYING, DISTRIBUTION AND MODIFICATION
0. This License applies to any program or other work which contains a notice placed by the copyright holder saying it may be distributed under the terms of this General Public License. The "Program", below, refers to any such program or work, and a "work based on the Program" means either the Program or any derivative work under copyright law: that is to say, a work containing the Program or a portion of it, either verbatim or with modifications and/or translated into another language. (Hereinafter, translation is included without limitation in the term "modification".) Each licensee is addressed as "you".
Activities other than copying, distribution and modification are not covered by this License; they are outside its scope. The act of running the Program is not restricted, and the output from the Program is covered only if its contents constitute a work based on the Program (independent of having been made by running the Program). Whether that is true depends on what the Program does.
1. You may copy and distribute verbatim copies of the Program's source code as you receive it, in any medium, provided that you conspicuously and appropriately publish on each copy an appropriate copyright notice and disclaimer of warranty; keep intact all the notices that refer to this License and to the absence of any warranty; and give any other recipients of the Program a copy of this License along with the Program.
You may charge a fee for the physical act of transferring a copy, and you may at your option offer warranty protection in exchange for a fee.
2. You may modify your copy or copies of the Program or any portion of it, thus forming a work based on the Program, and copy and distribute such modifications or work under the terms of Section 1 above, provided that you also meet all of these conditions:
- a) You must cause the modified files to carry prominent notices stating that you changed the files and the date of any change.
- b) You must cause any work that you distribute or publish, that in whole or in part contains or is derived from the Program or any part thereof, to be licensed as a whole at no charge to all third parties under the terms of this License.
- c) If the modified program normally reads commands interactively when run, you must cause it, when started running for such interactive use in the most ordinary way, to print or display an announcement including an appropriate copyright notice and a notice that there is no warranty (or else, saying that you provide a warranty) and that users may redistribute the program under these conditions, and telling the user how to view a copy of this License. (Exception: if the Program itself is interactive but does not normally print such an announcement, your work based on the Program is not required to print an announcement.)
These requirements apply to the modified work as a whole. If identifiable sections of that work are not derived from the Program, and can be reasonably considered independent and separate works in themselves, then this License, and its terms, do not apply to those sections when you distribute them as separate works. But when you distribute the same sections as part of a whole which is a work based on the Program, the distribution of the whole must be on the terms of this License, whose permissions for other licensees extend to the entire whole, and thus to each and every part regardless of who wrote it.
Thus, it is not the intent of this section to claim rights or contest your rights to work written entirely by you; rather, the intent is to exercise the right to control the distribution of derivative or collective works based on the Program.
In addition, mere aggregation of another work not based on the Program with the Program (or with a work based on the Program) on a volume of a storage or distribution medium does not bring the other work under the scope of this License.
3. You may copy and distribute the Program (or a work based on it, under Section 2) in object code or executable form under the terms of Sections 1 and 2 above provided that you also do one of the following:
- a) Accompany it with the complete corresponding machine-readable source code, which must be distributed under the terms of Sections 1 and 2 above on a medium customarily used for software interchange; or,
- b) Accompany it with a written offer, valid for at least three years, to give any third party, for a charge no more than your cost of physically performing source distribution, a complete machine-readable copy of the corresponding source code, to be distributed under the terms of Sections 1 and 2 above on a medium customarily used for software interchange; or,
- c) Accompany it with the information you received as to the offer to distribute corresponding source code. (This alternative is allowed only for noncommercial distribution and only if you received the program in object code or executable form with such an offer, in accord with Subsection b above.)
The source code for a work means the preferred form of the work for making modifications to it. For an executable work, complete source code means all the source code for all modules it contains, plus any associated interface definition files, plus the scripts used to control compilation and installation of the executable. However, as a special exception, the source code distributed need not include anything that is normally distributed (in either source or binary form) with the major components (compiler, kernel, and so on) of the operating system on which the executable runs, unless that component itself accompanies the executable.
If distribution of executable or object code is made by offering access to copy from a designated place, then offering equivalent access to copy the source code from the same place counts as distribution of the source code, even though third parties are not compelled to copy the source along with the object code.
4. You may not copy, modify, sublicense, or distribute the Program except as expressly provided under this License. Any attempt otherwise to copy, modify, sublicense or distribute the Program is void, and will automatically terminate your rights under this License. However, parties who have received copies, or rights, from you under this License will not have their licenses terminated so long as such parties remain in full compliance.
5. You are not required to accept this License, since you have not signed it. However, nothing else grants you permission to modify or distribute the Program or its derivative works. These actions are prohibited by law if you do not accept this License. Therefore, by modifying or distributing the Program (or any work based on the Program), you indicate your acceptance of this License to do so, and all its terms and conditions for copying, distributing or modifying the Program or works based on it.
6. Each time you redistribute the Program (or any work based on the Program), the recipient automatically receives a license from the original licensor to copy, distribute or modify the Program subject to these terms and conditions. You may not impose any further restrictions on the recipients' exercise of the rights granted herein. You are not responsible for enforcing compliance by third parties to this License.
7. If, as a consequence of a court judgment or allegation of patent infringement or for any other reason (not limited to patent issues), conditions are imposed on you (whether by court order, agreement or otherwise) that contradict the conditions of this License, they do not excuse you from the conditions of this License. If you cannot distribute so as to satisfy simultaneously your obligations under this License and any other pertinent obligations, then as a consequence you may not distribute the Program at all. For example, if a patent license would not permit royalty-free redistribution of the Program by all those who receive copies directly or indirectly through you, then the only way you could satisfy both it and this License would be to refrain entirely from distribution of the Program.
If any portion of this section is held invalid or unenforceable under any particular circumstance, the balance of the section is intended to apply and the section as a whole is intended to apply in other circumstances.
It is not the purpose of this section to induce you to infringe any patents or other property right claims or to contest validity of any such claims; this section has the sole purpose of protecting the integrity of the free software distribution system, which is implemented by public license practices. Many people have made generous contributions to the wide range of software distributed through that system in reliance on consistent application of that system; it is up to the author/donor to decide if he or she is willing to distribute software through any other system and a licensee cannot impose that choice.
This section is intended to make thoroughly clear what is believed to be a consequence of the rest of this License.
8. If the distribution and/or use of the Program is restricted in certain countries either by patents or by copyrighted interfaces, the original copyright holder who places the Program under this License may add an explicit geographical distribution limitation excluding those countries, so that distribution is permitted only in or among countries not thus excluded. In such case, this License incorporates the limitation as if written in the body of this License.
9. The Free Software Foundation may publish revised and/or new versions of the General Public License from time to time. Such new versions will be similar in spirit to the present version, but may differ in detail to address new problems or concerns.
Each version is given a distinguishing version number. If the Program specifies a version number of this License which applies to it and "any later version", you have the option of following the terms and conditions either of that version or of any later version published by the Free Software Foundation. If the Program does not specify a version number of this License, you may choose any version ever published by the Free Software Foundation.
10. If you wish to incorporate parts of the Program into other free programs whose distribution conditions are different, write to the author to ask for permission. For software which is copyrighted by the Free Software Foundation, write to the Free Software Foundation; we sometimes make exceptions for this. Our decision will be guided by the two goals of preserving the free status of all derivatives of our free software and of promoting the sharing and reuse of software generally.
NO WARRANTY
11. BECAUSE THE PROGRAM IS LICENSED FREE OF CHARGE, THERE IS NO WARRANTY FOR THE PROGRAM, TO THE EXTENT PERMITTED BY APPLICABLE LAW. EXCEPT WHEN OTHERWISE STATED IN WRITING THE COPYRIGHT HOLDERS AND/OR OTHER PARTIES PROVIDE THE PROGRAM "AS IS" WITHOUT WARRANTY OF ANY KIND, EITHER EXPRESSED OR IMPLIED, INCLUDING, BUT NOT LIMITED TO, THE IMPLIED WARRANTIES OF MERCHANTABILITY AND FITNESS FOR A PARTICULAR PURPOSE. THE ENTIRE RISK AS TO THE QUALITY AND PERFORMANCE OF THE PROGRAM IS WITH YOU. SHOULD THE PROGRAM PROVE DEFECTIVE, YOU ASSUME THE COST OF ALL NECESSARY SERVICING, REPAIR OR CORRECTION.
12. IN NO EVENT UNLESS REQUIRED BY APPLICABLE LAW OR AGREED TO IN WRITING WILL ANY COPYRIGHT HOLDER, OR ANY OTHER PARTY WHO MAY MODIFY AND/OR REDISTRIBUTE THE PROGRAM AS PERMITTED ABOVE, BE LIABLE TO YOU FOR DAMAGES, INCLUDING ANY GENERAL, SPECIAL, INCIDENTAL OR CONSEQUENTIAL DAMAGES ARISING OUT OF THE USE OR INABILITY TO USE THE PROGRAM (INCLUDING BUT NOT LIMITED TO LOSS OF DATA OR DATA BEING RENDERED INACCURATE OR LOSSES SUSTAINED BY YOU OR THIRD PARTIES OR A FAILURE OF THE PROGRAM TO OPERATE WITH ANY OTHER PROGRAMS), EVEN IF SUCH HOLDER OR OTHER PARTY HAS BEEN ADVISED OF THE POSSIBILITY OF SUCH DAMAGES.
END OF TERMS AND CONDITIONS
Configuring Jubler on Mac OS X
Now we need to configure Jubler so it can use MPlayer and Aspell.
Configure Jubler for MPlayer
Now open Jubler - when it starts you will see a 'splash screen' - a picture of a parrot. Eventually the Jubler window will appear. Select Jubler > Preferences:
The Preferences Window then opens:
Click on "Wizard":
Now select "Continue" using the Automatically serarch option rather than the manual option. Jubler will then search your computer for the location of MPlayer.
This wizard should then pick up where your MPlayer file is. If so it will say MPlayer executable has been resolved, as below.
Click Finish, and you should end up back at the Jubler Preferences with the MPlayer path setup properly, as below.
Then Click Accept.
Configuring Jubler for Aspell
Since Mac OS X doesnt have a native installer for aspell, configuring Aspell for Jubler on Mac OS X is unsupported.
Configuring Jubler on Windows
Now we need to configure Jubler so it can use MPlayer and Aspell.
Configure Jubler for MPlayer
Now open Jubler (when Jubler starts you will see a 'splash screen' - a picture of a parrot. Click on this and it will disappear and the Jubler window will appear). Select File > Preferences:
The Preferences Window then opens:
Click on the Player Tab at the top.
Click on "Wizard":
Now select "Automatically search for the exexutable" rather than the manual option, and press Continue. Jubler will then search your computer for the location of MPlayer.
This wizard should then pick up where your MPlayer file is. If so it will say MPlayer executable has been found.
If so Click Finish.
Then Click Accept.
Configuring Jubler for Aspell
Now open Jubler and once again Select File > Preferences.
You will see the Preferences Window:
Click on the "Speller" tab :
Click on "Wizard" and you will see the following :
Select "Automatically search for the executable"
Click on "Continue" and Jubler will start searching for Aspell and Juber should come back with a message that the executable has been found.
If so Click "Finish".
Then Click "Accept".
Preparing Jubler to Subtitle
Lets prepare Jubler for subtitling a video. I will imagine you have a video file ready you wish to subtitle.
Create a New Project
First we create a new subtitle file. Its a pretty simple and quick process. Jubler will be open on your computer :
First select File from the manu bar and then slide down to New... and the left to File (alternatively you could just press CTRL and N on your keyboard at the same time) :
When you do this you will notice the interface change :
So Jubler is in a 'ready' state for creating new subtitles.
Load a Video
Next you need to choose the video file that the subtitles are for. To choose this video file select Tools > Preview (or press F7) :
You will see a window pop up like this :
Press the 'browse' button next to the 'Use the following video file' and you will be presented with a 'File Browser' with which you can browse your computer looking for the video file you wish to subtitle.
When you have located that file click "Open" :
You are now returned to the "Select video" window you were at earlier. Now...there are some other options displayed but we will not worry about these. You would only check the "Use a different audio stream" if there was another audio file other than the one in the selected video that you wished to subtitle. You might wish to use this option if you had been editing audio to fit with the video but had not yet combined the two (audio and video). If this was the case you would check the box and press the second "Browse" button to select the new audio file.
The last box is just the location of a temporary file that Jubler will create for its own purpose while you create the subtitle. In the above example the location is on the Desktop of my computer. This is not a very good place for the file but we will leave it there for this example.
Now press "OK" and Jubler should load the video :
When you load a video you will see a preview image. Note: when Jubler plays the video file it opens in a separate window and does not play 'within' Jubler. This is because Jubler asks MPlayer to play the video.
Setting Basic Preferences
Before we start creating the subtitles we have to set some basic preferences. Open the preferences again by selecting File > Preferences
You should see this :
Under the Load Tab (the Tab that is opened by default). Normally the first encoding should be UTF-8. If you know the frame rate of the video set it in the drop down box otherwise leave it set with the default.
Next choose the Save Tab :
Make sure to select Format as "SubRip *.srt" and Encoding should be "UTF-8"
Click "Accept" and that's it for preparing Jubler for creating subtitles.
Creating Subtitles
With Jubler opens on your computer and a video preview loaded, you must first select the time and duration of your first subtitle.
The start time and duration is visually represented by the blue highlighted area in the audio display timeline. So, I will select the audio area I wish to create a subtitle for by moving the blue area and stretching/shrinking it to fit :
You should also note that the exact start time and end time of the selected area is displayed numerically :
The three columns of number represent Start Time, End Time, and Duration. The format is hours:minutes:seconds,1000ths of a second
In the above example we see the duration is 1.185 seconds, probably too short to be read on the screen so I will drag the blue area to make the subtitle display longer. In this situation it is ok to do this as there is no other audio after the current selected area. So I make the blue area about 3 seconds.
You can now type the subtitle in the dark grey box at the bottom of the main window.
You will also see the text appear overlayed on the video still :
The above example is a very short subtitle. In most cases the text will be much longer and you may find that you have too many words to fit in the lines. 35-40 characters is about right per line. If you have more than 35-40 words you may need to split the subtitles up and juggle the timing.
Setting Font Size
If your text is too long you could make the font size smaller. To do this click on the Green button with "Aa" on it (at the bottom of the Jubler window) :
This will display some font options for the subtitle you are working on (the current selected start and end time). These options appear below the video still preview window.
You can now set a new font size. 18 and Arial is what I generally use as this is very readable but it is hard to recommend a setting as it is always dependant on the width of your video.
Adding more Subtitles
When you are happy with the first subtitle and wish to enter the next one select Edit > Insert > After or hit Control and Enter at the same time on the keyboard :
Several things happen when you do this:
- the area you entered your subtitle is shown in green on the timeline
- the bottom (grey) text area becomes blank ready for you to enter your next line
- Jubler searches for the next probable place you may wish to insert a subtitle
License
All chapters copyright of the authors (see below). Unless otherwise stated all chapters in this manual licensed with GNU General Public License version 2
This documentation is free documentation; you can redistribute it and/or modify it under the terms of the GNU General Public License as published by the Free Software Foundation; either version 2 of the License, or (at your option) any later version.
This documentation is distributed in the hope that it will be useful, but WITHOUT ANY WARRANTY; without even the implied warranty of MERCHANTABILITY or FITNESS FOR A PARTICULAR PURPOSE. See the GNU General Public License for more details.
You should have received a copy of the GNU General Public License along with this documentation; if not, write to the Free Software Foundation, Inc., 51 Franklin Street, Fifth Floor, Boston, MA 02110-1301, USA.
Authors
AUDIO SET UP
© mick fuzz 2007
Modifications:
adam hyde 2008
Andrew Lowenthal 2008
Andrew Nicholson 2009
Thomas Middleton 2008
AUTOMATIC TRANSLATION OF SUBTITLES
© Andrew Nicholson 2009
Modifications:
Lachlan Musicman 2009
CONFIGURING JUBLER ON WINDOWS
© adam hyde 2008
Modifications:
Andrew Lowenthal 2008
Andrew Nicholson 2009
CONFIGURING JUBLER ON MAC OS X
© Andrew Nicholson 2009
CREATING SUBTITLES
© adam hyde 2008
Modifications:
Andrew Lowenthal 2008
CREDITS
© adam hyde 2006, 2007, 2008
INSTALLING ASPELL ON MAC OS X
© Andrew Nicholson 2009
INSTALLING ASPELL ON WINDOWS
© adam hyde 2008
Modifications:
Andrew Lowenthal 2008
JUBLER ON MAC OS X
© Andrew Nicholson 2009
Modifications:
Sebastien Grenier 2009
INSTALLING MPLAYER ON MAC OS X
© Andrew Nicholson 2009
Modifications:
Lachlan Musicman 2010
INSTALLING MPLAYER ON WINDOWS
© adam hyde 2008
Modifications:
Andrew Nicholson 2009
JUBLER ON WINDOWS
© mick fuzz 2007
Modifications:
adam hyde 2007, 2008
Andrew Lowenthal 2008
Thomas Middleton 2008
INTRODUCTION
© mick fuzz 2007
Modifications:
adam hyde 2007, 2008
Thomas Middleton 2008
SAVING / EXPORTING SUBS
© adam hyde 2009
Modifications:
Andrew Nicholson 2009
Lachlan Musicman 2009
CREATE A NEW PROJECT
© mick fuzz 2007
Modifications:
adam hyde 2008
Andrew Lowenthal 2008
Thomas Middleton 2008
Free manuals for free software
General Public License
Version 2, June 1991
Copyright (C) 1989, 1991 Free Software Foundation, Inc.
51 Franklin Street, Fifth Floor, Boston, MA 02110-1301, USA
Everyone is permitted to copy and distribute verbatim copies
of this license document, but changing it is not allowed.
Preamble
The licenses for most software are designed to take away your freedom to share and change it. By contrast, the GNU General Public License is intended to guarantee your freedom to share and change free software--to make sure the software is free for all its users. This General Public License applies to most of the Free Software Foundation's software and to any other program whose authors commit to using it. (Some other Free Software Foundation software is covered by the GNU Lesser General Public License instead.) You can apply it to your programs, too.
When we speak of free software, we are referring to freedom, not price. Our General Public Licenses are designed to make sure that you have the freedom to distribute copies of free software (and charge for this service if you wish), that you receive source code or can get it if you want it, that you can change the software or use pieces of it in new free programs; and that you know you can do these things.
To protect your rights, we need to make restrictions that forbid anyone to deny you these rights or to ask you to surrender the rights. These restrictions translate to certain responsibilities for you if you distribute copies of the software, or if you modify it.
For example, if you distribute copies of such a program, whether gratis or for a fee, you must give the recipients all the rights that you have. You must make sure that they, too, receive or can get the source code. And you must show them these terms so they know their rights.
We protect your rights with two steps: (1) copyright the software, and (2) offer you this license which gives you legal permission to copy, distribute and/or modify the software.
Also, for each author's protection and ours, we want to make certain that everyone understands that there is no warranty for this free software. If the software is modified by someone else and passed on, we want its recipients to know that what they have is not the original, so that any problems introduced by others will not reflect on the original authors' reputations.
Finally, any free program is threatened constantly by software patents. We wish to avoid the danger that redistributors of a free program will individually obtain patent licenses, in effect making the program proprietary. To prevent this, we have made it clear that any patent must be licensed for everyone's free use or not licensed at all.
The precise terms and conditions for copying, distribution and modification follow.
TERMS AND CONDITIONS FOR COPYING, DISTRIBUTION AND MODIFICATION
0. This License applies to any program or other work which contains a notice placed by the copyright holder saying it may be distributed under the terms of this General Public License. The "Program", below, refers to any such program or work, and a "work based on the Program" means either the Program or any derivative work under copyright law: that is to say, a work containing the Program or a portion of it, either verbatim or with modifications and/or translated into another language. (Hereinafter, translation is included without limitation in the term "modification".) Each licensee is addressed as "you".
Activities other than copying, distribution and modification are not covered by this License; they are outside its scope. The act of running the Program is not restricted, and the output from the Program is covered only if its contents constitute a work based on the Program (independent of having been made by running the Program). Whether that is true depends on what the Program does.
1. You may copy and distribute verbatim copies of the Program's source code as you receive it, in any medium, provided that you conspicuously and appropriately publish on each copy an appropriate copyright notice and disclaimer of warranty; keep intact all the notices that refer to this License and to the absence of any warranty; and give any other recipients of the Program a copy of this License along with the Program.
You may charge a fee for the physical act of transferring a copy, and you may at your option offer warranty protection in exchange for a fee.
2. You may modify your copy or copies of the Program or any portion of it, thus forming a work based on the Program, and copy and distribute such modifications or work under the terms of Section 1 above, provided that you also meet all of these conditions:
- a) You must cause the modified files to carry prominent notices stating that you changed the files and the date of any change.
- b) You must cause any work that you distribute or publish, that in whole or in part contains or is derived from the Program or any part thereof, to be licensed as a whole at no charge to all third parties under the terms of this License.
- c) If the modified program normally reads commands interactively when run, you must cause it, when started running for such interactive use in the most ordinary way, to print or display an announcement including an appropriate copyright notice and a notice that there is no warranty (or else, saying that you provide a warranty) and that users may redistribute the program under these conditions, and telling the user how to view a copy of this License. (Exception: if the Program itself is interactive but does not normally print such an announcement, your work based on the Program is not required to print an announcement.)
These requirements apply to the modified work as a whole. If identifiable sections of that work are not derived from the Program, and can be reasonably considered independent and separate works in themselves, then this License, and its terms, do not apply to those sections when you distribute them as separate works. But when you distribute the same sections as part of a whole which is a work based on the Program, the distribution of the whole must be on the terms of this License, whose permissions for other licensees extend to the entire whole, and thus to each and every part regardless of who wrote it.
Thus, it is not the intent of this section to claim rights or contest your rights to work written entirely by you; rather, the intent is to exercise the right to control the distribution of derivative or collective works based on the Program.
In addition, mere aggregation of another work not based on the Program with the Program (or with a work based on the Program) on a volume of a storage or distribution medium does not bring the other work under the scope of this License.
3. You may copy and distribute the Program (or a work based on it, under Section 2) in object code or executable form under the terms of Sections 1 and 2 above provided that you also do one of the following:
- a) Accompany it with the complete corresponding machine-readable source code, which must be distributed under the terms of Sections 1 and 2 above on a medium customarily used for software interchange; or,
- b) Accompany it with a written offer, valid for at least three years, to give any third party, for a charge no more than your cost of physically performing source distribution, a complete machine-readable copy of the corresponding source code, to be distributed under the terms of Sections 1 and 2 above on a medium customarily used for software interchange; or,
- c) Accompany it with the information you received as to the offer to distribute corresponding source code. (This alternative is allowed only for noncommercial distribution and only if you received the program in object code or executable form with such an offer, in accord with Subsection b above.)
The source code for a work means the preferred form of the work for making modifications to it. For an executable work, complete source code means all the source code for all modules it contains, plus any associated interface definition files, plus the scripts used to control compilation and installation of the executable. However, as a special exception, the source code distributed need not include anything that is normally distributed (in either source or binary form) with the major components (compiler, kernel, and so on) of the operating system on which the executable runs, unless that component itself accompanies the executable.
If distribution of executable or object code is made by offering access to copy from a designated place, then offering equivalent access to copy the source code from the same place counts as distribution of the source code, even though third parties are not compelled to copy the source along with the object code.
4. You may not copy, modify, sublicense, or distribute the Program except as expressly provided under this License. Any attempt otherwise to copy, modify, sublicense or distribute the Program is void, and will automatically terminate your rights under this License. However, parties who have received copies, or rights, from you under this License will not have their licenses terminated so long as such parties remain in full compliance.
5. You are not required to accept this License, since you have not signed it. However, nothing else grants you permission to modify or distribute the Program or its derivative works. These actions are prohibited by law if you do not accept this License. Therefore, by modifying or distributing the Program (or any work based on the Program), you indicate your acceptance of this License to do so, and all its terms and conditions for copying, distributing or modifying the Program or works based on it.
6. Each time you redistribute the Program (or any work based on the Program), the recipient automatically receives a license from the original licensor to copy, distribute or modify the Program subject to these terms and conditions. You may not impose any further restrictions on the recipients' exercise of the rights granted herein. You are not responsible for enforcing compliance by third parties to this License.
7. If, as a consequence of a court judgment or allegation of patent infringement or for any other reason (not limited to patent issues), conditions are imposed on you (whether by court order, agreement or otherwise) that contradict the conditions of this License, they do not excuse you from the conditions of this License. If you cannot distribute so as to satisfy simultaneously your obligations under this License and any other pertinent obligations, then as a consequence you may not distribute the Program at all. For example, if a patent license would not permit royalty-free redistribution of the Program by all those who receive copies directly or indirectly through you, then the only way you could satisfy both it and this License would be to refrain entirely from distribution of the Program.
If any portion of this section is held invalid or unenforceable under any particular circumstance, the balance of the section is intended to apply and the section as a whole is intended to apply in other circumstances.
It is not the purpose of this section to induce you to infringe any patents or other property right claims or to contest validity of any such claims; this section has the sole purpose of protecting the integrity of the free software distribution system, which is implemented by public license practices. Many people have made generous contributions to the wide range of software distributed through that system in reliance on consistent application of that system; it is up to the author/donor to decide if he or she is willing to distribute software through any other system and a licensee cannot impose that choice.
This section is intended to make thoroughly clear what is believed to be a consequence of the rest of this License.
8. If the distribution and/or use of the Program is restricted in certain countries either by patents or by copyrighted interfaces, the original copyright holder who places the Program under this License may add an explicit geographical distribution limitation excluding those countries, so that distribution is permitted only in or among countries not thus excluded. In such case, this License incorporates the limitation as if written in the body of this License.
9. The Free Software Foundation may publish revised and/or new versions of the General Public License from time to time. Such new versions will be similar in spirit to the present version, but may differ in detail to address new problems or concerns.
Each version is given a distinguishing version number. If the Program specifies a version number of this License which applies to it and "any later version", you have the option of following the terms and conditions either of that version or of any later version published by the Free Software Foundation. If the Program does not specify a version number of this License, you may choose any version ever published by the Free Software Foundation.
10. If you wish to incorporate parts of the Program into other free programs whose distribution conditions are different, write to the author to ask for permission. For software which is copyrighted by the Free Software Foundation, write to the Free Software Foundation; we sometimes make exceptions for this. Our decision will be guided by the two goals of preserving the free status of all derivatives of our free software and of promoting the sharing and reuse of software generally.
NO WARRANTY
11. BECAUSE THE PROGRAM IS LICENSED FREE OF CHARGE, THERE IS NO WARRANTY FOR THE PROGRAM, TO THE EXTENT PERMITTED BY APPLICABLE LAW. EXCEPT WHEN OTHERWISE STATED IN WRITING THE COPYRIGHT HOLDERS AND/OR OTHER PARTIES PROVIDE THE PROGRAM "AS IS" WITHOUT WARRANTY OF ANY KIND, EITHER EXPRESSED OR IMPLIED, INCLUDING, BUT NOT LIMITED TO, THE IMPLIED WARRANTIES OF MERCHANTABILITY AND FITNESS FOR A PARTICULAR PURPOSE. THE ENTIRE RISK AS TO THE QUALITY AND PERFORMANCE OF THE PROGRAM IS WITH YOU. SHOULD THE PROGRAM PROVE DEFECTIVE, YOU ASSUME THE COST OF ALL NECESSARY SERVICING, REPAIR OR CORRECTION.
12. IN NO EVENT UNLESS REQUIRED BY APPLICABLE LAW OR AGREED TO IN WRITING WILL ANY COPYRIGHT HOLDER, OR ANY OTHER PARTY WHO MAY MODIFY AND/OR REDISTRIBUTE THE PROGRAM AS PERMITTED ABOVE, BE LIABLE TO YOU FOR DAMAGES, INCLUDING ANY GENERAL, SPECIAL, INCIDENTAL OR CONSEQUENTIAL DAMAGES ARISING OUT OF THE USE OR INABILITY TO USE THE PROGRAM (INCLUDING BUT NOT LIMITED TO LOSS OF DATA OR DATA BEING RENDERED INACCURATE OR LOSSES SUSTAINED BY YOU OR THIRD PARTIES OR A FAILURE OF THE PROGRAM TO OPERATE WITH ANY OTHER PROGRAMS), EVEN IF SUCH HOLDER OR OTHER PARTY HAS BEEN ADVISED OF THE POSSIBILITY OF SUCH DAMAGES.
END OF TERMS AND CONDITIONS
Installing Aspell on Mac OS X
Aspell has no native installer for Mac OS X. The most automated way to install at the moment would be to use Darwin Ports - a low level command line interface to most open source software available for downloading/compiling/installing FOSS for Mac OS X. See this article for help with aspell - http://aspell.darwinports.com/
Installing Aspell on Windows
Now to install aspell...first download the Aspell windows installer by visiting the following page http://aspell.net/win32/
Click on Full Installer link:
Depending on your browser you will see something similar to this:
Save it to your hard drive. Double click on the exe file:
This will start the installation of Aspell
Click Next for this window and for the following screens :Welcome, Licence, Install Location. Then Click "Install" when presented with the Ready to Install screen (see below):
.
The installation process will start. You should see this screen when it is completed:
And then click "Next >" and the final screen appears:
Finally, click "Finish".
Installing MPlayer OSX
Software name : MPlayer OSX
Homepage : http://www.mplayerhq.hu
Software version used for this installation : 1.0 rc2 [ MPlayer-dev-SVN-090416-01.dmg ]
Operating System use for this installation : Mac OS X 10.5.7
Recommended Hardware : 200 Mhz processor (CPU) minimum
NOTE:: As of June 2009, the default MPlayer OSX doesnt work with Jubler - see this forum post - http://jubler.org/smf/index.php?topic=126.0 If MPlayer OSX doesnt work for you, you can use unofficial dmg packages downloaded from http://www.haque.net/software/mplayer/mplayerosx/builds/
Also, even with this latest version of Mplayer OSX, you may not see the Video Preview and Audio Waveform Preview - see this forum post - http://jubler.org/smf/index.php?topic=126.0 After you have successfully installed Jubler, you will need to go to the Applications folder, CTRL+click on the Jubler icon and select 'Get Info'. Inside this screen, select the 'Open in 32 Bit Mode' checkbox.
Basically, You need to install the previous rc version of MPlayer. it can be downloaded from http://www.mplayerhq.hu/MPlayer/releases/ The name that you are looking for is MPlayerOSX_1.0rc1.dmg
First go to http://www.mplayerhq.hu/design7/dload.html
We want to select a version from the "HTTP" column. The choices in the columns reflect ways of downloading the files - it is not necessary to understand the difference between HTTP (Hyper Text Transfer Protocol) and FTP (File Transfer Protocol) and BT (Bittorrent) - just choose the 'HTTP' column.
Choose the second from the bottom, download line which reads "Mplayer1.0rc.2 outdated" (the name may alter slightly as a new version may be available by the time you read this). The link for me was http://www.mplayerhq.hu/MPlayer/releases/MPlayerOSX_1.0rc2.dmg
I am using the Firefox browser and so I see this :
Click 'OK' to start downloading MPlayer. In the Download window for Firefox, I see:
You may see something slightly different depending on what browser you use.
After the download has completely finished the MPlayer Disk Image should open automatically. That is, the following screen should open up:
Now drag and drop the 'Mplayer OSX' icon into the 'Applications' icon, under the PLACES heading.
A progress bar will appear while the application is being copied. After that finishes, move to the Applications folder, like so:
You should be able to find 'MPlayer OSX' now in Applications, like so:
Doubleclick the 'MPlayer OSX' icon to start MPlayer. Since this is the first time it has run, you will see a warning like so:
If you trust the application, you should click Open to start MPlayer. You should then see:
At this stage, MPlayer OSX is successfully installed.
Installing MPlayer on Windows
Software name : MPlayer
Homepage : http://www.mplayerhq.hu
Software version used for this installation : 1.0rc2
Operating System use for this installation : Microsoft Windows (XP)
Recommended Hardware : 200 Mhz processor (CPU) minimum
First go to http://www.mplayerhq.hu/design7/dload.html
We want to select a version from the "HTTP" column. The choices in the columns reflect ways of downloading the files - it is not necessary to understand the difference between HTTP (Hyper Text Transfer Protocol) and FTP (File Transfer Protocol) and BT (Bittorrent) - just choose the 'HTTP' column.
Choose the second download line which reads "Mplayer1.0rc.2 Windows" (the name may alter slightly as a new version may be available by the time you read this). Regardless of the version you choose, don't choose the "GUI" version (line 3). I clicked on the 'UK' link - this is not a choice of language it is a choice of download locations (ie. which country you download the file from - choose the one closest to you).
I am using the Firefox browser and so I see this :
You may see something slightly different depending on what browser you use.
Save the file, it will most likely download to your Desktop (but not necessarily, depending on how you have configured your browser). This file will end in '.zip' and is known as a ZIP file. The icon may be a folder icon with a 'chain' around it like this:
ZIP files are compressed collections of files and you must first 'decompress' or 'unzip' the file. Windows XP and Vista have built-in helper applications for this. You need to Unzip the file to a location in your "Program File" directory (technically, it doesn't matter where you install the files, but it is good practiceto put them all software in the 'Program Files' directory). Do this by right-clicking on the file and choosing "Extract All"
This will display the first screen of the 'unzip' process :
Now press "Next >" and you will see the following :
You must choose "Browse" and then a 'file browser' window opens :
Highlight the 'Program Files' folder similar to how I have done it in the example above. Then press 'OK'. You will see the following :
Click "Next >" and the Unzip process will actually start (!) :
When the process is complete you will see this final screen :
Now click "Finish".
Installing Jubler on Mac OS X
Software name : Jubler
Homepage : http://jubler.org/
Software version used for this installation : 4.1.1
Operating System use for this installation : Mac OS X 10.5.7
Recommended Hardware : 200 Mhz processor (CPU) minimum
Note : Jubler can be tricky to install. If at any point you get stuck installing Jubler then one tip is to try the freeware Subtitle Workshop instead as it is easier to install but not as feature rich. Jubler requires MPlayer and Aspell to play video files and spell check subtitles. Before proceeding with this installation first install these two applications. If you need some help we have provided information on how to install MPlayer and Aspell (in the sections after installing Jubler - you can follow the process exactly as see below, installing first Jubler and then MPlayer an then Aspell.
Downloading
Go to the Jubler download page http://jubler.org/download/index.html
Click on "Visit this page on SourceForge" and you will see something like this:
Click on "Download Jubler-4.0.dmg" (the green button) and Jubler should start downloading to your hard drive. I am using Firefox (a type of browser) to download Jubler so I first see this window:
I press 'OK' and then when the download is completed I see this:
If you are using another browser like Internet Explorer or Opera then the above two steps would be slightly different.
Now you must drag the Jubler icon into the Applications folder. Thats it!
Now double click on the Applications folder to find where the Jubler application is installed, so we can start it up for the first time.
The first screen you should see is this :
Double click the Jubler icon and you see the following :
Click Open to accept this warning about downloading apps from the Internet, and you should see Jubler loading:
After starting Jubler, it checks for new versions for installing. If a new version is found, you may see this screen:
You can skip versions, by reminded later, or install it now. If you click 'Install Update', you should see a download progress bar as the new version is downloaded, and if you are connected online properly, eventually you will see:
Click 'Restart Application', and Jubler will close, then reopen. I have noticed some versions dont restart properly. If Jubler doesnt start , go to the Finder -> Applications -> Jubler , and double click to start Jubler again.
You can also use Apple+SPACEBAR to open Spotlight. Start typing 'Jubler', and then select 'Jubler - Applications'.
Installing Jubler on Windows
Software name : Jubler
Homepage : http://jubler.org/
Software version used for this installation : 3.9
Operating System use for this installation : Microsoft Windows (XP)
Recommended Hardware : 200 Mhz processor (CPU) minimum
Note : Jubler can be tricky to install. If at any point you get stuck installing Jubler then one tip is to try the freeware Subtitle Workshop instead as it is easier to install but not as feature rich. Jubler requires MPlayer and Aspell to play video files and spell check subtitles. Before proceeding with this installation first install these two applications. If you need some help we have provided information on how to install MPlayer and Aspell (in the sections after installing Jubler - you can follow the process exactly as see below, installing first Jubler and then MPlayer an then Aspell.
Downloading
Go to the Jubler download page http://jubler.org/download/index.html
Click on "Visit this page on SourceForge" and you will see something like this:
Click on "Download Jubler-3.9.0.exe" (the green button) and Jubler should start downloading to your hard drive. I am using Firefox (a type of browser) to download Jubler so I first see this window:
I press 'Save File' and then when the download is completed I see this:
If you are using another browser like Internet Explorer or Opera then the above two steps would be slightly different.
Now you must know where the file has downloaded to. I always save my files to the Desktop so when I look there I see the installer file I just downloaded:
Double click on the icon to start the install process. The first screen you should see is this :
Click "Next >" and you see the following :
Put a tick in the "I accept the terms of the Licence Agreement" box and click "Next >":
Leave the above set with the defaults and click "Next >":
Click "Install" and the installer will start doing its magic. If you do not have Java Runtime Environment (also just called 'Java') installed then the installer will download and install it for you (if Java is already installed then you will not see the following installation screens for Java). In this case you will see something like this:
When Java is downloaded you need to accept the license agreement from the pop-up window that appears:
Just press "Accept >" and you will see the progress bar displayed for the installation process of Java:
Click "Finish" and then the last screen should appear:
Click "Finish" and then start the programme from the Start Menu or from the icon on the Desktop.
Saving and Exporting Subtitles
Saving Subtitles
It's a good idea to save the project and keep saving regularly so you don't lose your work.
When you are ready to save your file select File > Save As
Browse for a folder to save the subtitle file, give it a name and click "Save".
Exporting Subtitles
The files that Jubler saves are the same files you can use to "burn in" the subtitles, or distribute separately with your video for other people to use with their video player software. The file format Jubler uses, by default, is Advanced Sub Station Alpha (.ass) format.
FILE FORMATS
A subtitle file format specifies the format of a file (text or image) containing the subtitle and timing information. Some text-based formats also allow for specifying styling information, such as colours or location of the subtitle.
Some subtitle file formats are:
- Micro DVD (.sub) - a text-based format, with video frame timing, and no text styling
- Sub Rip (.srt) - a text-based format, with video duration timing, and no text styling
- VOB Sub (.sub, .idx) - an image-based format, generally used in DVDs
- Sub Station Alpha / Advanced Sub Station (.ssa, .ass) - a text-based format, with video duration timing, and text styling and metadata information attributes.
- Sub Viewer (.sub) - a text-based format, with video duration timing, text styling and metadata information attributes.
Examples
Lets look at the actual content of some subtitle files. They will all be simply showing "This is my first subtitle!" in the first 10 seconds of video playback. These were all produced by the FOSS subtitling software Jubler.
The first thing to note is that each file is simply a text file, and is editable by any text editor, such as vi on GNU/Linux, or Text Edit on Mac, or Notepad on Windows.
The following is how our example is realised in a Micro DVD subtitle file (presuming 25 frames per second):
{0}{250}This is my first subtitle!
As a Sub Rip subtitle file:
 1
00:00:00,000 --> 00:00:10,000
This is my first subtitle!
As a Sub Station Alpha (.ssa) file:
[Script Info]
; Edited with Jubler subtitle editor
Title:
Original Script: andycat
Update Details:
ScriptType: v4.00
Collisions: Normal
PlayResX: 320
PlayResY: 288
PlayDepth: 0
Timer: 100,0000

[V4 Styles]
Format: Name, Fontname, Fontsize, PrimaryColour, SecondaryColour, TertiaryColour, BackColour, Bold, Italic, BorderStyle, Outline, Shadow, Alignment, MarginL, MarginR, MarginV, AlphaLevel, Encoding
Style: Default,Arial Unicode MS,31,&HFFFFFF,&H00FFFF,&H000000,&H404040,0,0,1,0,2,2,20,20,20,255,0

[Events]
Format: Marked, Start, End, Style, Name, MarginL, MarginR, MarginV, Effect, Text
Dialogue: 0,0:00:00.00,0:00:10.00,*Default,,0000,0000,0000,,This is my first subtitle!
As an Advanced Sub Station (.ass):
[Script Info]
; Edited with Jubler subtitle editor
Title:
Original Script: andycat
Update Details:
ScriptType: v4.00+
Collisions: Normal
PlayResX: 320
PlayResY: 288
PlayDepth: 0
Timer: 100,0000

[V4+ Styles]
Format: Name, Fontname, Fontsize, PrimaryColour, SecondaryColour, OutlineColour, BackColour, Bold, Italic, Underline, StrikeOut, ScaleX, ScaleY, Spacing, Angle, BorderStyle, Outline, Shadow, Alignment, MarginL, MarginR, MarginV, Encoding
Style: Default,Arial Unicode MS,31,&H00FFFFFF,&H0000FFFF,&H4B000000,&H4B404040,0,0,0,0,100,100,0,0,1,0,2,2,20,20,
20,0

[Events]
Format: Layer, Start, End, Style, Name, MarginL, MarginR, MarginV, Effect, Text
Dialogue: 0,0:00:00.00,0:00:10.00,*Default,,0000,0000,0000,,This is my first subtitle!
As a Sub Viewer (.sub) file:
[INFORMATION]
[TITLE]
[AUTHOR]andycat
[SOURCE]
[FILEPATH]
[DELAY]0
[COMMENT]Edited with Jubler subtitle editor
[END INFORMATION]
[SUBTITLE]
[COLF]&HFFFFFF,[STYLE]bd,[SIZE]18,[FONT]Arial
00:00:00.00,00:00:10.00
This is my first subtitle!
There are large numbers of file formats around (see http://diveintomark.org/archives/2009/01/07/give-part-4-captioning - the main ones mentioned by this article not covered here are MPEG4 Timed Text, SMIL and SAMI).
Comparisons of Formats
Tables of comparisons of subtitles file formats are found at the following:
http://www.annodex.net/node/8
http://en.wikipedia.org/wiki/Subtitles
Supported File Formats in FLOSS video players
A list of subtitles supported by the FLOSS video player, VLC, can be found at:
http://wiki.videolan.org/Subtitles