


Use VLC to Stream Video
Video Lan Client (vlc) is a versatile program that does not only allow you to view video files, but also allows you to publish your live stream to the internet. VLC media player is relased under the GLP-2 and LGPL licences. In this task you will learn how to use vlc to stream the live video from your webcam to a streaming server on the internet.
What is streaming
A video file is like a bucket of water, a fixed amount of video content, while a stream is more like a water tap, it flows from the moment you start it, to the moment you stop it. This analogy also holds for actions like replaying, if you do not fill the bucket, save the stream to a file, your water or video is not replayable. You need streaming if you want other people to see your live event.
What do I need
For streaming you need:
- A streaming server; You can setup one yourself, but for this task we will be up-streaming to giss.tv, a free streaming service for personal or non-profit use.
- A capturing source; for this task we will use the built-in camera of your computer, but other cameras or even a file can be a source too.
- A stable internet connection, as you are sending the video data over this connection it needs to be good, otherwise your viewers might see freezing images or nothing at all.
Where to publish to
For this excercise we will be publishing to giss.tv, a free streaming service for non-profit and personal use. You can of course also use other services. This manual can be used with any service that is built on the icecast2 streaming server, for other servers small adjustments are needed, these are pointed out below.
To use giss.tv you first have to create an account.
1. Go to the website giss.tv and halfway the page click on "Create your channel" you will be presented with a form. Below we will describe the meaning of the values and what to fill in.
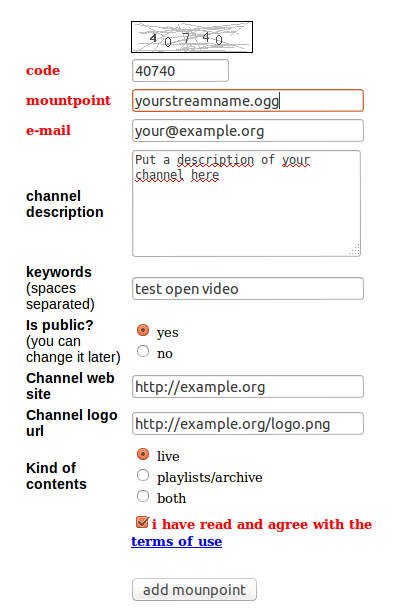
- code: this is just a code to make sure you are not a computer, try to read the code in the image on top and put it here.
- mountpoint: this is the name of your stream, you can choose your own name here, but it has to end with ".ogg"
- e-mail: an activation mail will be sent to this address, make sure you do not make a typo.
- channel description: give a description of your channel here
- keywords: a way to index the channel, use words to describe your content.
- public: whether or not it shows on the giss.tv site (not public does not mean private!)
- Website: you can point to your website here
- logo url: you van point to a logo image for your channel
Read and accept the tems of use and click the button "add mounpoint" (sic). The next screen will tell you a mail has been sent to your e-mail adress. Open the mail and click on the activation link, if all went well the following screen should appear in your browser:
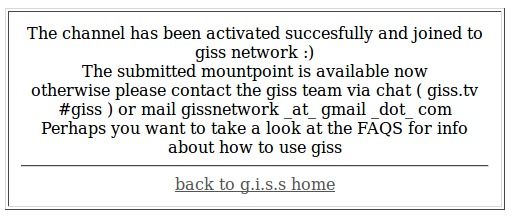
Congratulations, you are now ready to set up vlc to up-stream your event to the giss.tv streaming server.
Capturing your cam
To stream something you need to have a source (just like in the water example above), For this task we are going to use your webcam as a source, but most things that can produce video can be used, this includes dv-cameras, tv-cards, or even video files.
Your webcam itself produces a stream, this video stream is usually just sent to your screen, or if you are videochatting to the person on the other end. Now we need to connect it to the giss server, so giss can serve it. The program we are going to use for this is vlc.
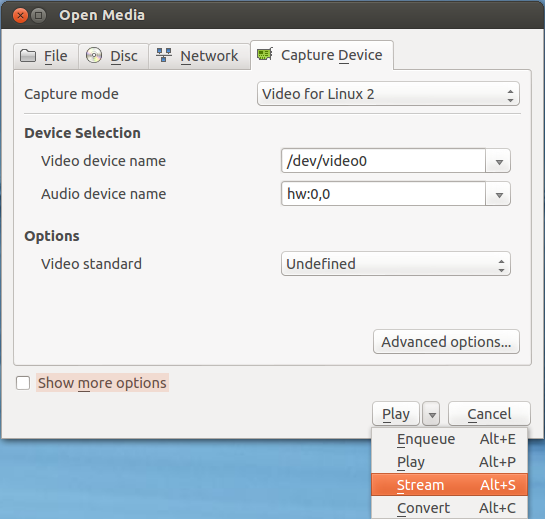
Open vlc, go to the "Media" menu and select "Open Capture Device" you will be presented with the following menu:

Use the dropdowns to select your video and audio device, typically ther will be one of each, if it lists more you can select play on the bottom of the dialog to test if you get the desired output to your screen. If it does, just reopen the "capture device" dialog.
If you are satisfied with the selected options use the dropdown arrow on the bottom of the dialog to select that you want to stream the output rather than put it on your screen. You will be presented by the "Stream Output" dialog:
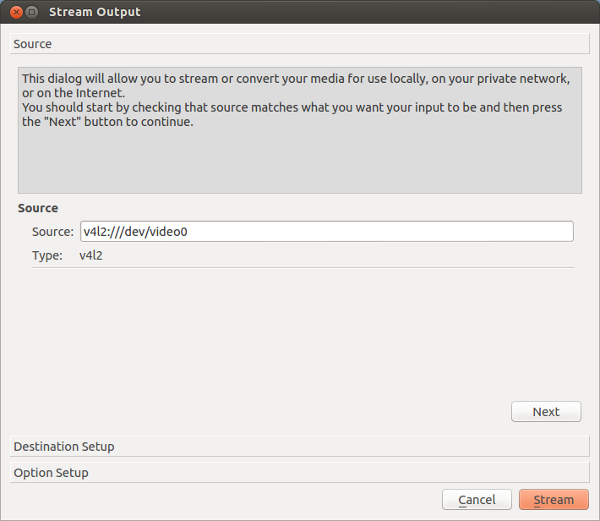
The source is already correctly filled in, so you can just click next:

If you want to see the stream on your screen "Display locally" this will let you view the stream as it is sent to the streaming server. Next, select IceCast for the "New destination" and click the add button:
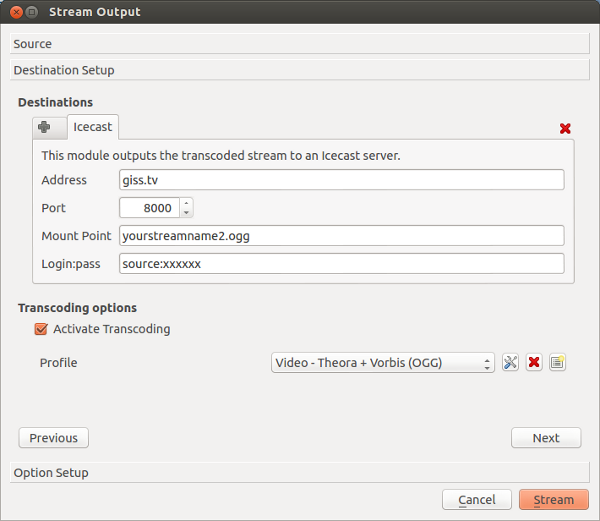
A new tab presents you with the fields required to connect to the server. The information can be found in the activation mail you received earlier. You have selected your mountpoint when creating the account. the login name is separated from the password by a colon ":"
Your webcam delivers the video in a format that the streaming server does not understand, that is why we have to 'transcode' it, change the internal format to something the streaming server understands. The giss.tv server uses Theora(video) + Vorbis(audio). These formats are open, which means nobody has to pay a license fee for them.
Select Theora + Forbis as profile and click on the tools button next to it, this gives the next dialog:
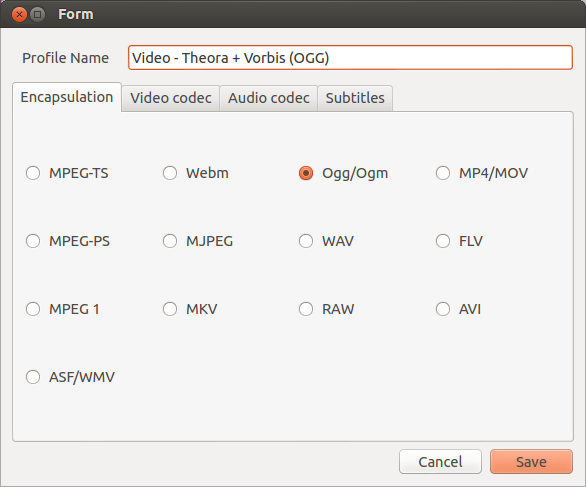
We do not need to change anything here, just click the "Video codec" tab to adjust the video settings:
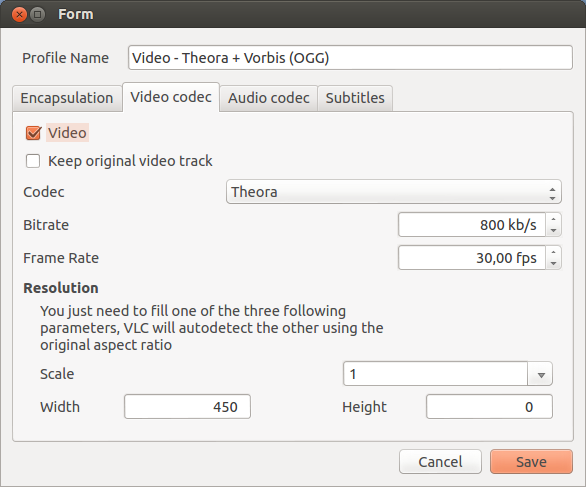
This screen defines the size and quality of the streamed video.
Bitrate: this defines the quality of the image, but also the capacity that is needed on your internet connection. be aware that you are sending data from your computer to the internet, so it is not your download rate but your upload rate that counts. Most consumer lines have considerably slower upload speeds. If you do not know your upload speed you could use one of the online speed tests available, just google "speed test".
If your upload speed allows it, setting this value to the default of 800 kb/s should be file for a built-in webcam. Be aware that 128 kbps is added for the sound channel.
The resolution, this is the size at which the video is shown, for a webcam you can generally leave this without changes, otherwise you can just change one of the fields to the desired size.
Hit save when you are done. You will be sent back to the "stream output" dialog. Every thing is set here so you can just click "stream". Depending on your earlier choice you will see a black vlc window or you will see the stream as it will be sent to the server.
Connect your webbrowser or another VLC to your stream (http://giss.tv:8000/yourstreamname2.ogg in the example) and you should see the stream. There will be some delay as at every stage there is a buffer to make surre there are no interruptions in the video output.